#1 An Ultralight Hiker’s Guide to Staying Light in Japan’s Okutone Mountains
#1 An Ultralight Hiker’s Guide to Staying Light in Japan’s Okutone Mountains
When winter’s ski crowds fade and spring’s soft snow lingers high in the mountains, a new season emerges, Backcountry ski hiking. A beautiful time to blend ski touring and ultralight backpacking. The weather steadies, the days stretch longer, and deep-winter hazards ease. With skis underfoot, routes unreachable in summer suddenly open up: long ridgelines, wide basins, and hidden passes that invite you to keep moving.
Kengo Nogami, one of Japan’s leading ultralight hikers and known as the “UL Ski Hiker,” has spent years perfecting this style. He approaches ski touring the ultralight way — trimming, tweaking, and field-testing until every piece of gear earns its place. His system, built on years of trial and error, has inspired many hikers eager to move lighter through snow.
This spring, 2025, Nogami took on one of his toughest projects yet — a full-scale ski traverse through the deep folds of Japan’s Okutone region. In this two-part series, the first installment, Gear & Prep, reveals how he stays light, warm, and efficient in the mountains — the essence of Hardcore Ski Hiking.
Planning and preparation
The season of true freedom
Early May 2025 — From my workplace in the mountains of Niigata, I can still see the peaks buried in snow.
For those of us who live in snow country, spring isn’t an end — it’s a continuation. When the ski lifts stop and the winter crowds fade, the snow begins to soften, and the mountains open new paths. For a few short weeks, boundaries blur, and you can travel anywhere the snow still lies.
Beyond those ridgelines lies the Okutone backcountry — a high basin that gathers the headwaters of the Tone River. Most people know the area through the Oze wetlands, but beyond the boardwalks and summer trails is a maze of remote, snowbound mountains. When the snow hardens in late spring, those mountains link together like stepping stones, opening a route that feels both forbidden and familiar.
For me, mountain travel is simply an extension of daily life. The shift from winter to spring feels natural — a change of rhythm, not of purpose. By following these connected ridges, I can move directly from my home valley into that deep, hidden country. This is the season of true freedom: a time to wander wherever the snow allows.
Early May 2025 — From my workplace
Why the Okutone Region
The traverse I’ve been chasing runs for about fifty kilometers, connecting Niigata and Gunma along the spine that encircles the Tone River’s source. It’s a long, unbroken ridgeline through wild, trackless country. For most of the year, it’s inaccessible — dense forest and steep slopes — but when the snowpack firms up in late March and April, it becomes a broad white corridor through the heart of the mountains.
The prefectural border runs along the ridgelines that encircle the headwaters of the Tone River. Linking those ridges from Mt. Makihata all the way to Oze covers just under 50 kilometers — a long, wild traverse through the heart of the Okutone backcountry.
I’m not out to conquer anything. What draws me is the rhythm of steady travel: the quiet balance between movement and pause, between snow and sky. Over the years, I’ve practiced for this — spring bivouacs in the Tateyama range, refining systems for cold, wind, and rain. Because I work at a ski resort, my trips happen late in the season, in April, when the snow is firm but the weather more stable. The Okutone traverse takes four or five nights, with extra days in reserve for storms. Once you commit to it, there’s no easy way out — the only way forward is through.
I’ve turned back three times before: once unprepared, once in bad weather, and once when a broken binding stopped me before I’d even begun. Each retreat stung at first, but in hindsight, they were lessons in humility. The mountains don’t reject you; they just remind you to come back ready.
This year, with deep snow and a rare stretch of clear skies, I took ten days off work, packed my gear, and waited. When the window finally opened, I set out again — tracing the ridgeline around the headwaters of the Tone River, one more time.
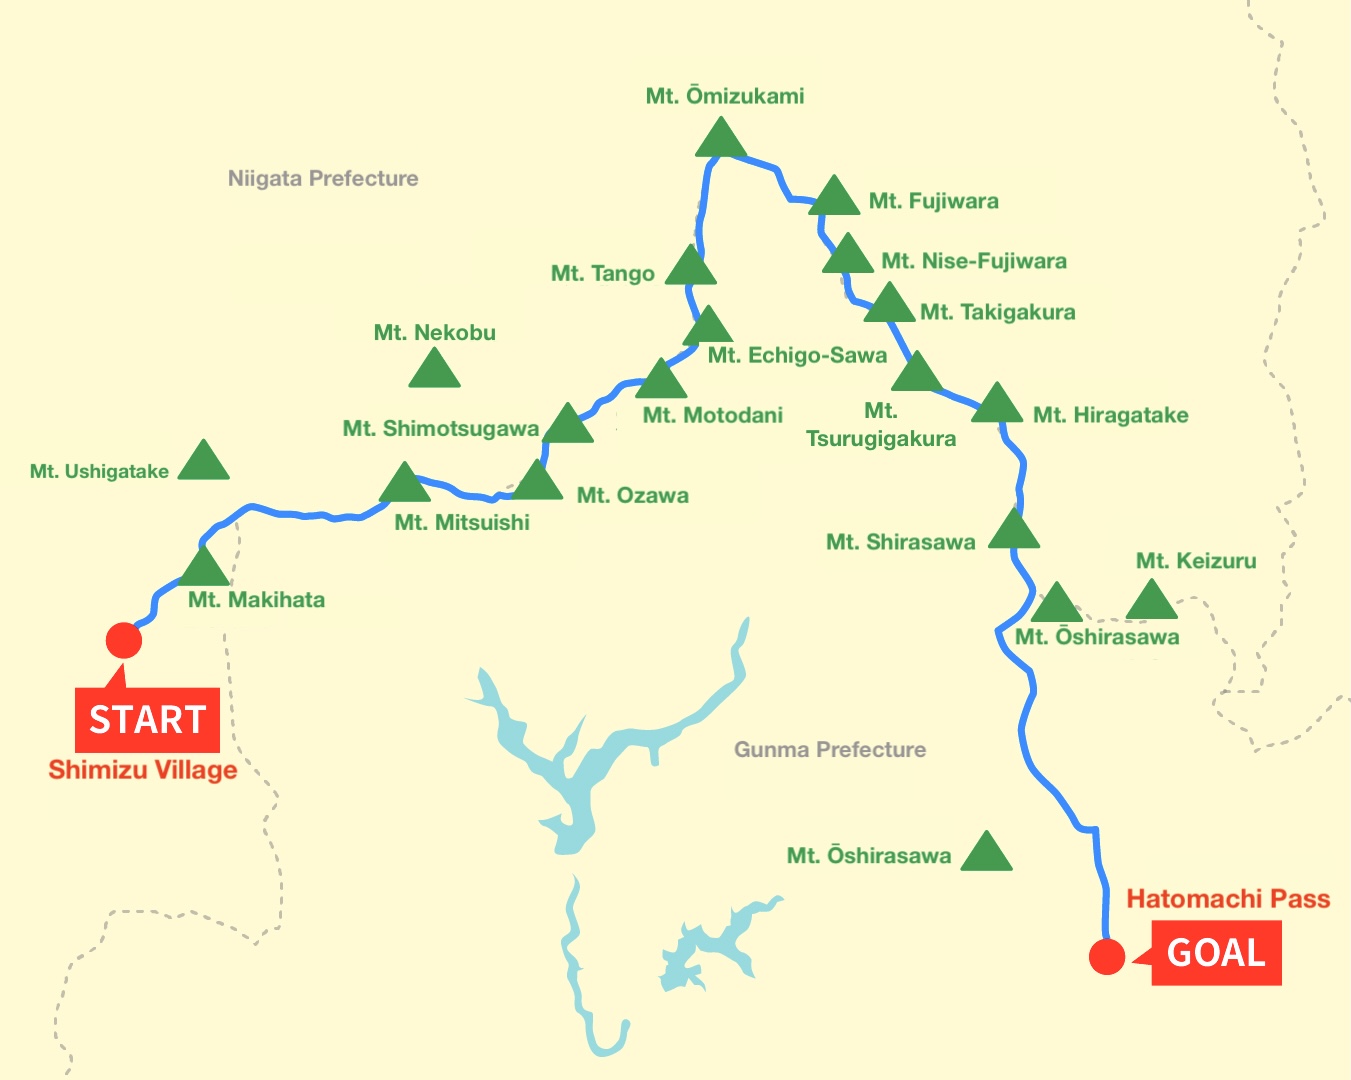
April 2022, from Mt. Makihata via Ushigatake

April 2024 — Raichozawa Camp, Tateyama.

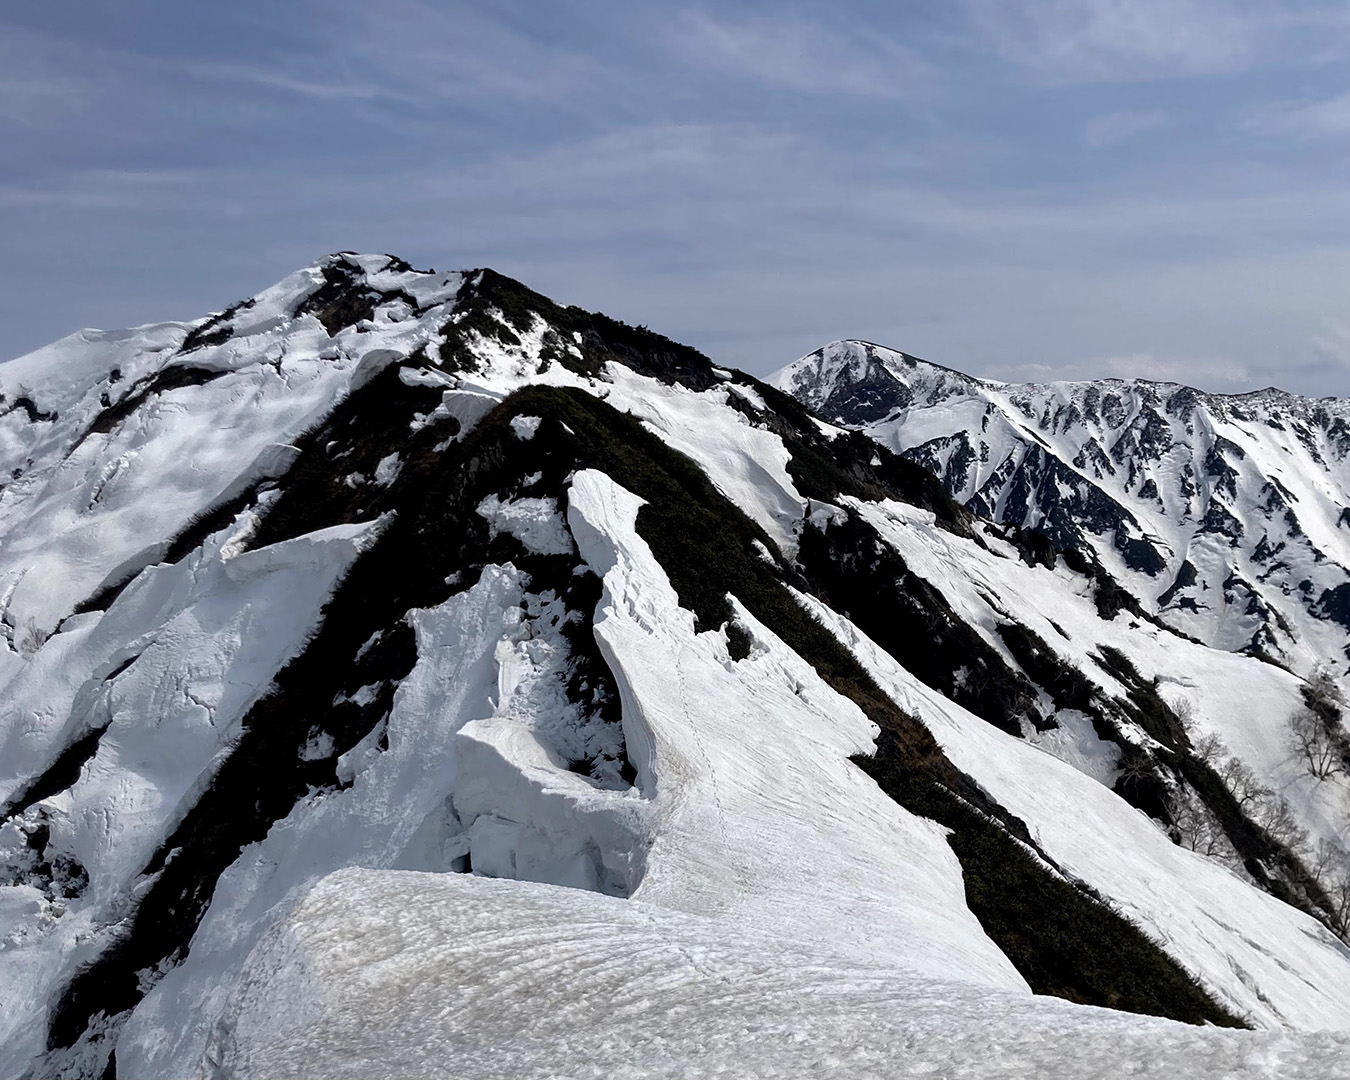
March 2025 — The border ridge from Oze, showing Ozawadake through Omizukamiyama.
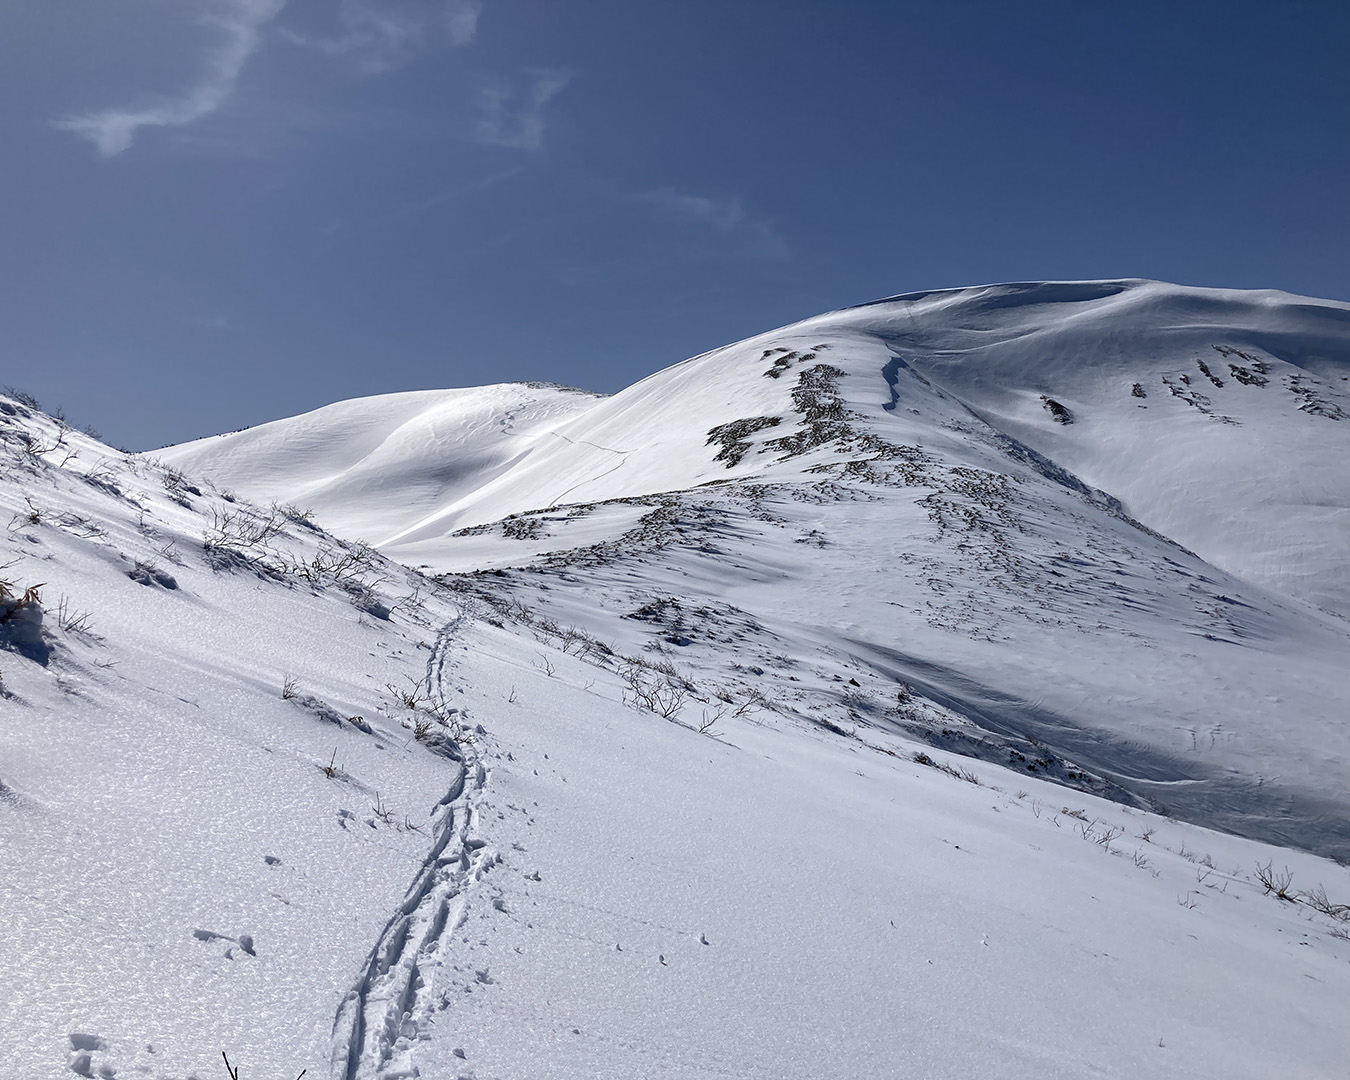
April 2024 — Glide cracks and deep crevasses on the east face of Ushigatake in a heavy-snow year.
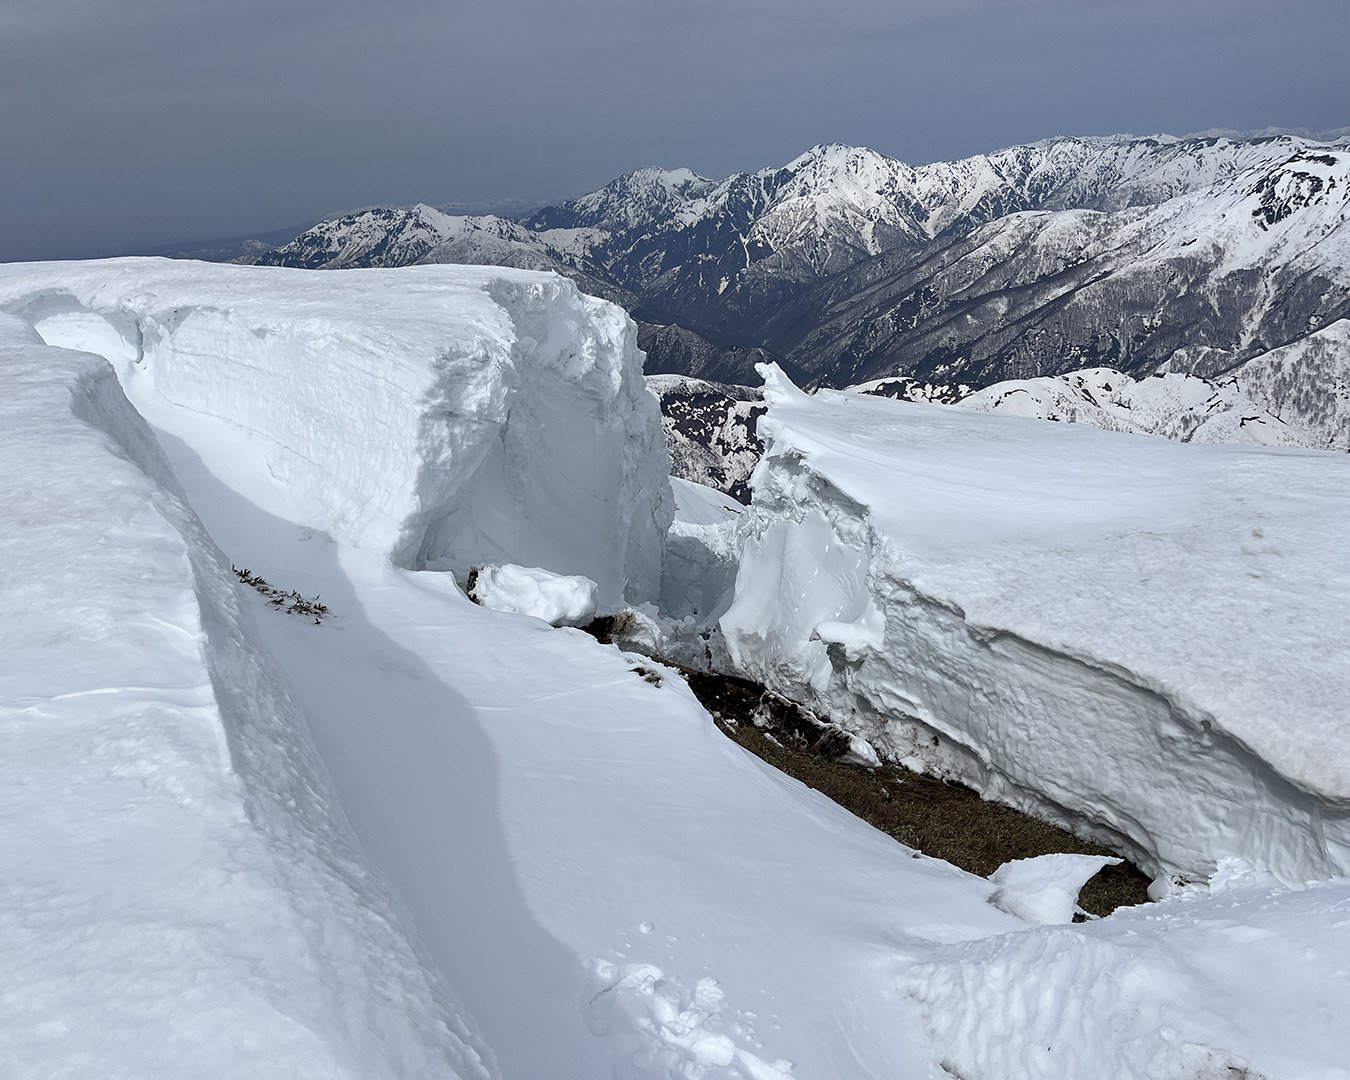
April 2021 — Bail out from Mt. Shimozukawadake toward Nekobuyama. My tracks ran along a snow cornice ready to give way at any moment.
The gear
Let’s start with the gear — the tools chosen by someone who lives and hikes in snow country. But more than the gear itself, I’d like you to pay attention to the how: the way it’s used and the thinking behind it.
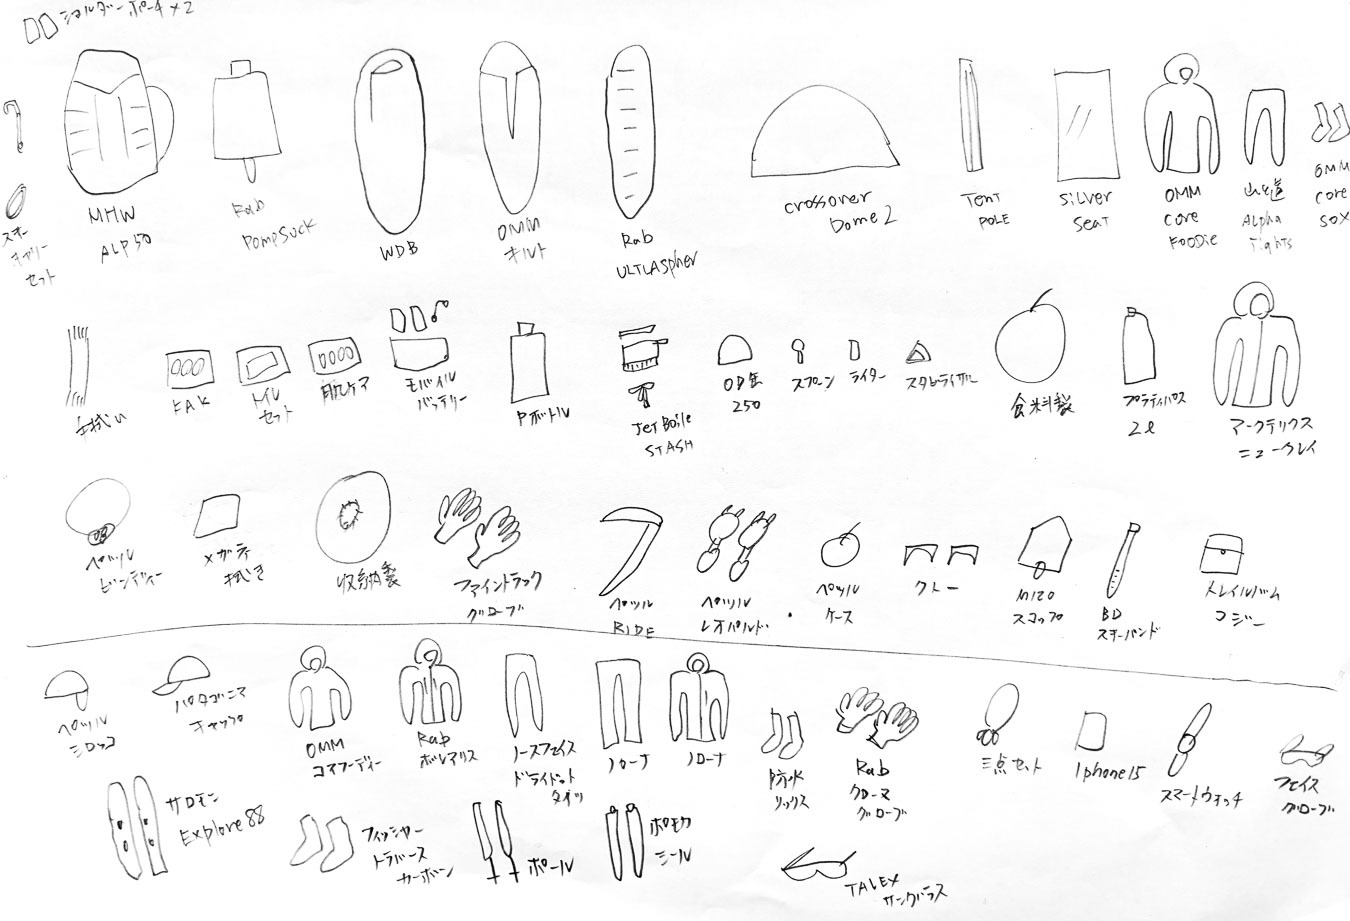
One thing I really recommend, even if it feels tedious, is making a gear list — your blueprint for the trip. I always start by sketching each piece of gear by hand, then turn that into a list and calculate the total weight. Seeing everything drawn out helps me visualize the setup and keeps me from forgetting anything when I leave. The drawings don’t have to be perfect — rough and simple is just fine.
Let’s start with the gear — the tools chosen by someone who lives and hikes in snow country. But more than the gear itself, I’d like you to pay attention to the how: the way it’s used and the thinking behind it.
One thing I always recommend, even if it feels tedious, is making a gear list — your blueprint for the trip. I start by sketching each piece by hand, then turn that into a list and calculate the total weight. Seeing everything drawn out helps me visualize the setup and keeps me from forgetting anything before I leave. The drawings don’t have to be perfect; rough and simple is fine. The point is to see how each piece fits into the whole.
Over the years, I’ve learned that the right setup changes with the season. Midwinter gear is built for stability — simple, dry, and cold. You don’t worry about rain then, so your shelter can be lighter, your layers simpler. Spring is different. The snow softens, rain becomes a real factor, and the weather shifts by the hour. You have to plan for uncertainty, which means slightly heavier, more flexible choices. This time, I was lucky: the forecast promised a long stretch of clear skies, so I left behind waterproof bivies and gloves. Even so, I brought a small dome tent capable of handling rain, just in case.
This season, my base weight came to 6.8 kilograms. With two liters of water, about 3.6 kilograms of food, and a few small ski-related items, my pack weight at the start came to 13 kilograms. From experience, that’s about right for a weeklong traverse in cold conditions using an ultralight approach — light enough to move easily, but not so minimal that safety feels like a gamble.
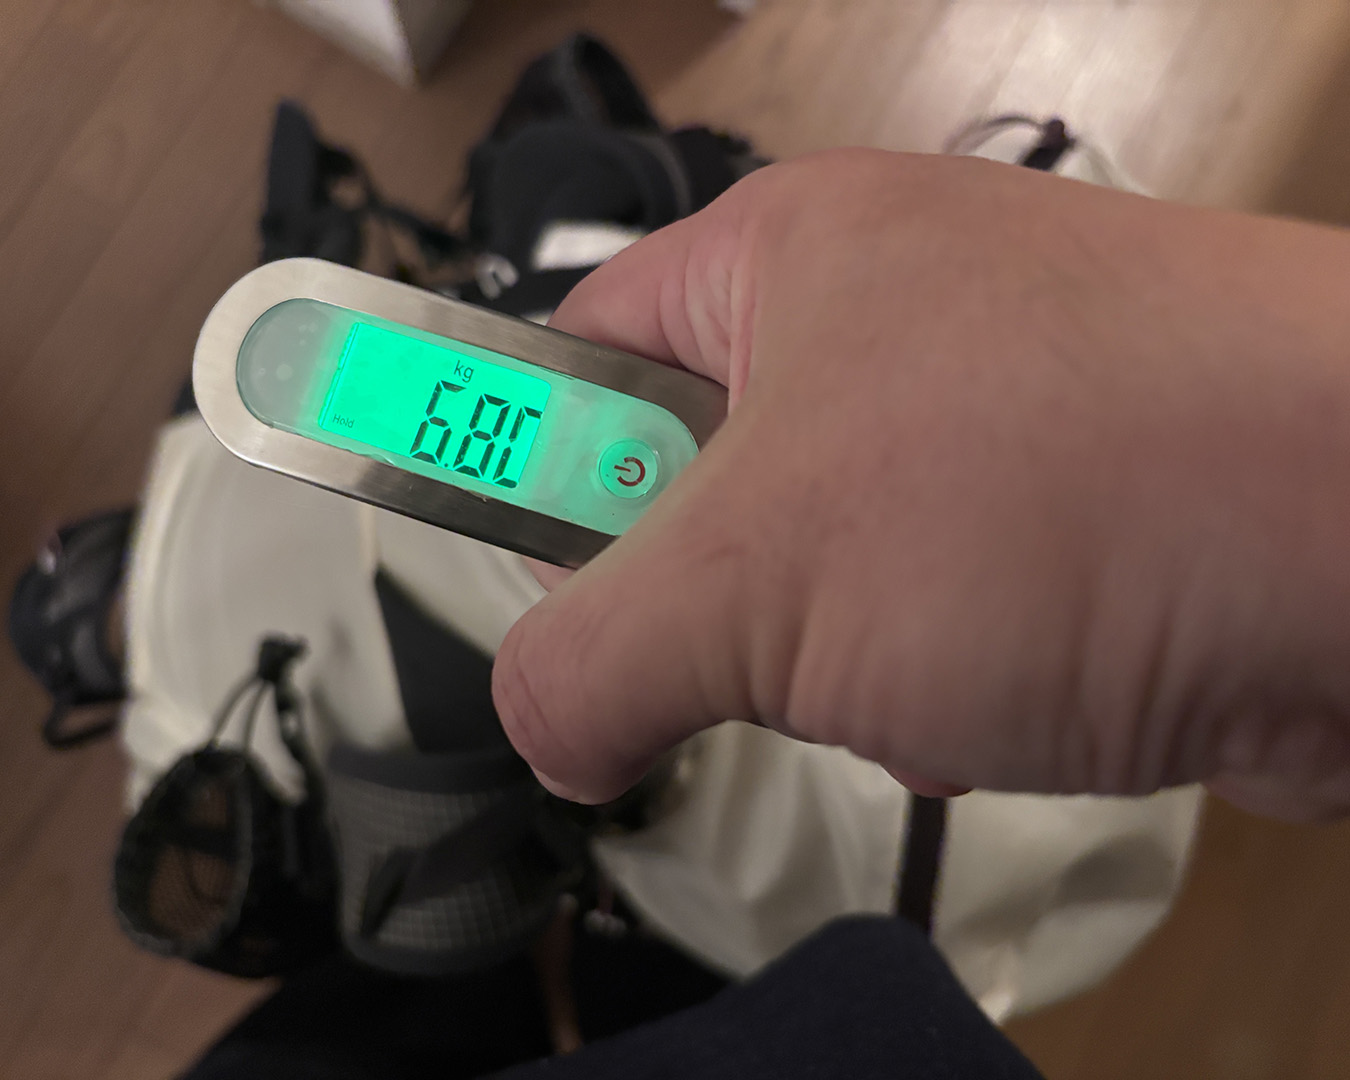
Base weight: total pack weight excluding water, food, and fuel.
Pack weight: total pack weight including water, food, and fuel.
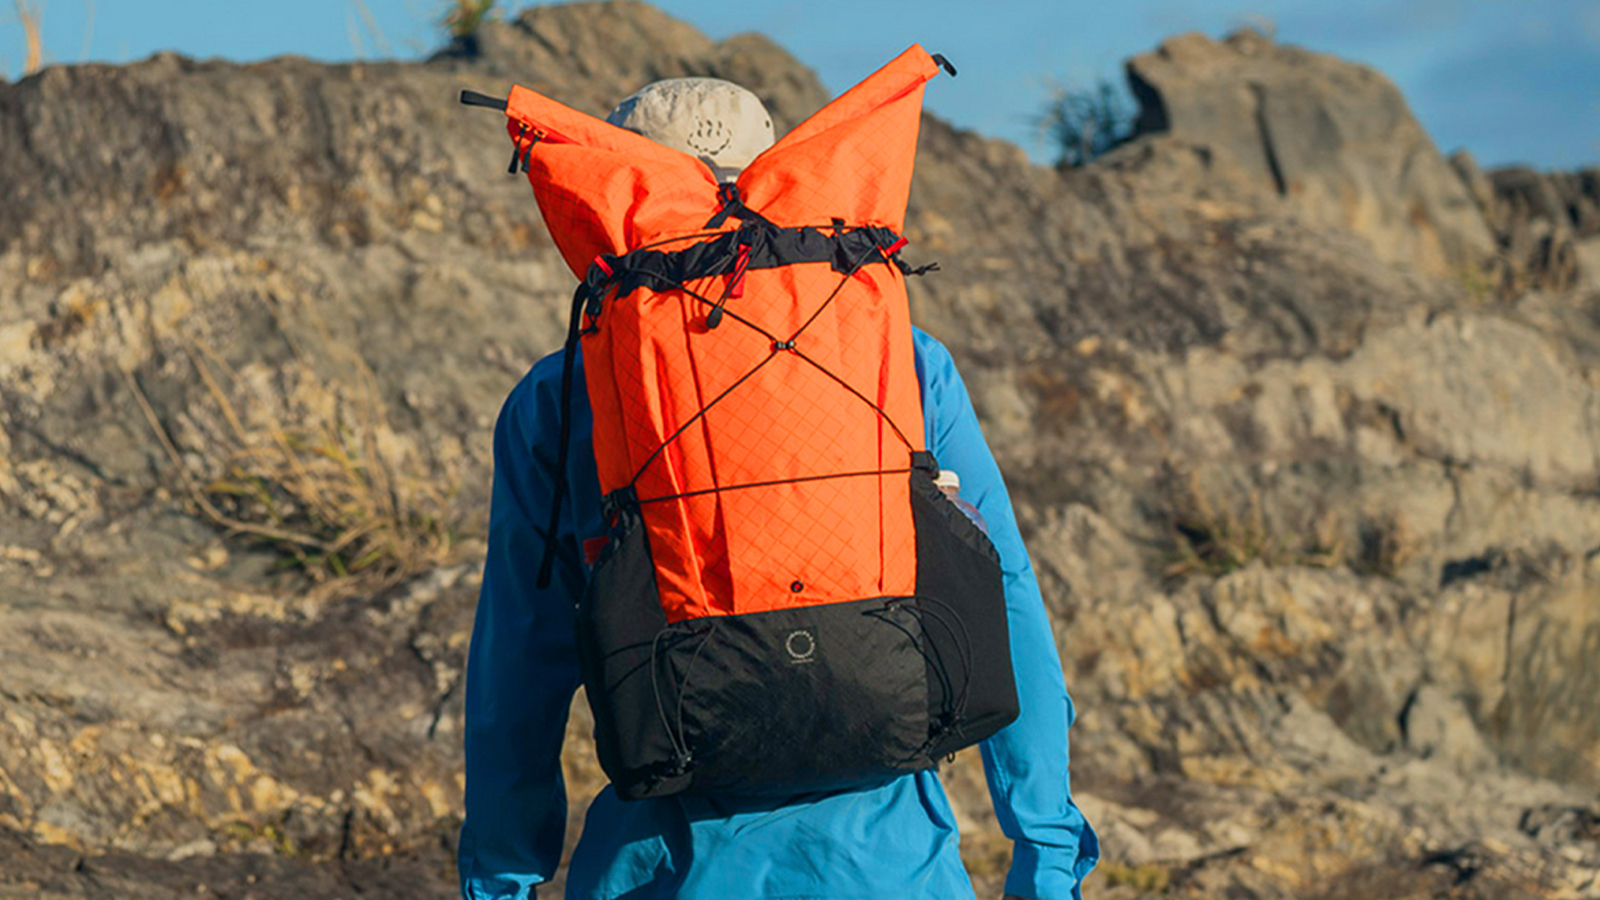
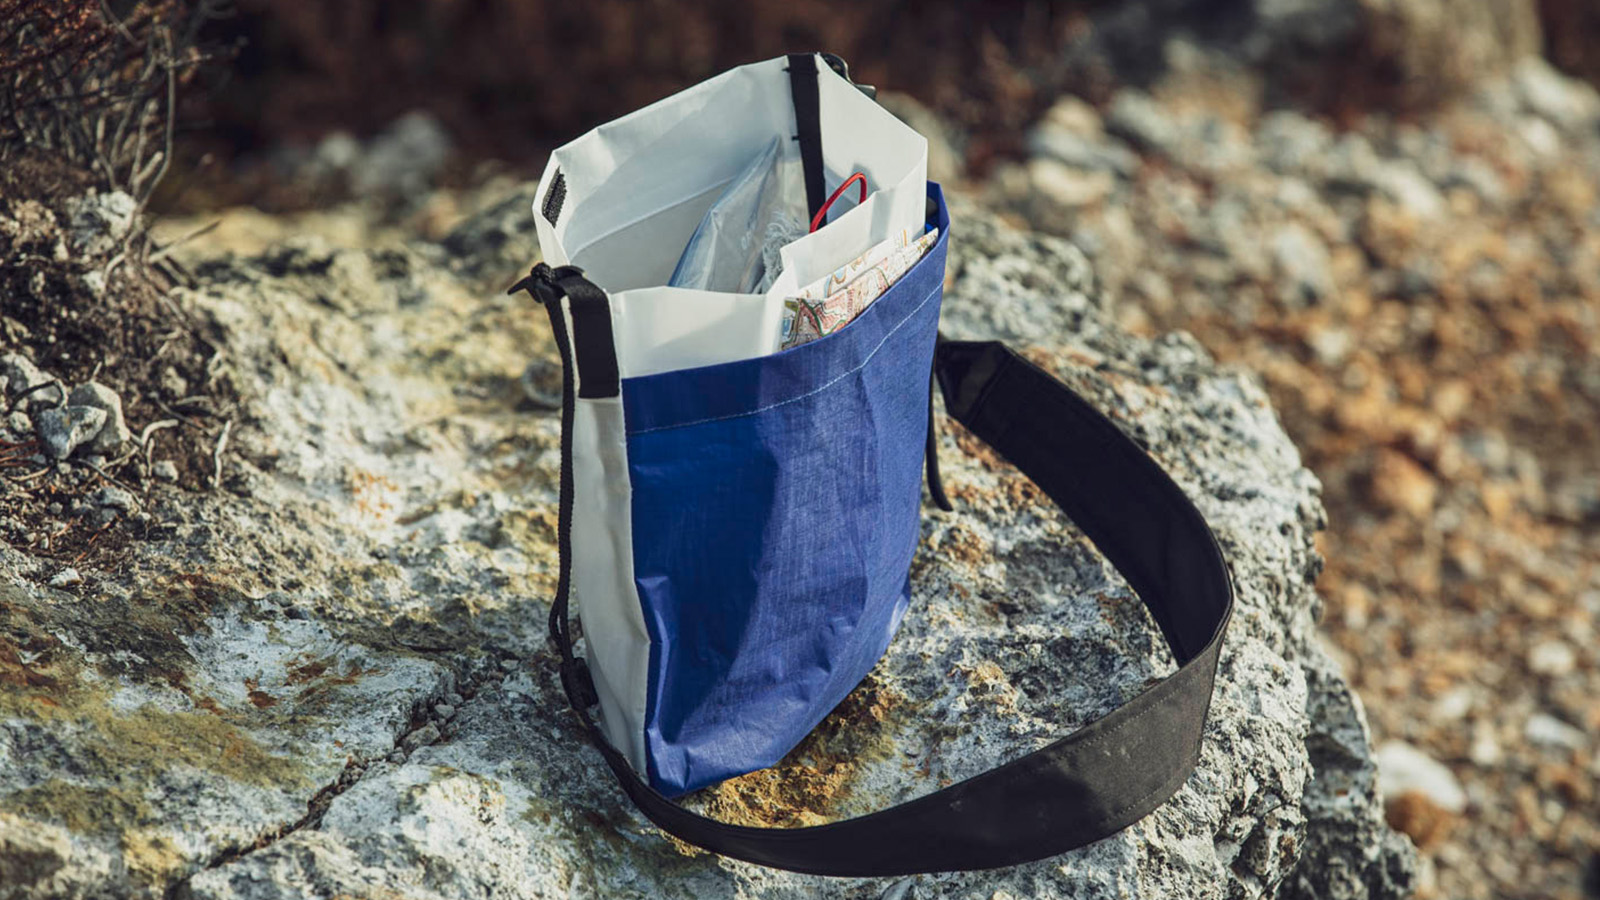
Backpack
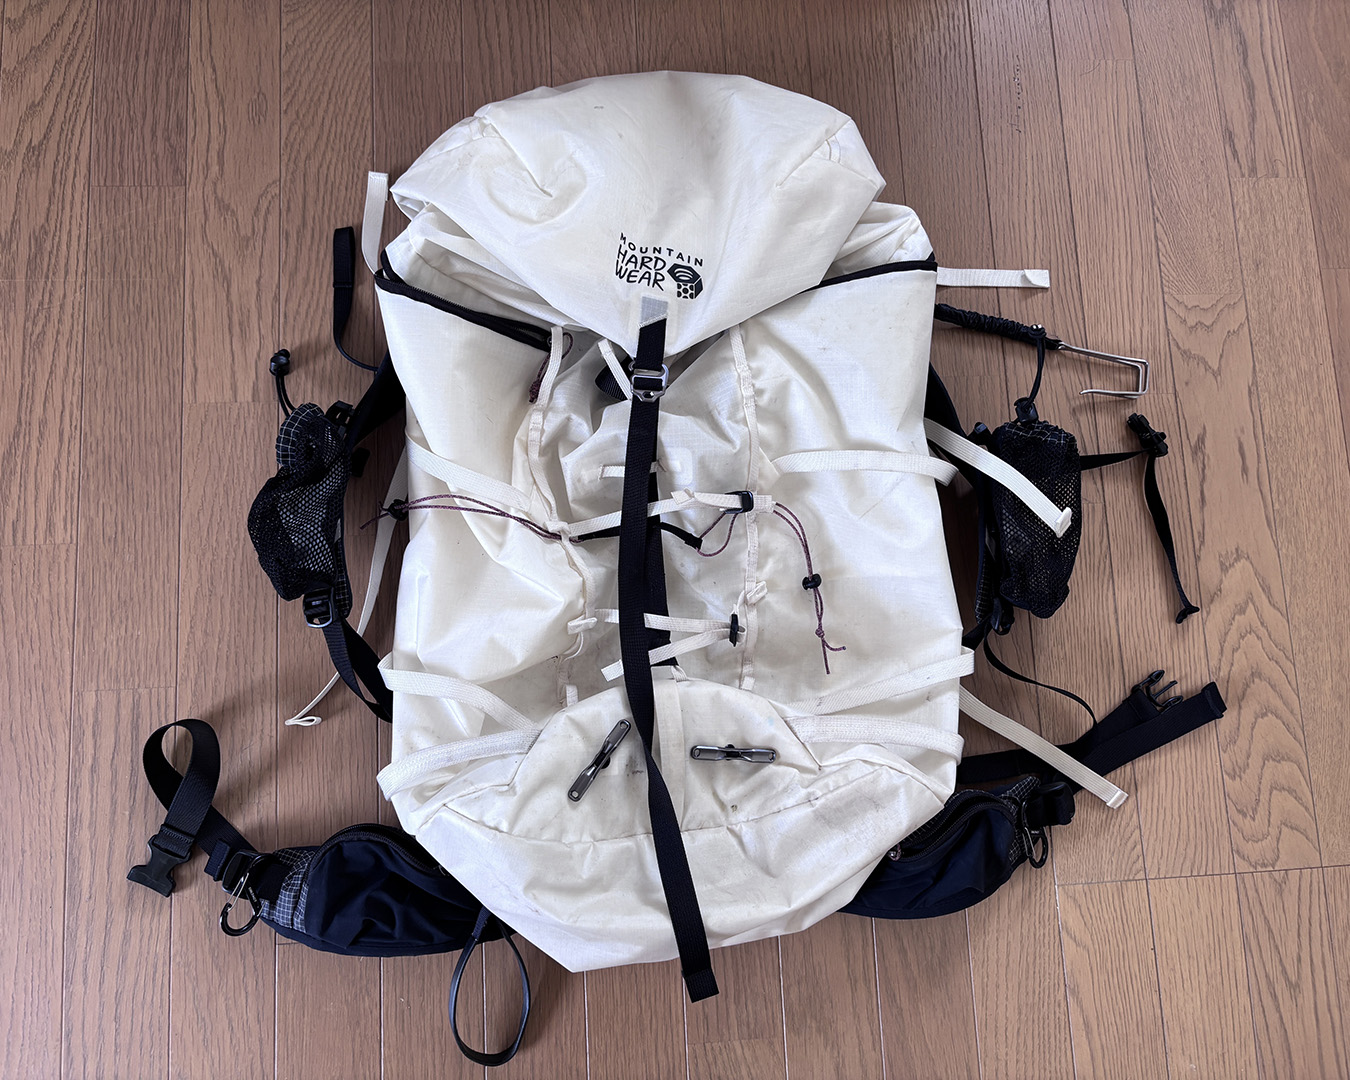
Mountain Hardwear | Alpine Light 50
For this trip, I used the Mountain Hardwear Alpine Light 50L. After several test runs, I decided to remove the aluminum frame but kept the original back panel in place. Since I was carrying a dome tent, I packed the two tent poles along the back to act as a substitute frame — adding just enough rigidity to the pack.
On paper, it weighs 1,153 grams with the frame, which sounds heavy. But once it’s on my back, the weight seems to disappear. Over six days of use on this trip, I never felt shoulder pain and only took the pack off during breaks. I could probably add another two kilograms of gear or food without issue. I also attached two bottle pockets to the shoulder straps for easy access while moving.
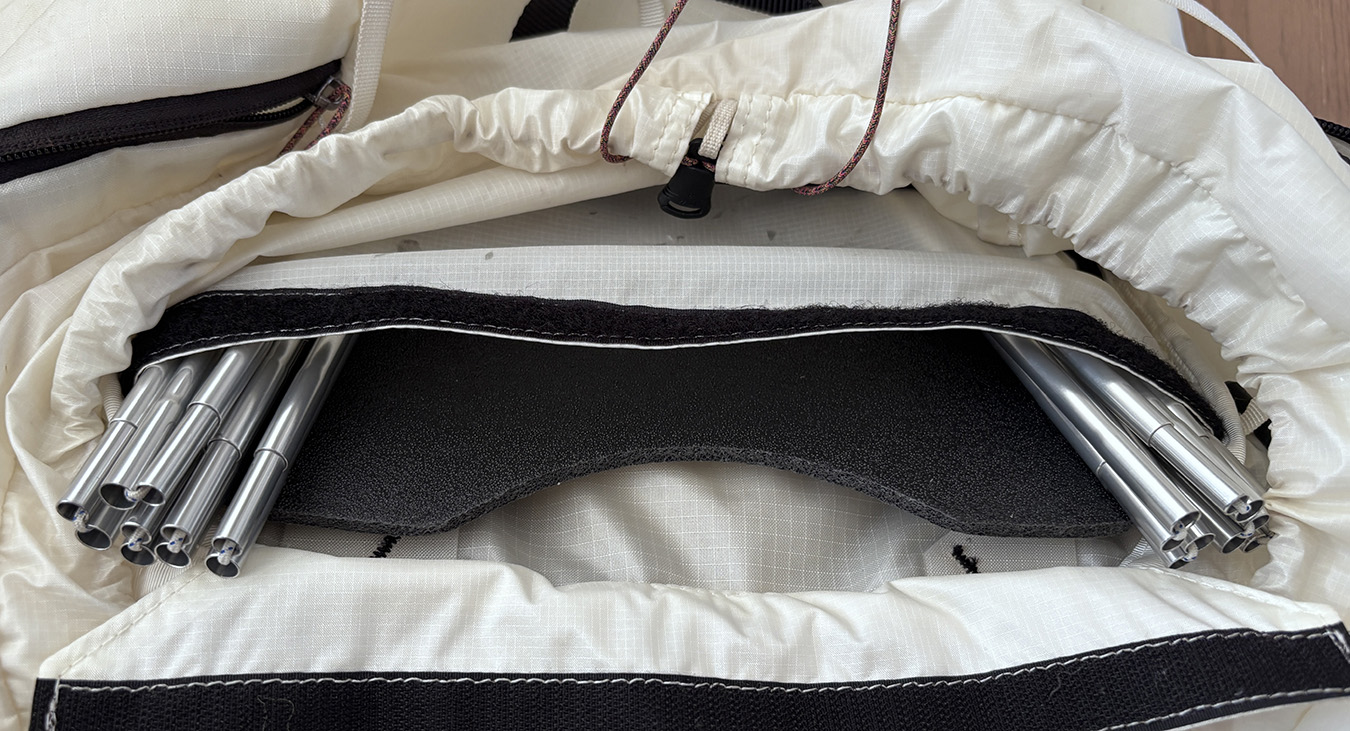
Tent poles double as a pack frame — avalanche probes or similar gear can work too.
Tip 1: Attaching Skis
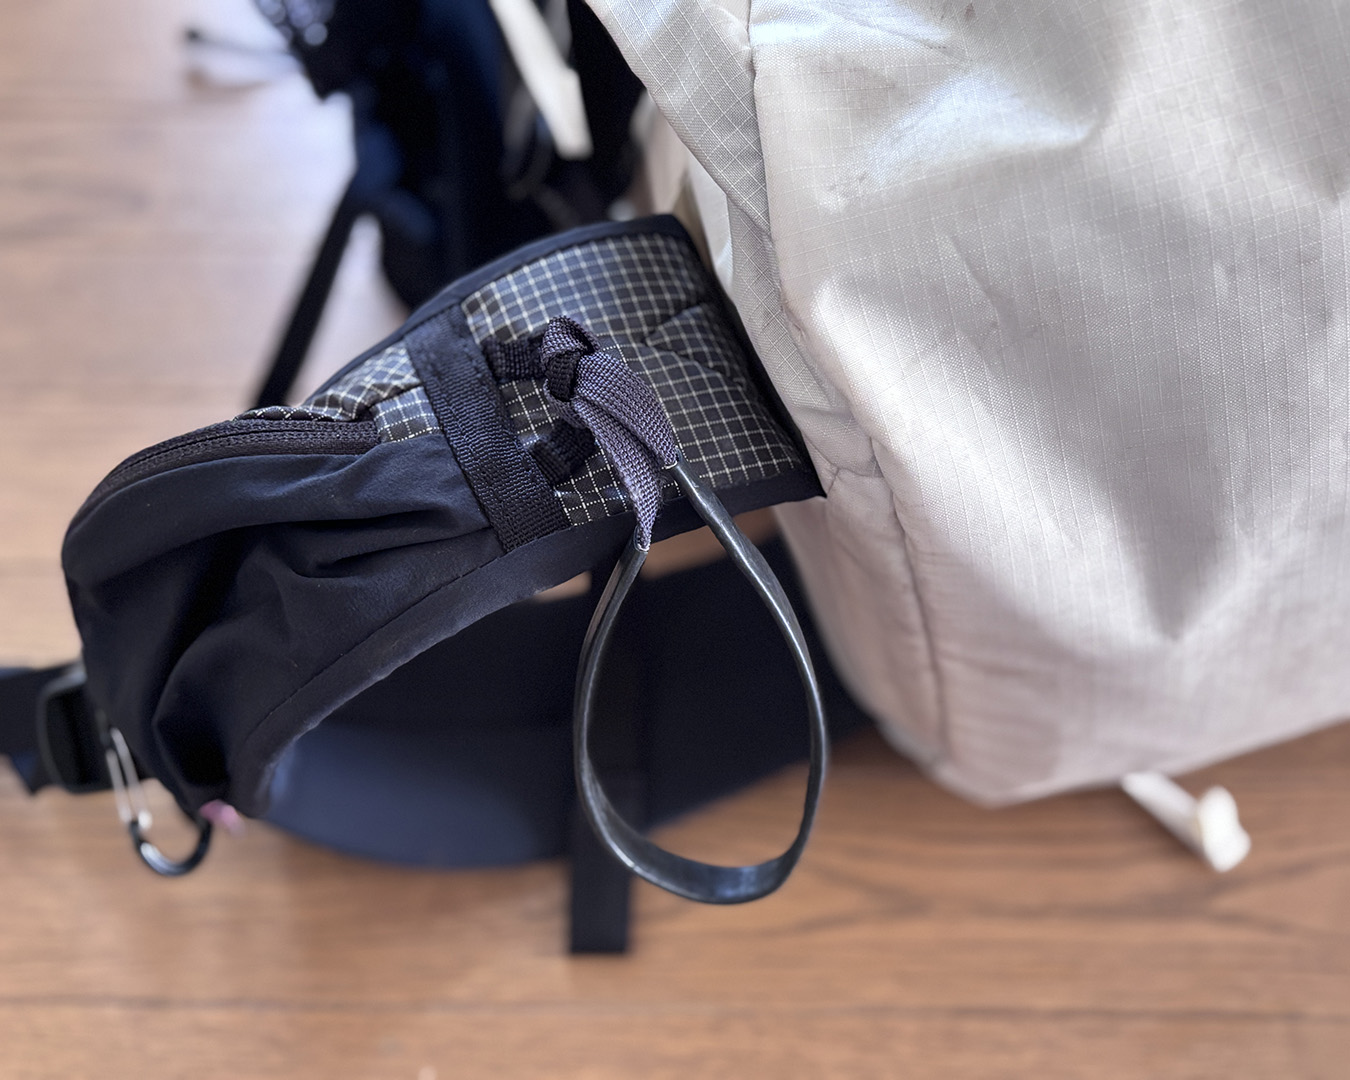
For carrying skis, I use the same quick-attach system popular with ski mountaineering racers. The Blue Ice Quick Ski Carry Kit lets you secure your skis to the pack in just two simple motions — no need to take your backpack off.
This setup works best with light, narrow skis. Heavier or wider ones can upset the balance and don’t stay as secure.
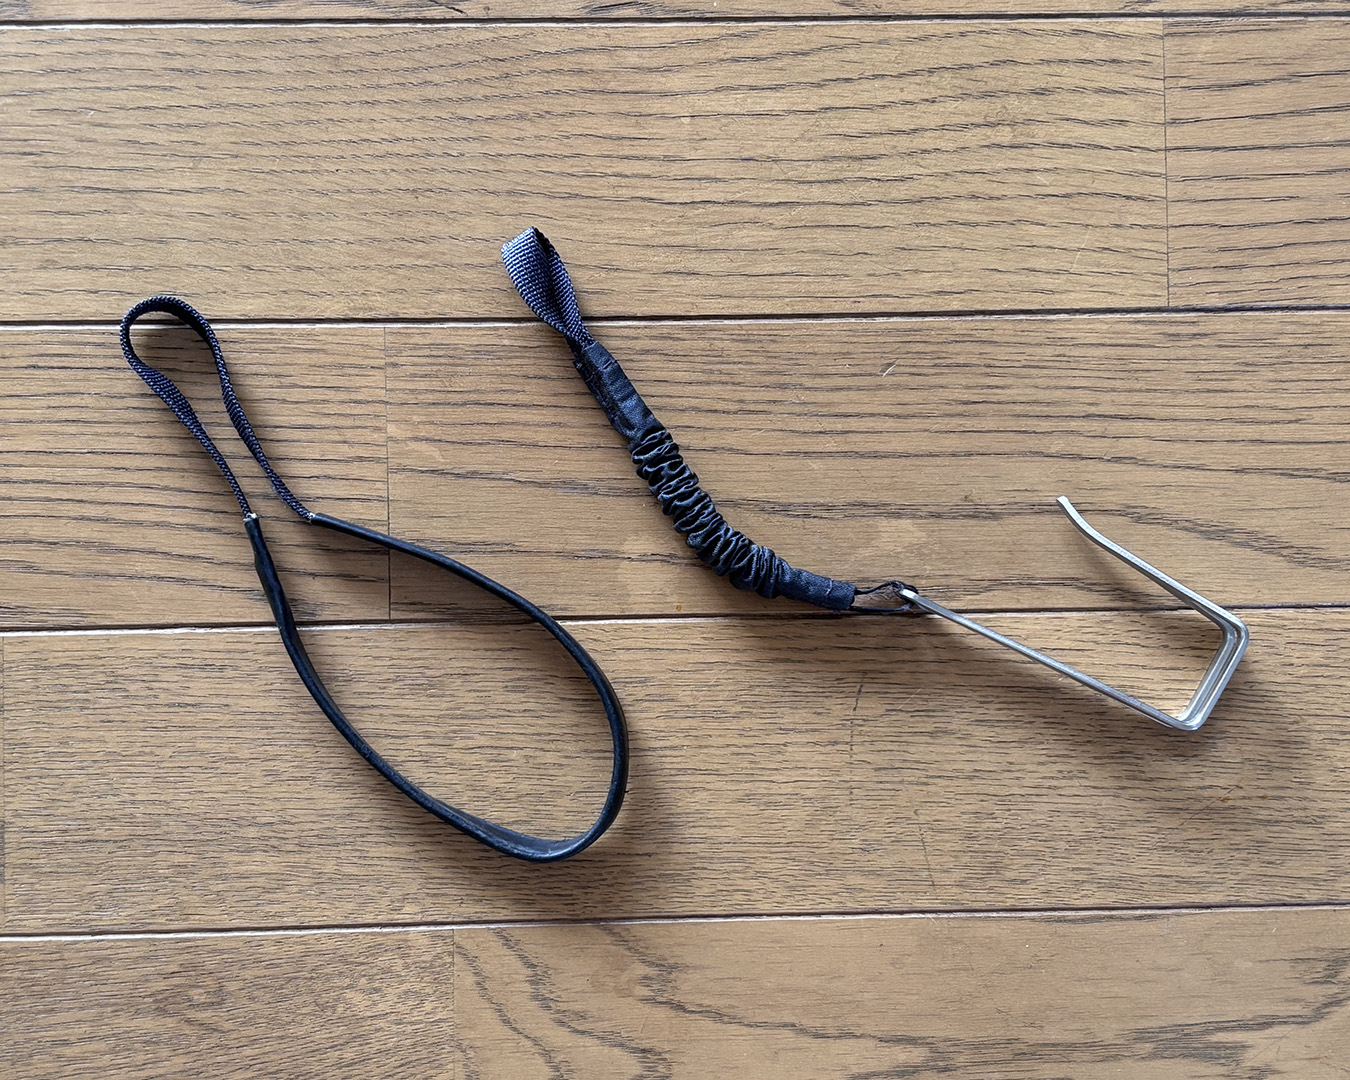
Blue Ice | Quick Ski Carry Kit
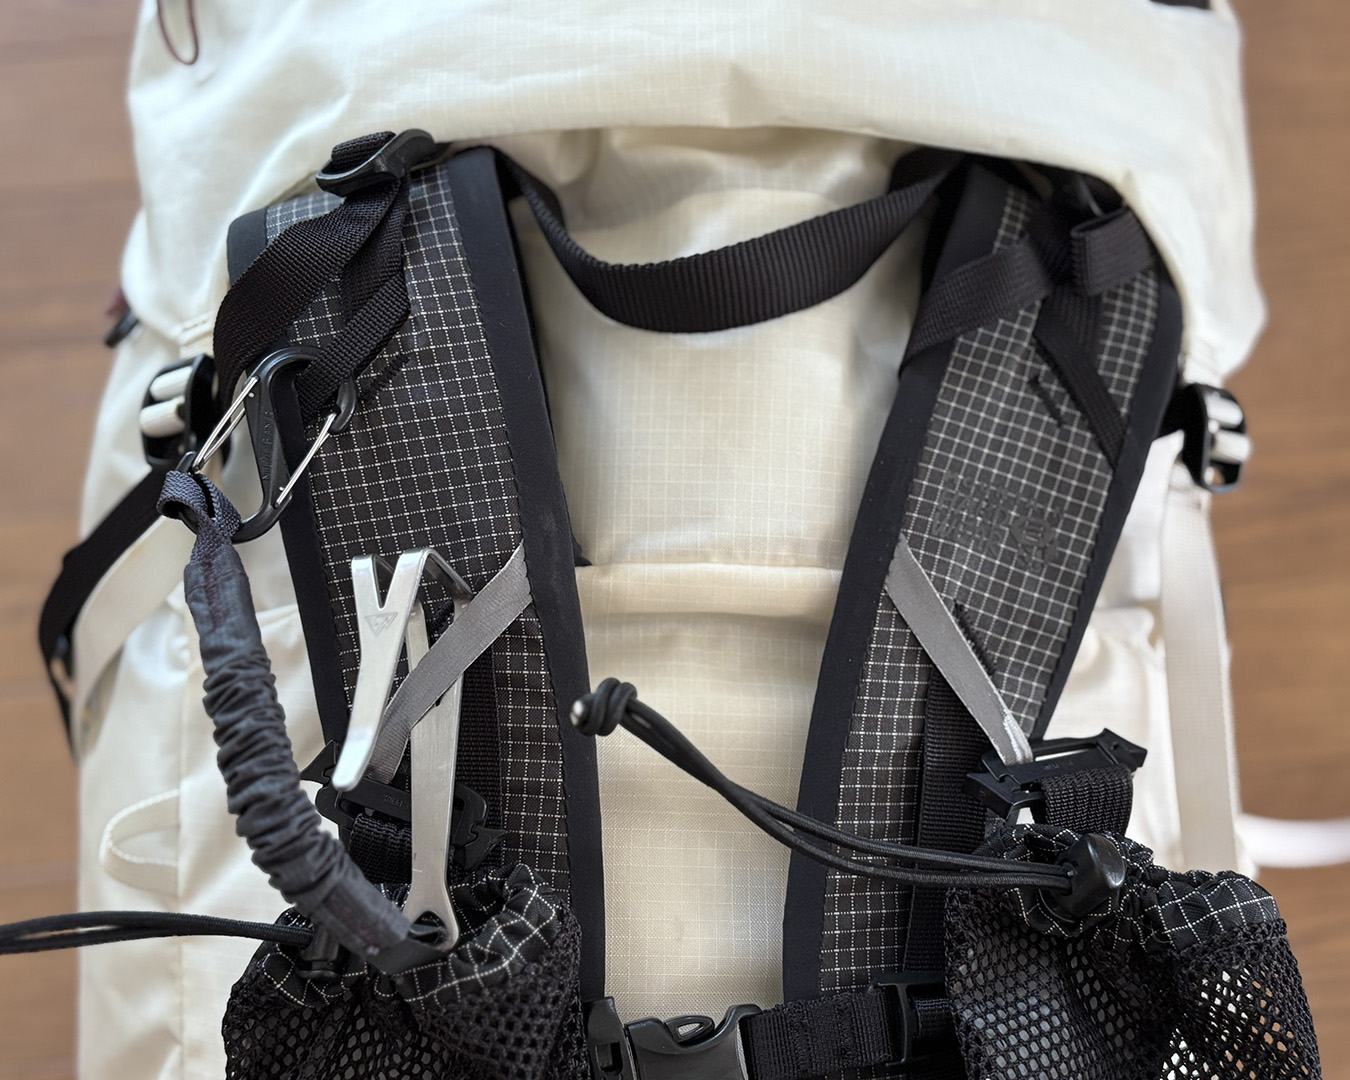
Ski hook attached to the dominant-side shoulder strap.
Attach a loop to the hip belt.
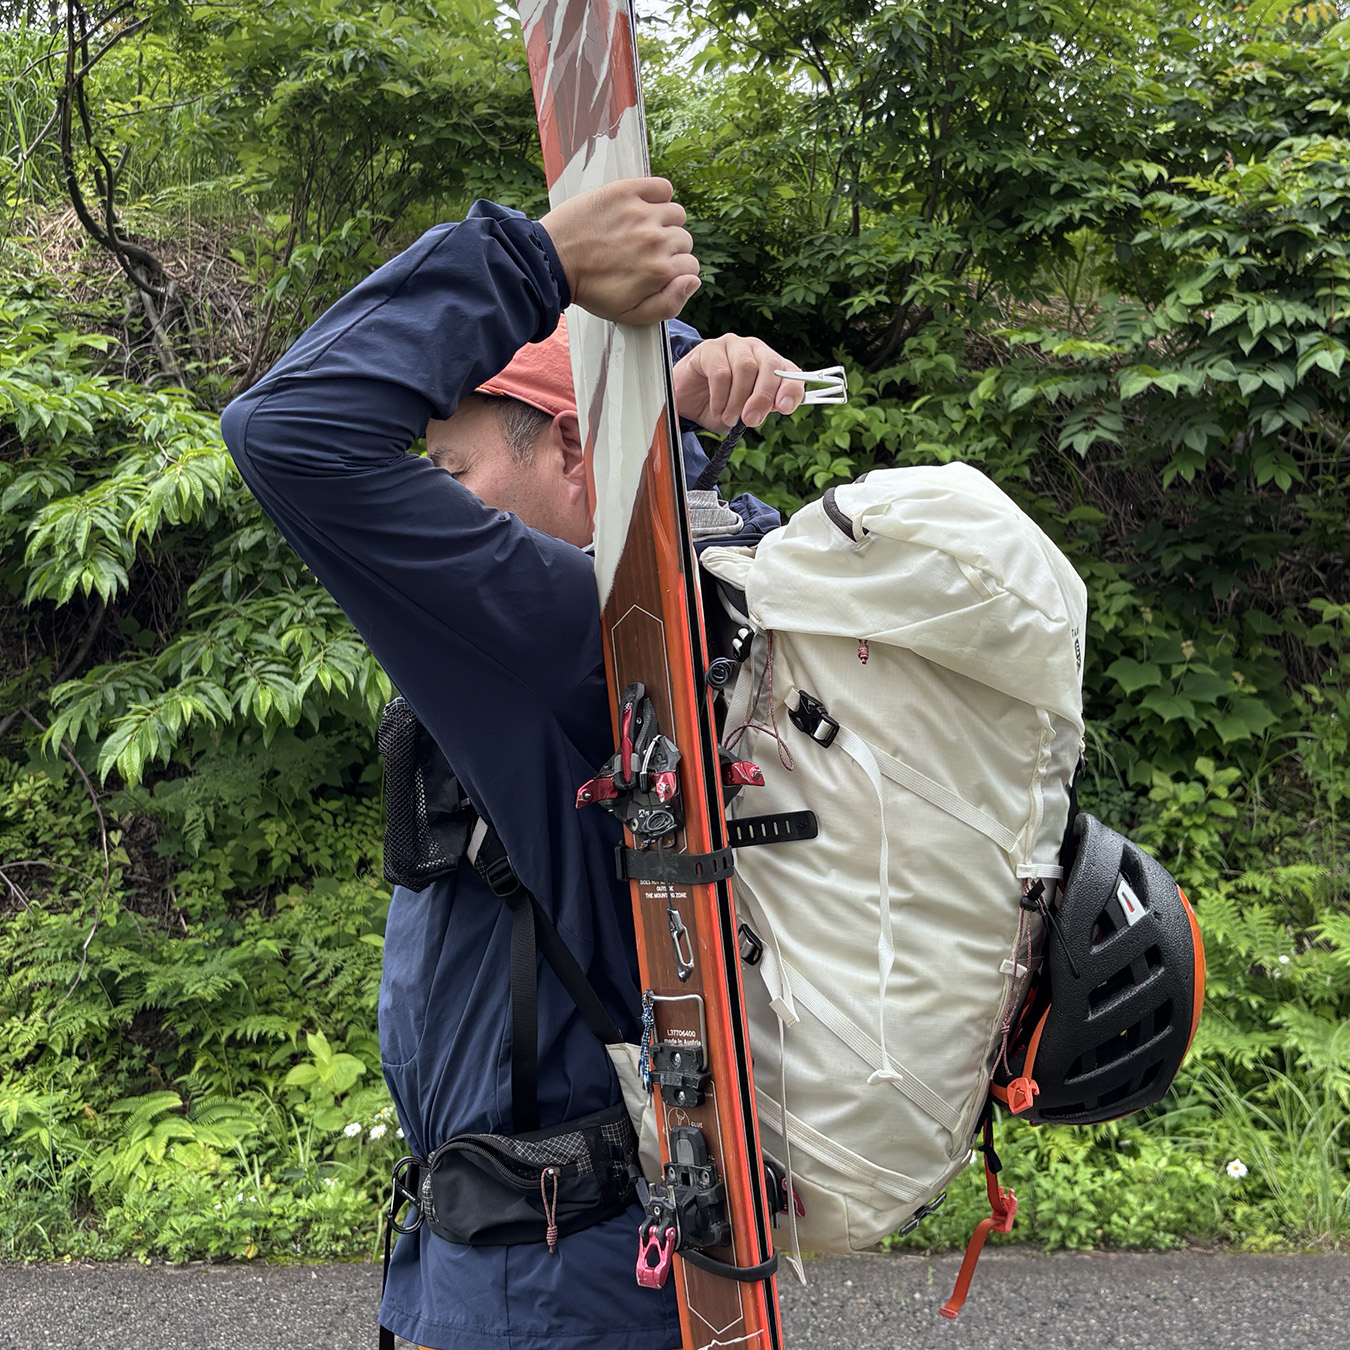
Action ① Insert the skis into the lower loop.
Action ② Hook the upper part of the skis into the clip.
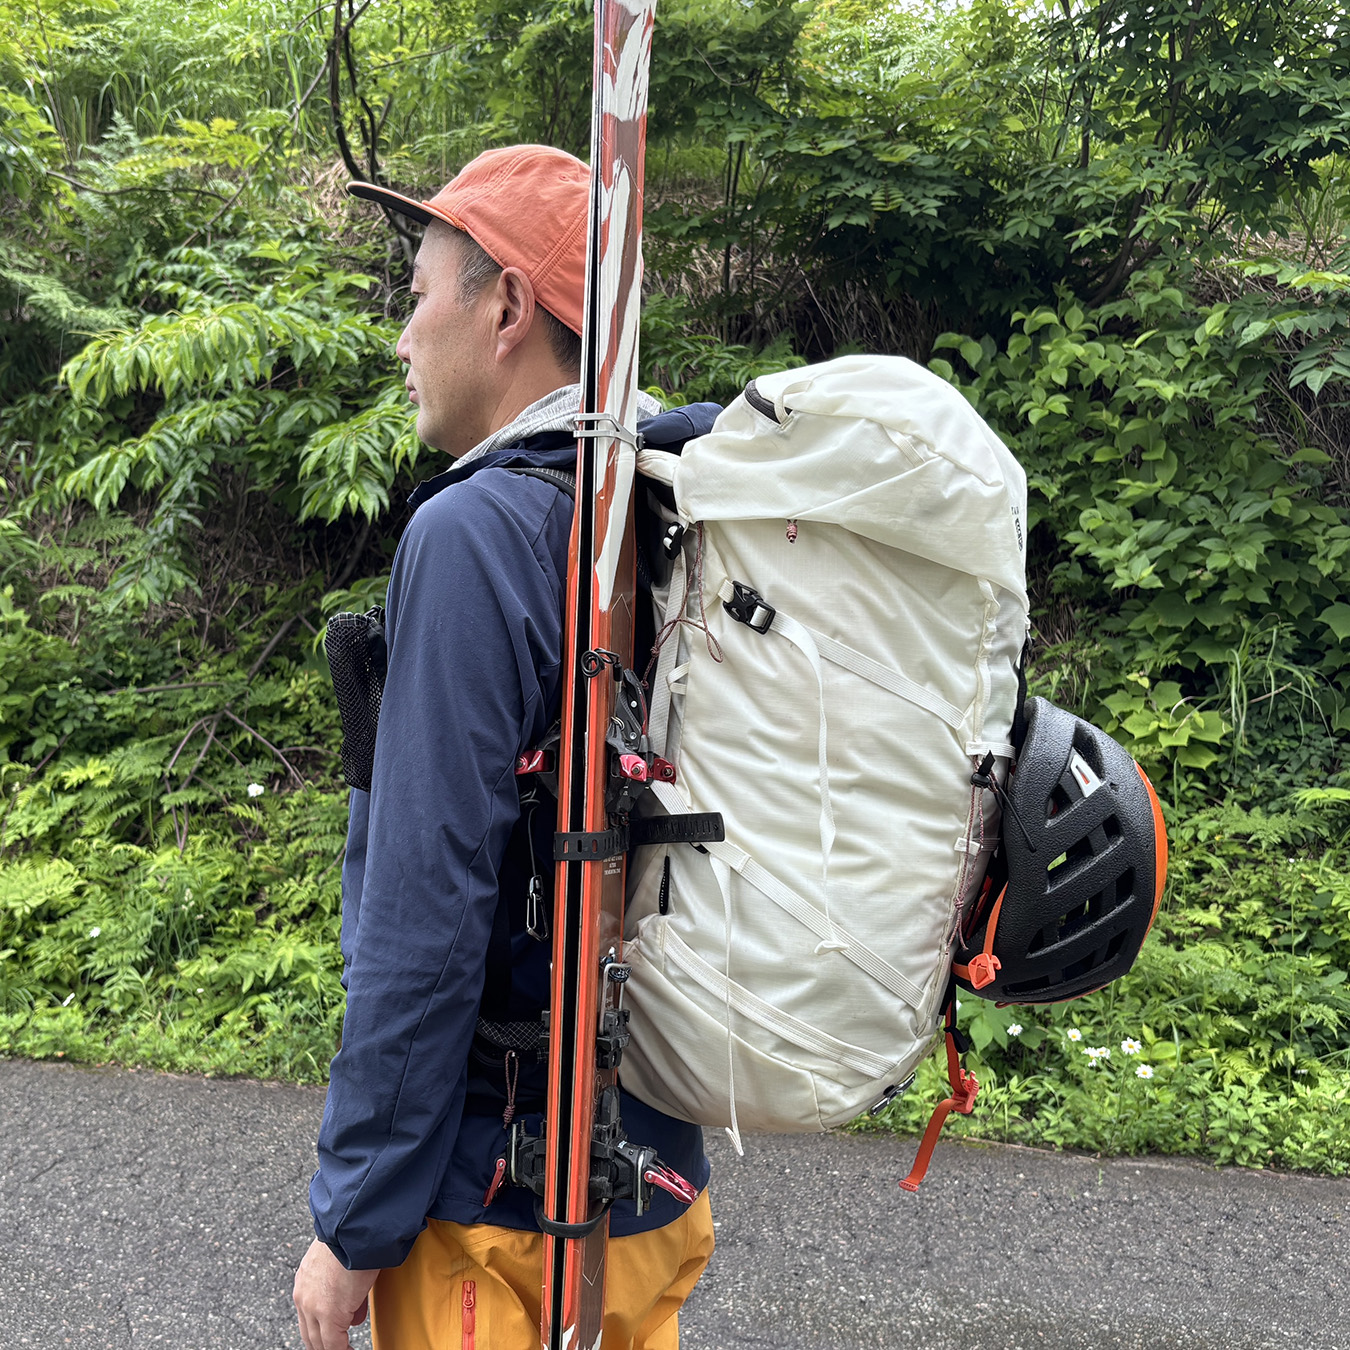
Skis stay close to the body, making them feel lighter.
When skis are strapped to the sides of your pack in the usual A-frame style, the weight pulls outward and makes every movement harder. It also puts extra stress on the shoulder straps when you try to put the pack on, which can eventually wear it down.
With this quick-attach setup, you put the pack on first and clip the skis afterward. The balance stays centered, and the whole process feels smoother and more efficient.
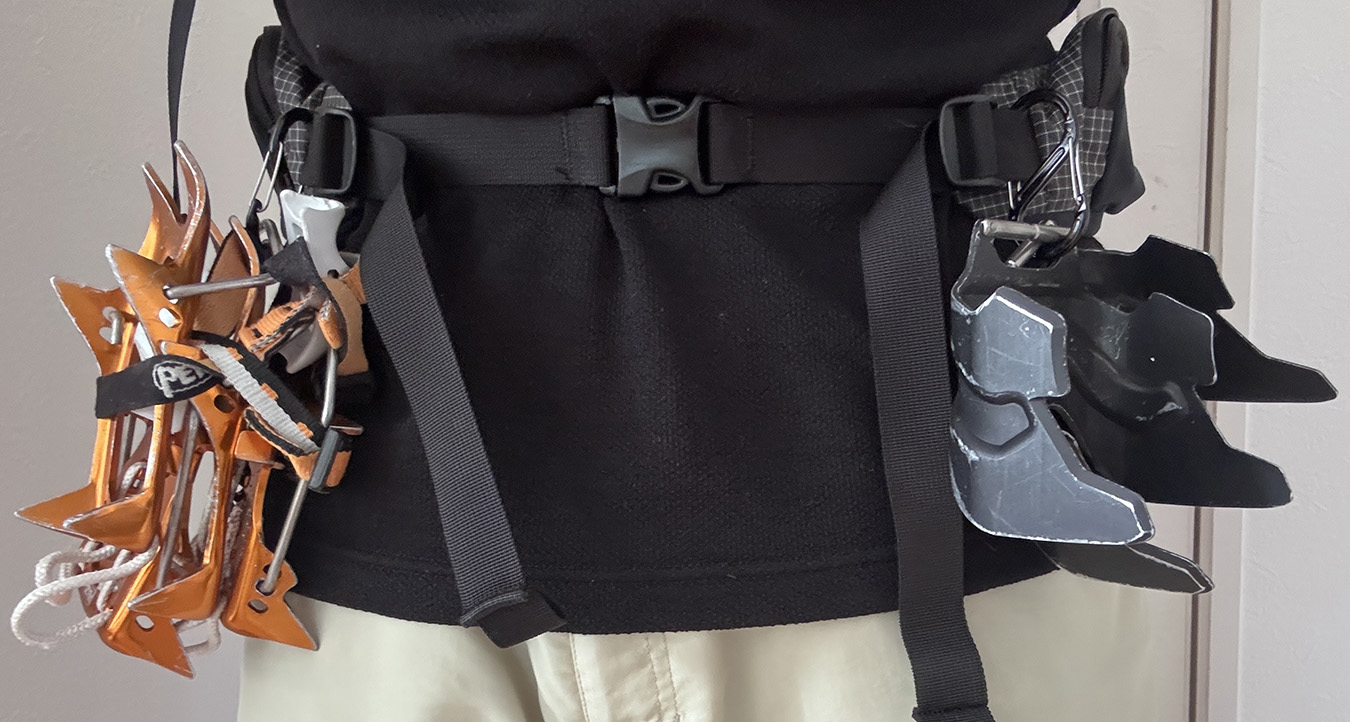
Tip 2: How to carry climbing gear
I attach double-gate S-shaped carabiners to both sides of my pack’s hip belt, so I can clip on or remove crampons, ski crampons, or an ice axe with one hand. This setup lets me switch between skinning and crampon modes without taking off the pack.
When I’m not using the gear, I just let it hang at my waist as I move — the same way construction workers keep their tools on their belts, ready to grab when needed.
Ski gear
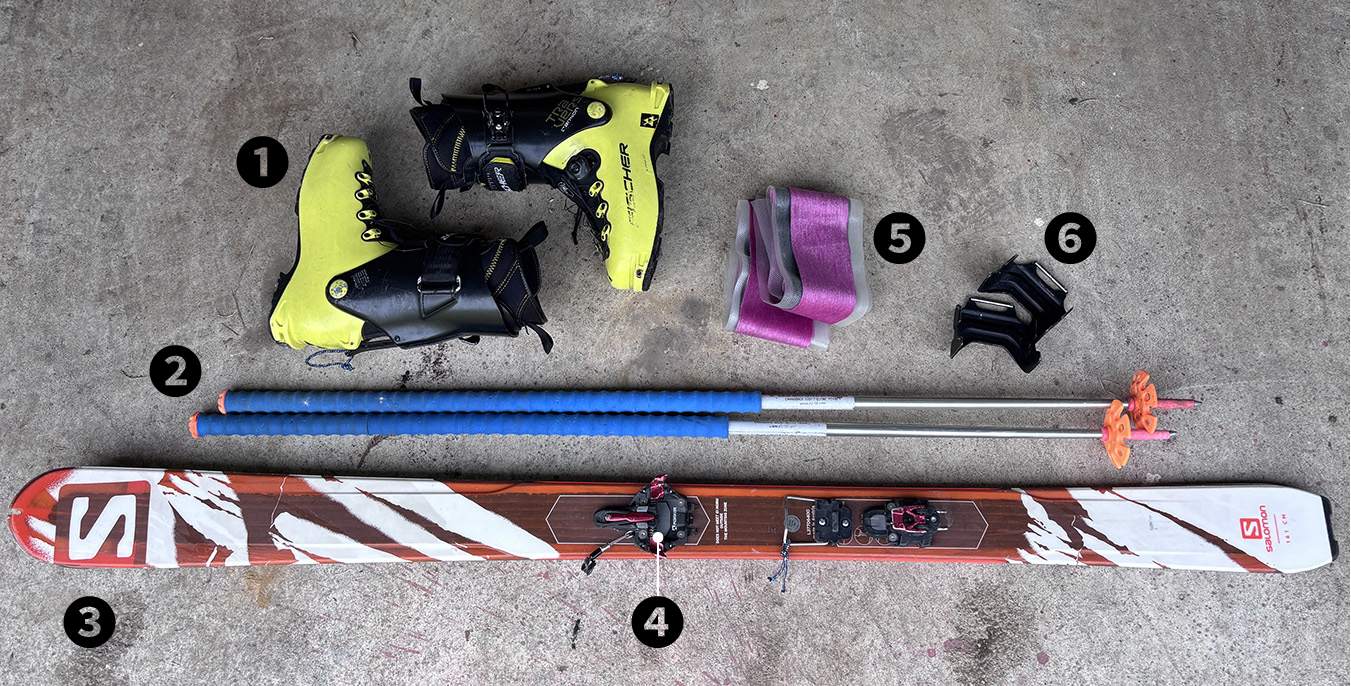
❶ Boots: Fischer | Traverse Carbon 27.5 cm (lightweight ski boots with 80° fore-aft range of motion)
❷ Poles: Les Bâtons d’Alain 135 cm (single aluminum poles)
❸ Skis: Salomon | MTN EXPLORE 88 162 cm (1.25 kg per ski)
❹ Bindings: Marker | Alpinist 12 (brakeless, release value 12, leash cord attached)
❺ Skins: Pomoca | Free Pro Ready 2 Climb (modified tip, free-tail finish)
❻ Ski Crampons: Marker | Pintech Crampon 90 mm (crampon-style attachment for skis)
Since this trip was mostly about hiking rather than skiing, I went with the lightest setup I own — and had zero complaints, even in terms of glide. I’ve used lighter race-style skis in the past, but their durability can be questionable. For long traverses, skis around 1 kg per foot feel just right. I also swapped in a new pair of skins this season, and they performed flawlessly.
My poles have taken quite a beating over the years, and a few parts are cracked, but they still work fine. The boots are in their eighth season and probably nearing the end of their life — yet when they do break, I’ll just buy the same model again. The climbing support on the bindings was too low as-is, so I added Voilé splitboard climbing supports, giving me two height options.
After fifteen years using this setup style, I don’t feel much need to experiment anymore — it just works.
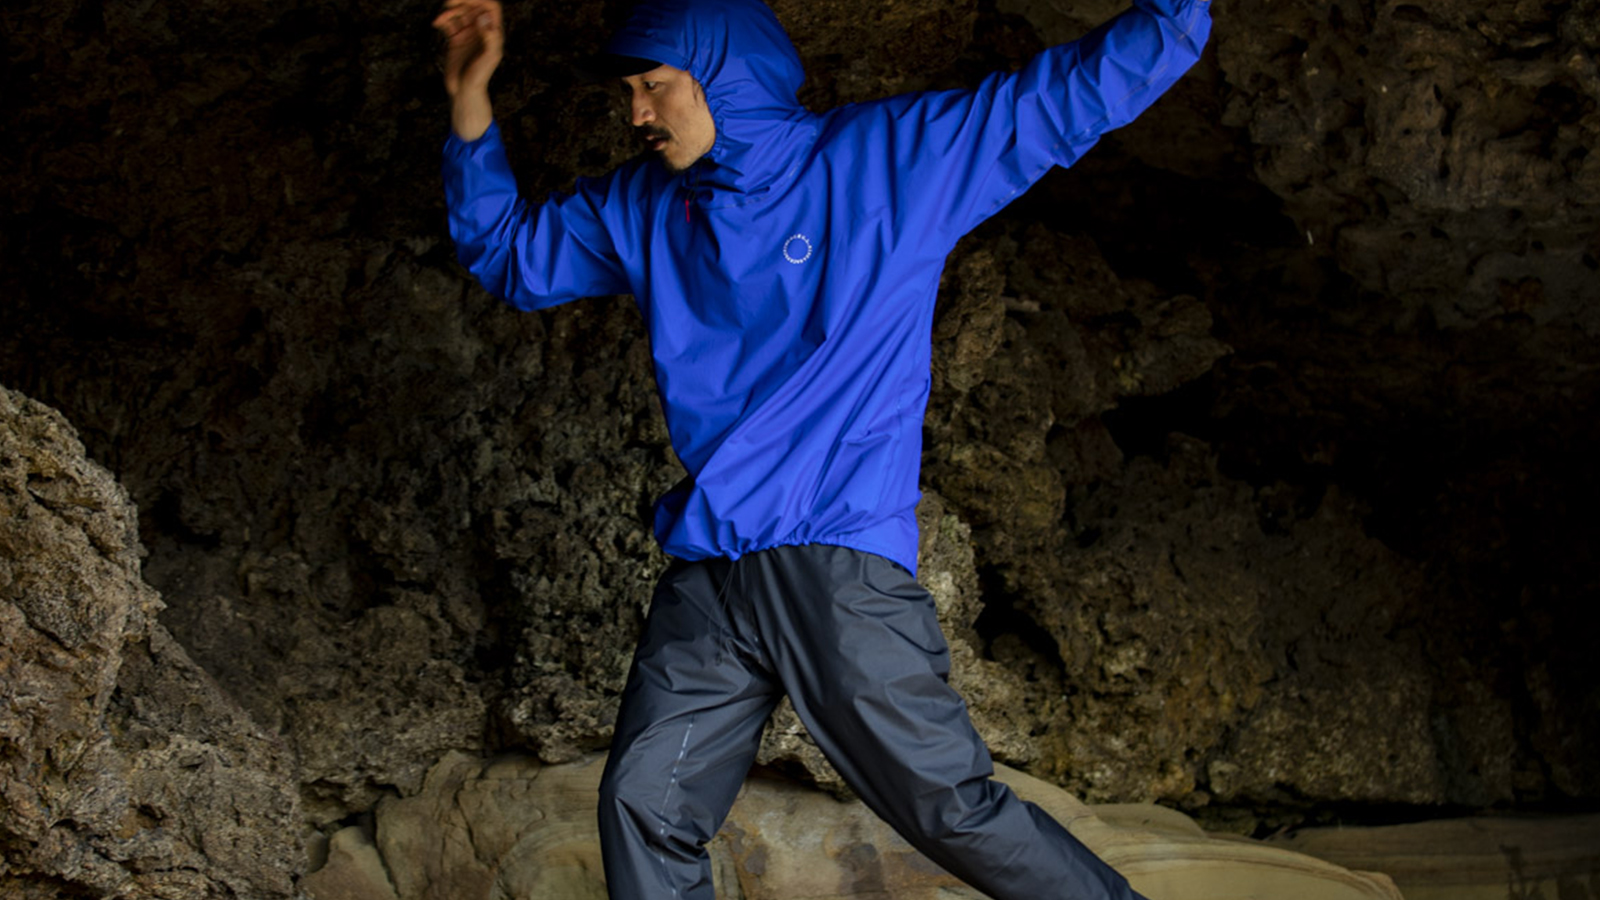
Clothing and layering
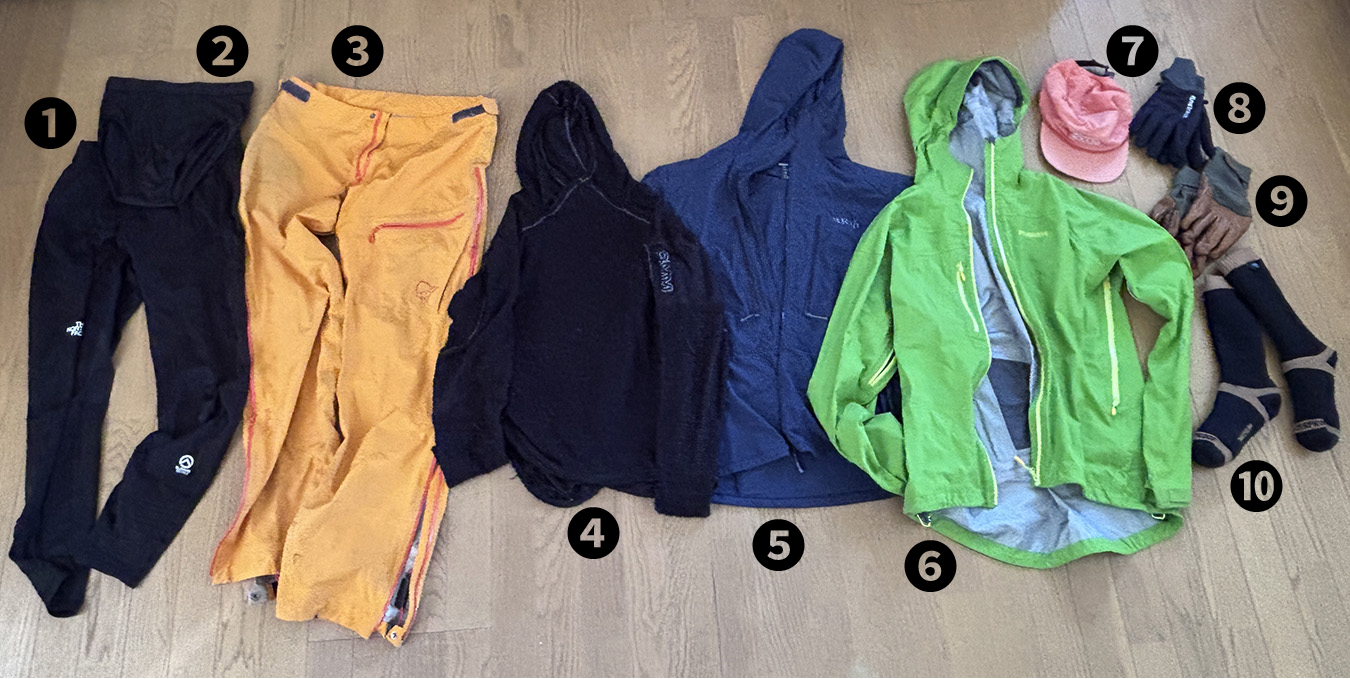
❶ Base Layer Bottoms: The North Face | Expedition Dry Dot Tights
❷ Base Layer Underwear: Montbell | Super Merino Wool L.W. Briefs
❸ Hardshell Pants: Norrona | Bitihorn DRI3 Pants
❹ Base Layer Top: OMM | Core Hoodie
❺ Wind Jacket: Rab | Borealis Jacket
❻ Hardshell Jacket: Norrona | Bitihorn Gore-Tex Active Jacket
❼ Cap: Patagonia | Snowfarer Cap
❽ Trekking Gloves: Finetrack | Everbreath Winter Trail Gloves
❾ Ski Gloves: Rab | Khroma Tour Infinium Gloves
➓ Waterproof Socks: DexShell | Hytherm Pro
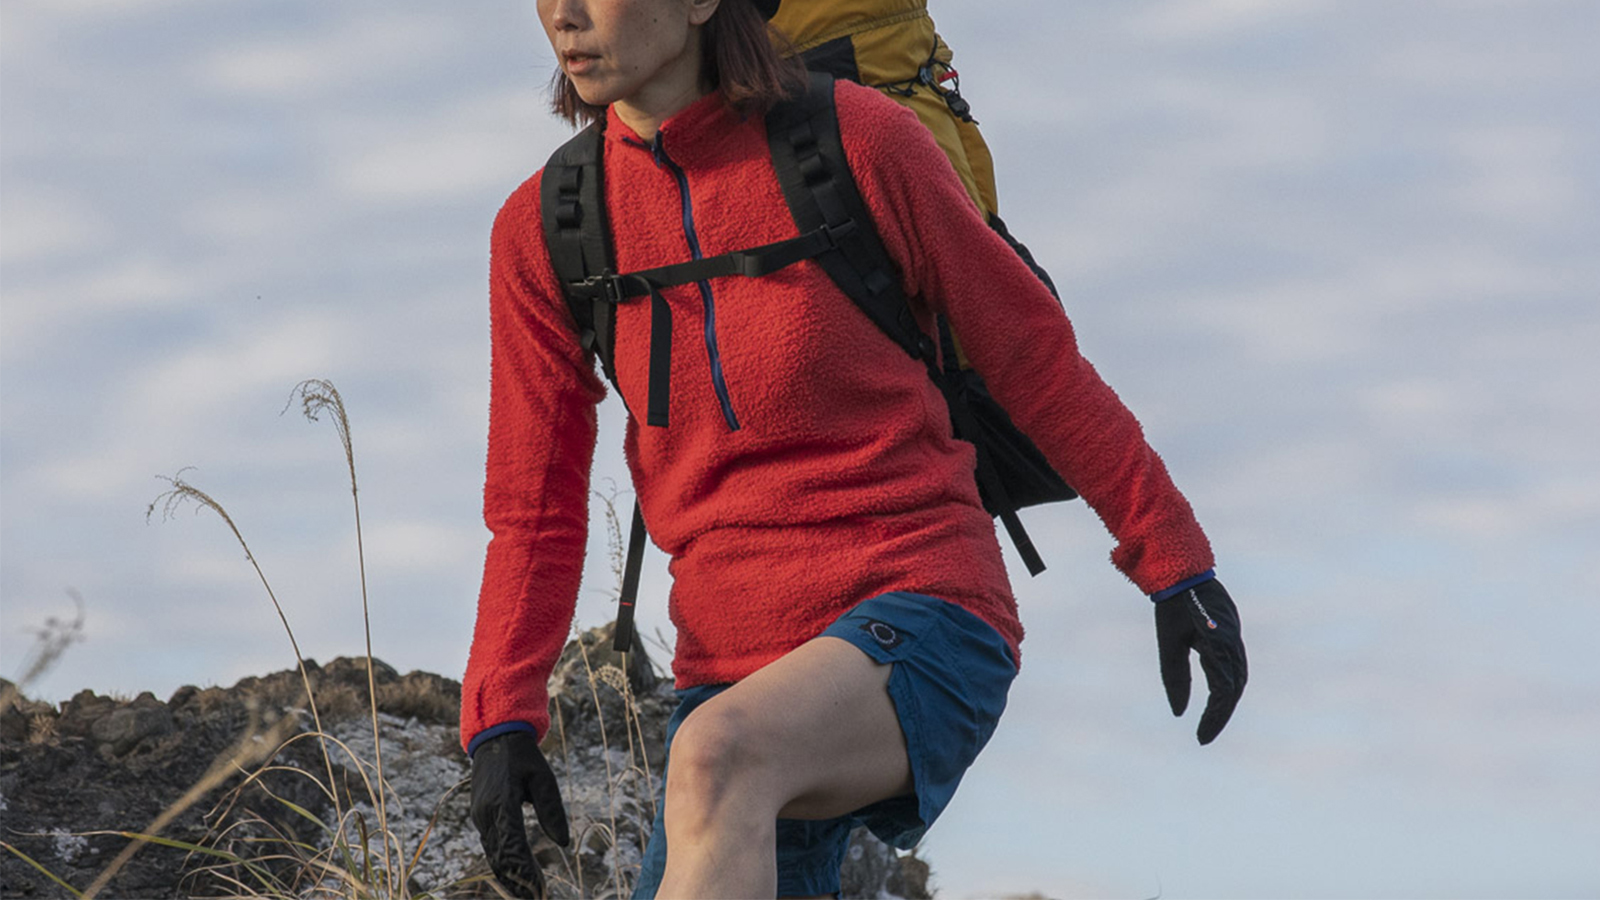
In spring, I choose light layers with good ventilation and sun protection. On a typical trip, I’d wear a wool base with a thin synthetic hoodie, but this time I expected steady wind along the ridgeline and colder mornings, so I went with the OMM Core Hoodie paired with a wind jacket.
The Core Hoodie’s mesh fabric stays comfortable even as temperatures rise — it breathes well in wind, so I can keep the hood up all day without overheating. Only in sheltered valleys did it feel warm; otherwise, it was just right. On sunny days, I wore only the hoodie while moving, and even after six days, sweat and odor were minimal.
For the wind layer, I use the Rab Borealis Jacket — technically a softshell. It’s more breathable than most wind jackets and vents moisture well. The alpine-style hood fits over a helmet, and the two large chest pockets easily hold climbing skins. It’s stretchy and never feels restrictive, though the fabric loses some elasticity after a few years — still, I keep buying the same one again.
My hardshell setup wasn’t winter-specific; I wore the Norrona Bitihorn Gore-Tex Active Jacket with Bitihorn DRI3 Pants — both lightweight and boot-compatible. Since I carried the jacket most of the time and the forecast called for clear skies, I kept rain protection minimal. If heavy weather had been expected, I’d have chosen a thicker shell.
I alternated between Rab Khroma Tour Infinium Gloves (leather, for skiing) and Finetrack Everbreath Winter Trail Gloves (synthetic, for hiking). Both performed beautifully, and if rain were in the forecast, I’d have packed waterproof over-gloves, but I left them behind this time.
For this trip, I chose DexShell Hytherm Pro waterproof socks to block moisture from both melting snow and sweat. They kept the boot liners clean and odor-free — a plus for the train ride home — and their thickness helped prevent blisters. They never fully dried in the field, but an hour of sun would’ve done the trick.
Finally, a note on a common problem during long traverses: chafing. I’ve dealt with it before, so this time I took precautions. The fix is simple — prevent skin-to-skin contact. When wearing long tights, layer briefs underneath, and carry a small tube of anti-inflammatory ointment just in case.
Other gear
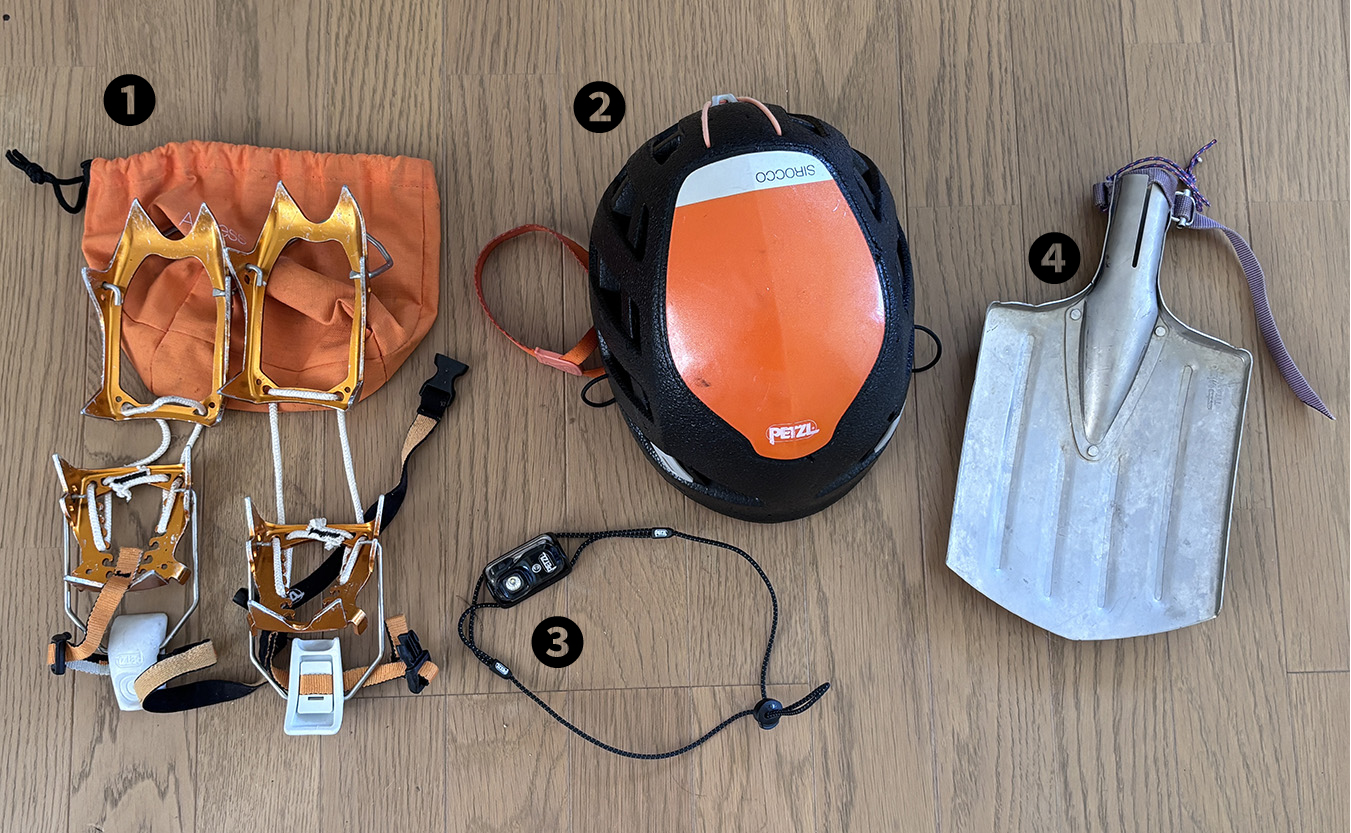
❶ Crampons: Petzl | Leopard LLF
❷ Helmet: Petzl | Sirocco
❸ Headlamp: Petzl | Bindi
❹ Shovel: MIZO | Mole Titanium Shovel (tip only, used with ice axe)
Ice Axe: Petzl | Ride (lost during the trip)
Both the crampons and ice axe are aluminum. On this ridgeline traverse, I spent roughly 70% of the time skinning and 30% walking in crampons. As I mentioned earlier, I didn’t want to keep taking off my pack each time I switched modes, so I clipped my crampons, ice axe, and ski crampons to carabiners on the hip belt while moving.
The shovel was mainly for leveling tent sites and cutting snow blocks. Its titanium blade with a sharp tip made it perfect for chipping away at the hard spring snow.
For the helmet, I added a simple rubber loop that lets me attach it directly to the pack’s ice axe holder when not in use. As for the headlamp, I’d like to eventually switch to a USB-C rechargeable model to cut down on cables, but the weight savings aren’t significant — so I’ll keep using this one until it finally gives out.
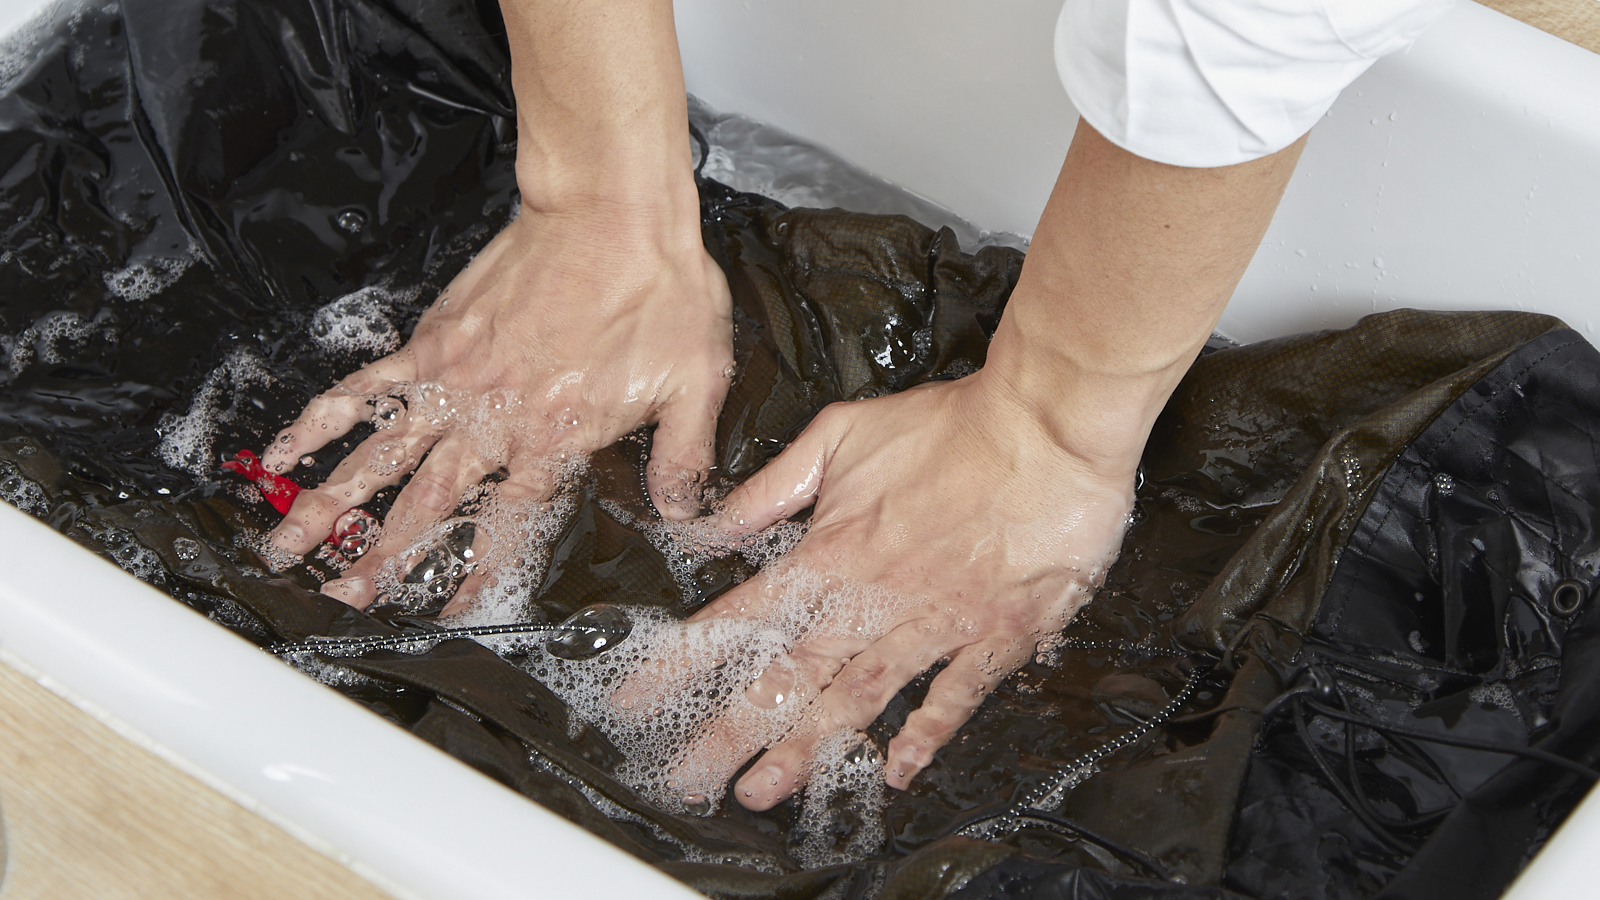
Tip: Utilizing your helmet
A helmet can double as a wash basin. Line it with a ziplock bag, pour in water heated to about 50°C, and you’ll have just enough for a quick wash inside the tent. Wipe your body with a small towel, then soak your feet — it feels unbelievably good after a long day in the snow.
The secret to staying warm through the night is simple: before bed, wash away sweat and body oils with hot water.

Shelter
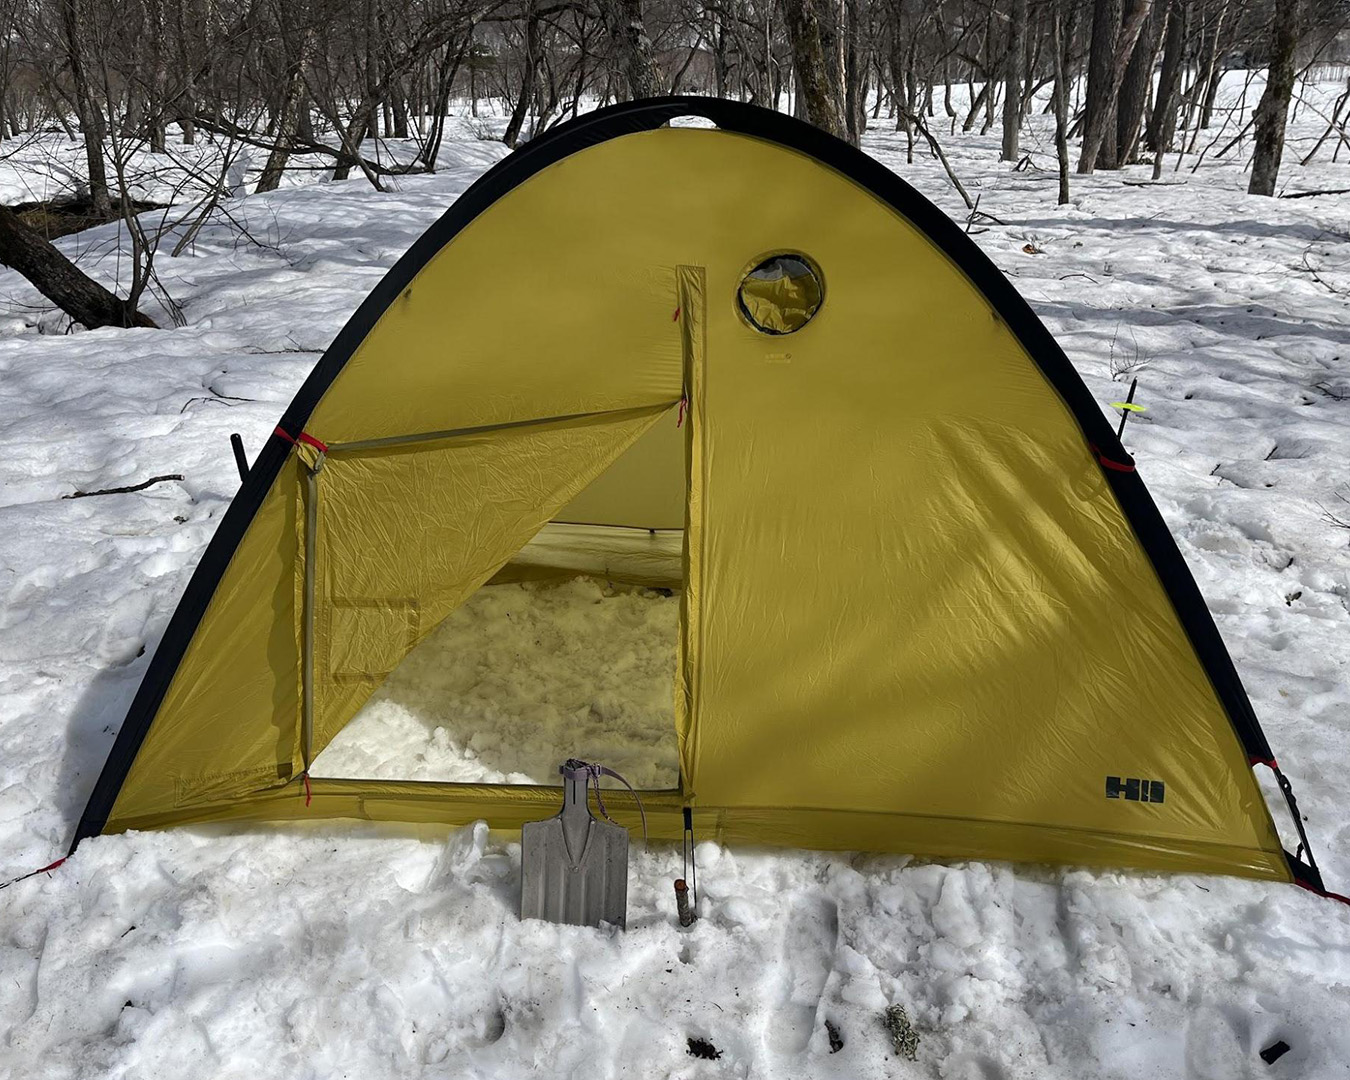
Heritage | Crossover Dome 2
The interior is completely floorless, but once it’s well pegged down, the structure is solid and stable.
I modified a lightweight two-person dome tent to use as a floorless shelter. For the spring snow season, I cut out the floor to better handle rain — when condensation or meltwater forms inside, the snow beneath simply absorbs it. I left the fabric flaps around the base intact, so in strong winds I can pile snow blocks over them from inside the tent to lock everything down solid. When cutting snow blocks for walls, I dig out the entrance area, which naturally creates a small “doma” — an earthen-style floor space inside. By opening a small vent on the downwind side near the ground, I can keep air circulating and prevent oxygen depletion in bad weather. I developed all of these techniques over years of basecamp life in the Tateyama range.
As I mentioned earlier, the main weaknesses of the Crossover Dome are water pooling on the floor during rain, reduced breathability leading to poor ventilation, and the vents becoming useless in storm conditions. By going floorless, I’ve managed to solve all of these issues.
In my system, I use a bivy or simple shelter (tsheruto) during the dry midwinter season, and switch to the Crossover Dome in the spring snow season when rain is more likely. Each has its place, depending on the weather and conditions.
Strong winds or heavy rain? Stack snow blocks inside for stability
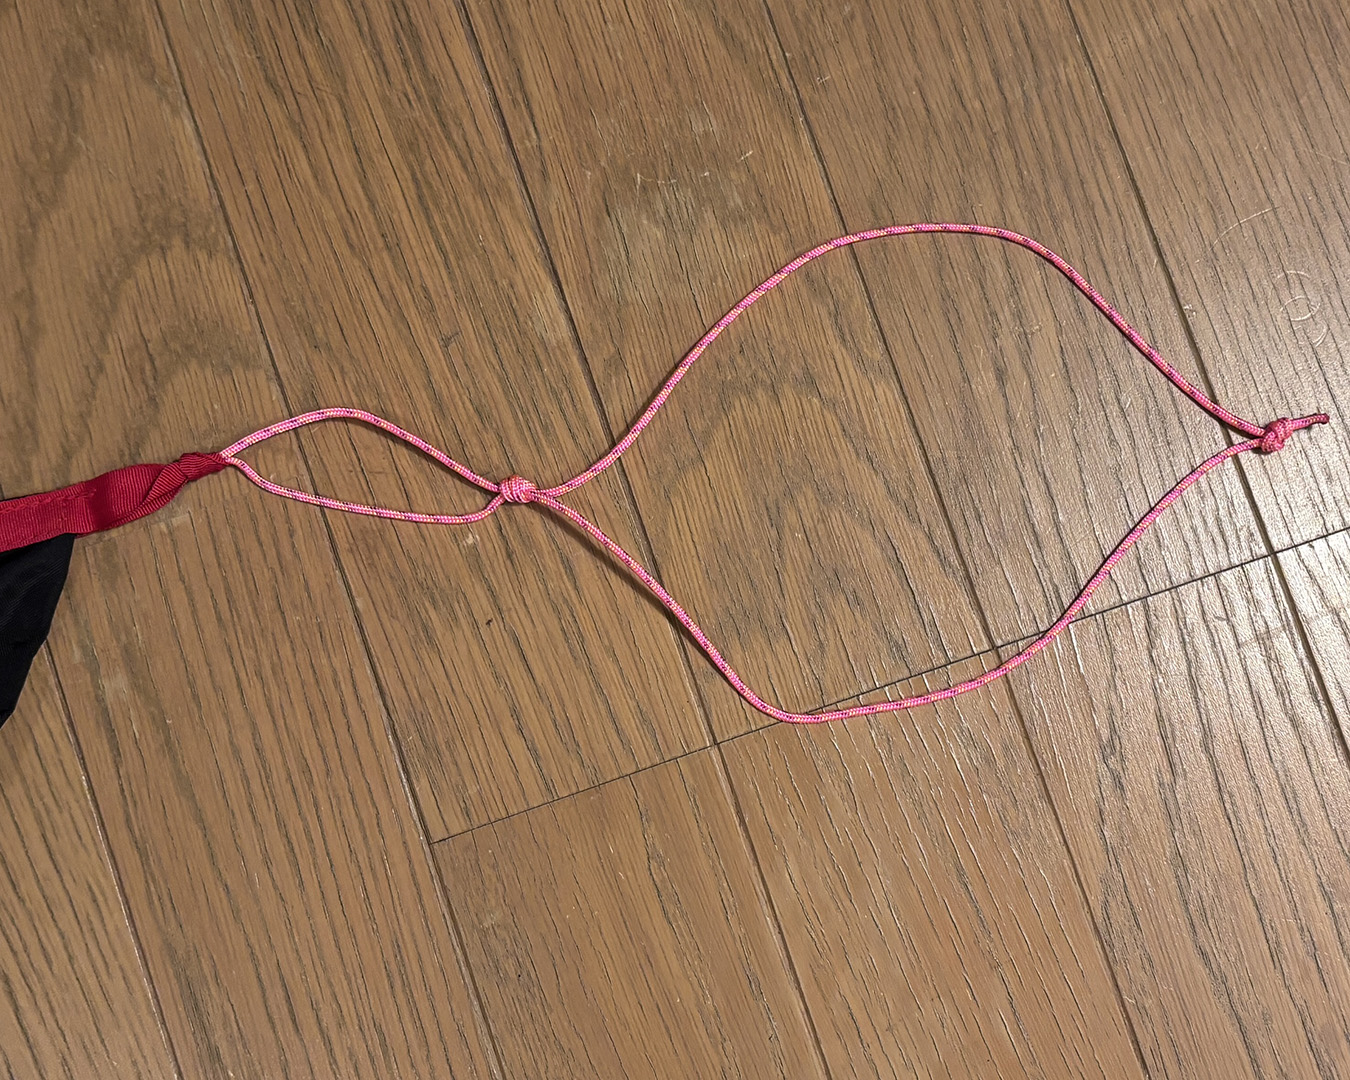
Tip: Anchoring a tent
For pegging down the four corners, I use my skis and poles driven directly into the snow, then attach four guylines to them. This method lets you keep the guylines shorter and still withstand strong winds. Because both skis and poles have a bit of flex, they also reduce stress on the tent fabric.
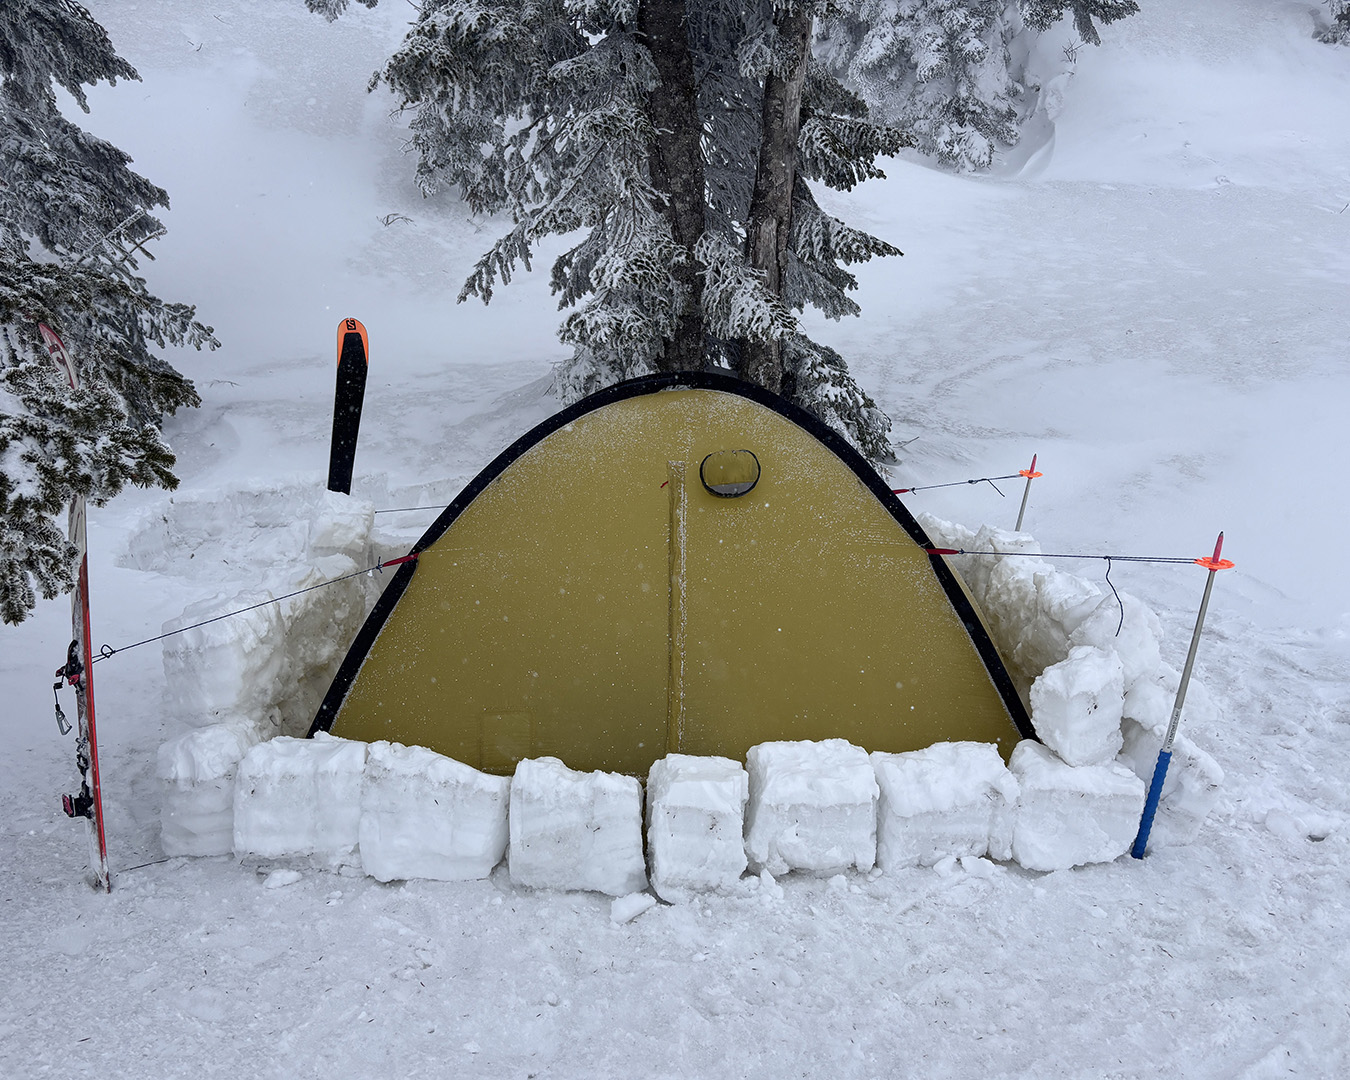
Tip: Guylines and loops
At each corner, I tie two different-sized loops so they can work with either skis or poles. During the spring snow season, I often use tree branches as anchors too, depending on the conditions.
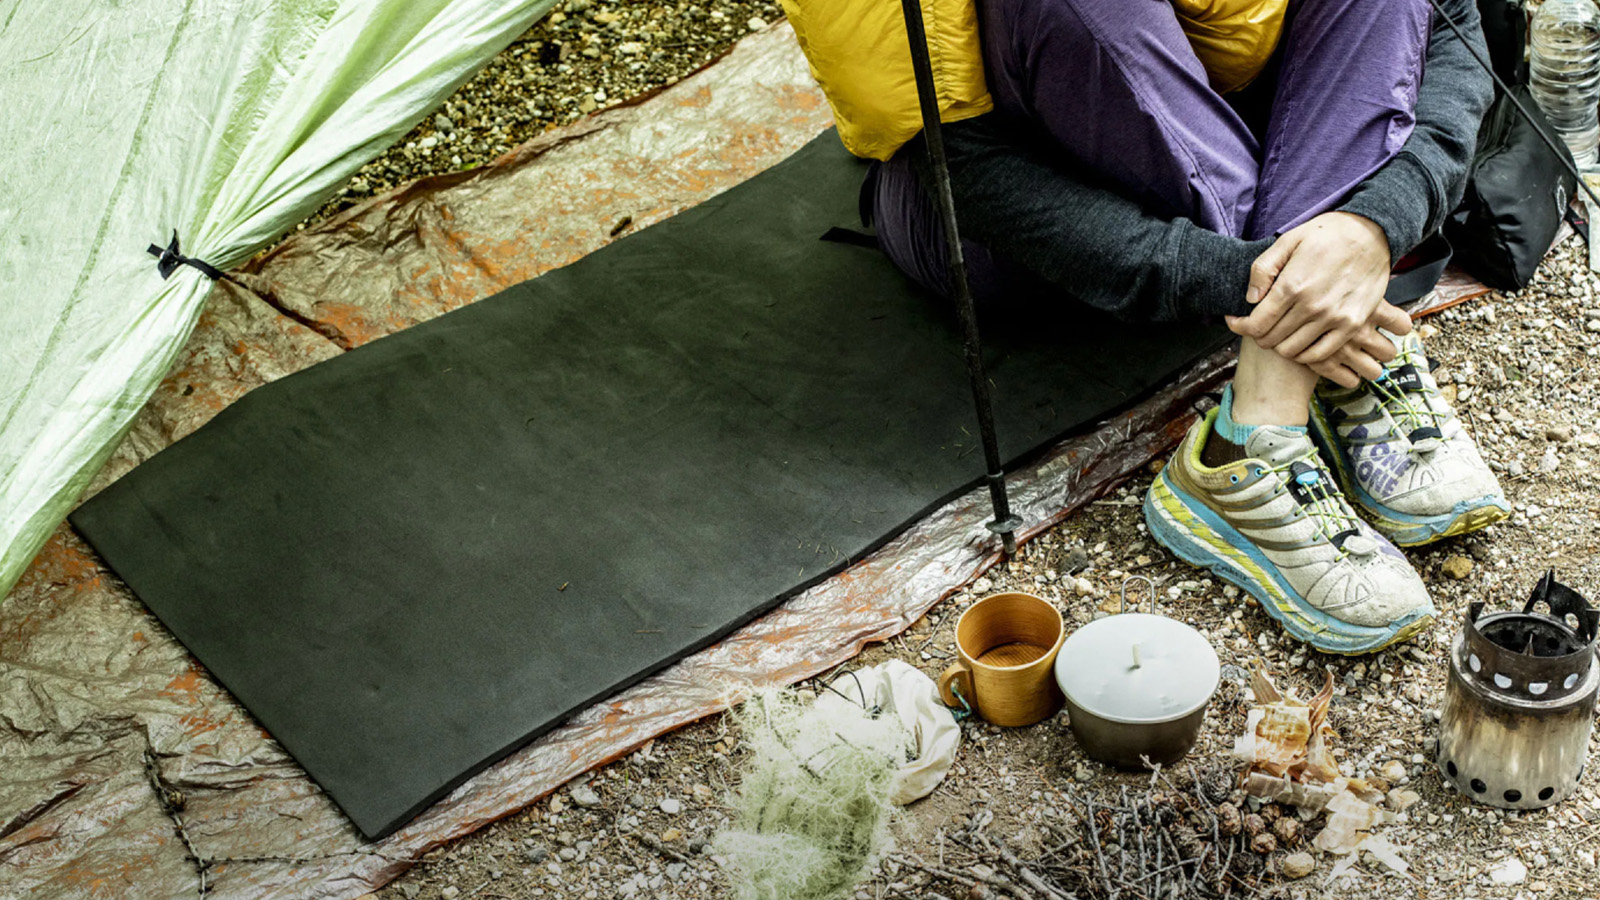
Sleep system
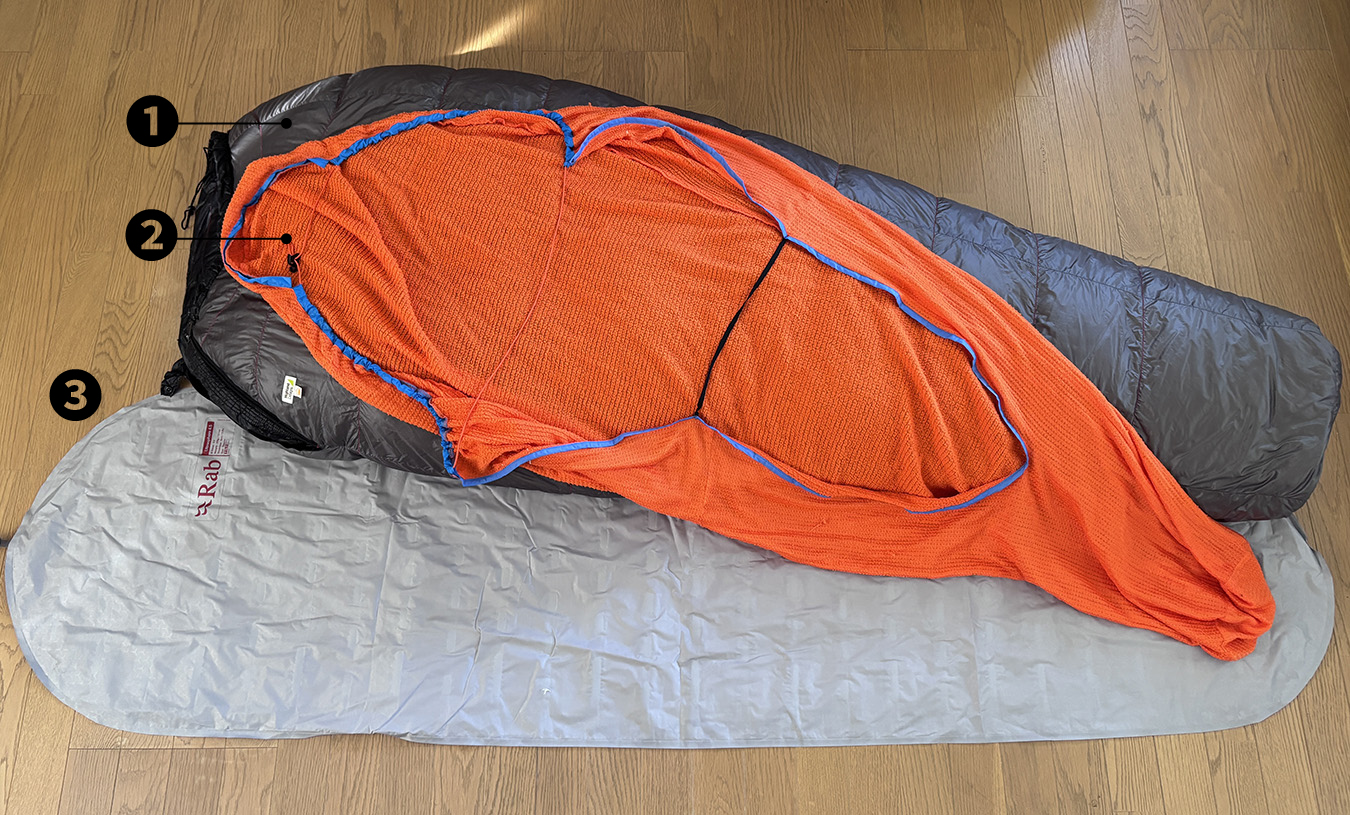
❶ Sleeping Bag: Highland Designs | Winter Down Bag
❷ Sleeping Bag Cover: OMM | Core Liner (modified)
❸ Sleeping Pad: Rab | Ultrasphere 4.5
I used a sleeping bag weighing around 900 grams. Having once experienced –26°C in Oze in April, I always go with a true winter model — the Highland Designs Winter Down Bag — even for spring trips. As I often say, trying to save weight on a sleeping bag is foolish.
To protect the bag from condensation, I layer a modified OMM Core Liner, quilt-style, over the top as a sleeping bag cover. For insulation, I chose the Rab Ultrasphere 4.5, a winter air mat with an R-value of 4.3. Inside the tent, the nighttime low dropped to about –5°C, but with this setup I never once felt cold.
While air mats do carry a puncture risk, that risk is lower when camping on snow. Still, it’s worth taking care to keep sharp gear — like your shovel or tent poles — away from the mat when packing or moving inside the tent.
I left it out this time, but if rain were in the forecast, I’d add a sleeping bag cover made from eVent fabric. In a spring storm, if anything were to go wrong with the tent, that waterproof layer would serve as the last line of defense.
Sleep wear
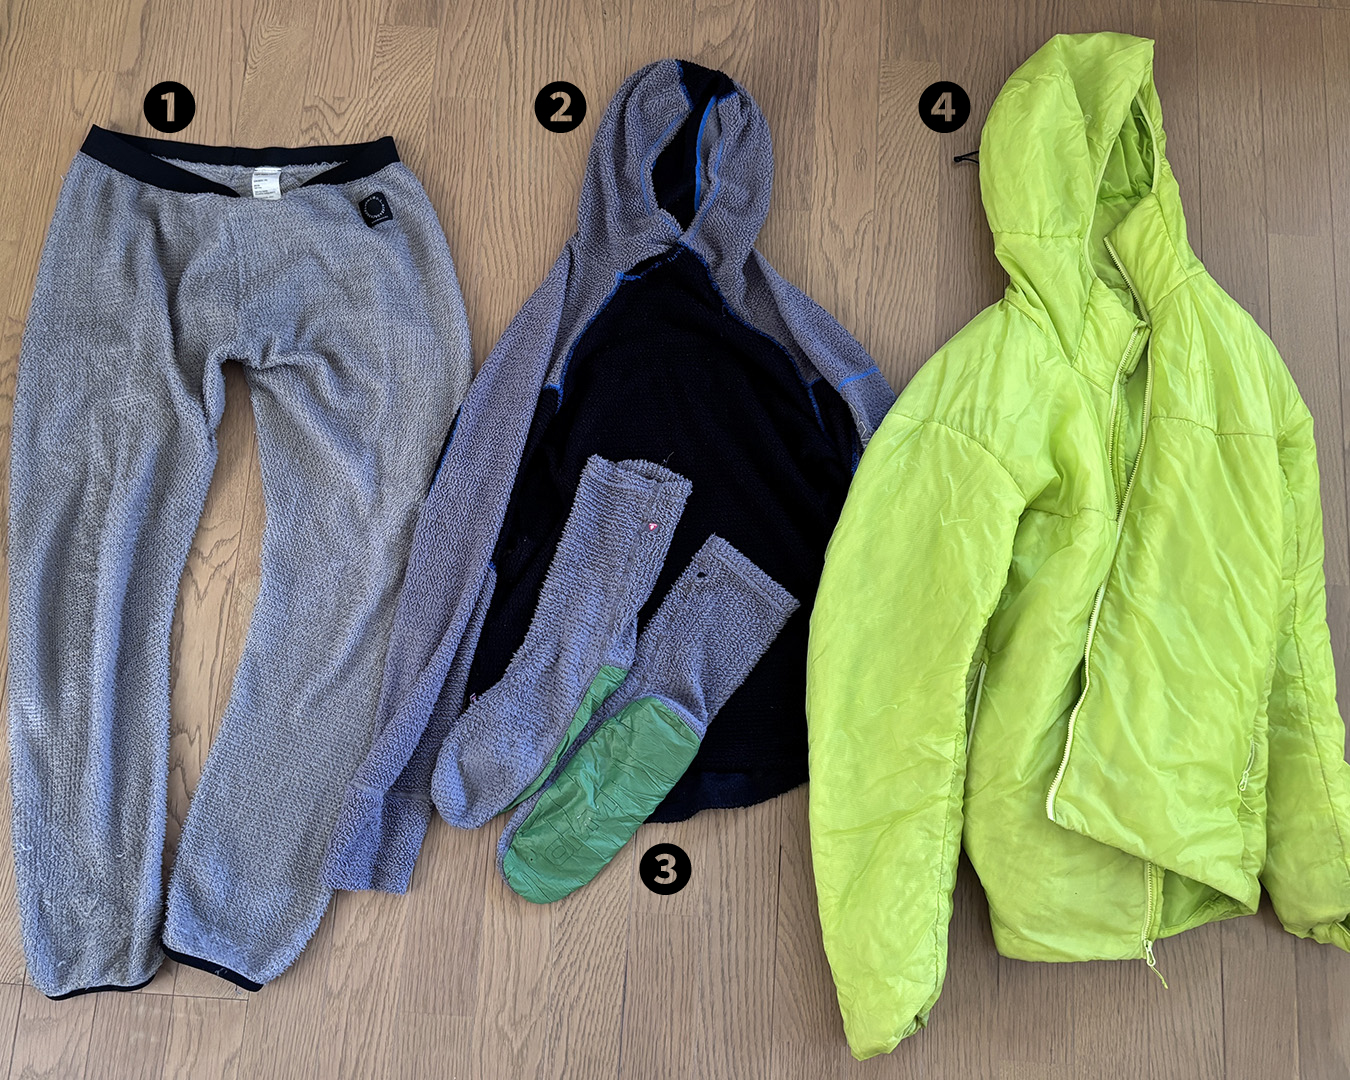
❶ Yamatomichi | Light Alpha Tights
❷ OMM | Core+ Hoodie
❸ OMM | Core Tent Socks
❹ Arc’teryx | Nuclei FL Hoody
Because my sleeping bag is warm, I keep my sleep clothing to a minimum. I use the Arc’teryx Nuclei FL Hoody, a synthetic insulated jacket that also works for active use, along with an active insulation base layer as my pajamas. Merino wool and natural down don’t always perform well on long trips in Japan’s humid Sea-of-Japan climate. With how far synthetic materials have come in recent years, I now rely almost entirely on synthetics except for my sleeping bag.
On long trips, never sleep in the same clothes you hike in. I once read in an old SAS field manual (from the British special forces) that even on operations, no matter how dirty the day gets, soldiers always change into dry clothes stored in a dry bag before crawling into their sleeping bags. That simple step directly affects sleep quality and recovery.
Before turning in, I either wash with warm water or, if that’s not possible, wipe my body with a towel soaked in hot water before changing into dry clothes. Leaving sweat and oil on your skin prevents evaporation and makes it harder to warm up. If your back feels cold, it’s usually not the sleeping pad — it’s your body failing to regulate heat.
Wearing sweaty or smelly clothes inside your sleeping bag will eventually make the bag itself smell and reduce sleep quality. I used to wear merino wool as sleepwear, but today active insulation pieces are far superior. Whether it’s Primaloft Active or Alpha Direct, the difference in performance is minor — just choose whatever feels best against your skin. They also double nicely as backup layers for hiking or for the trip home.
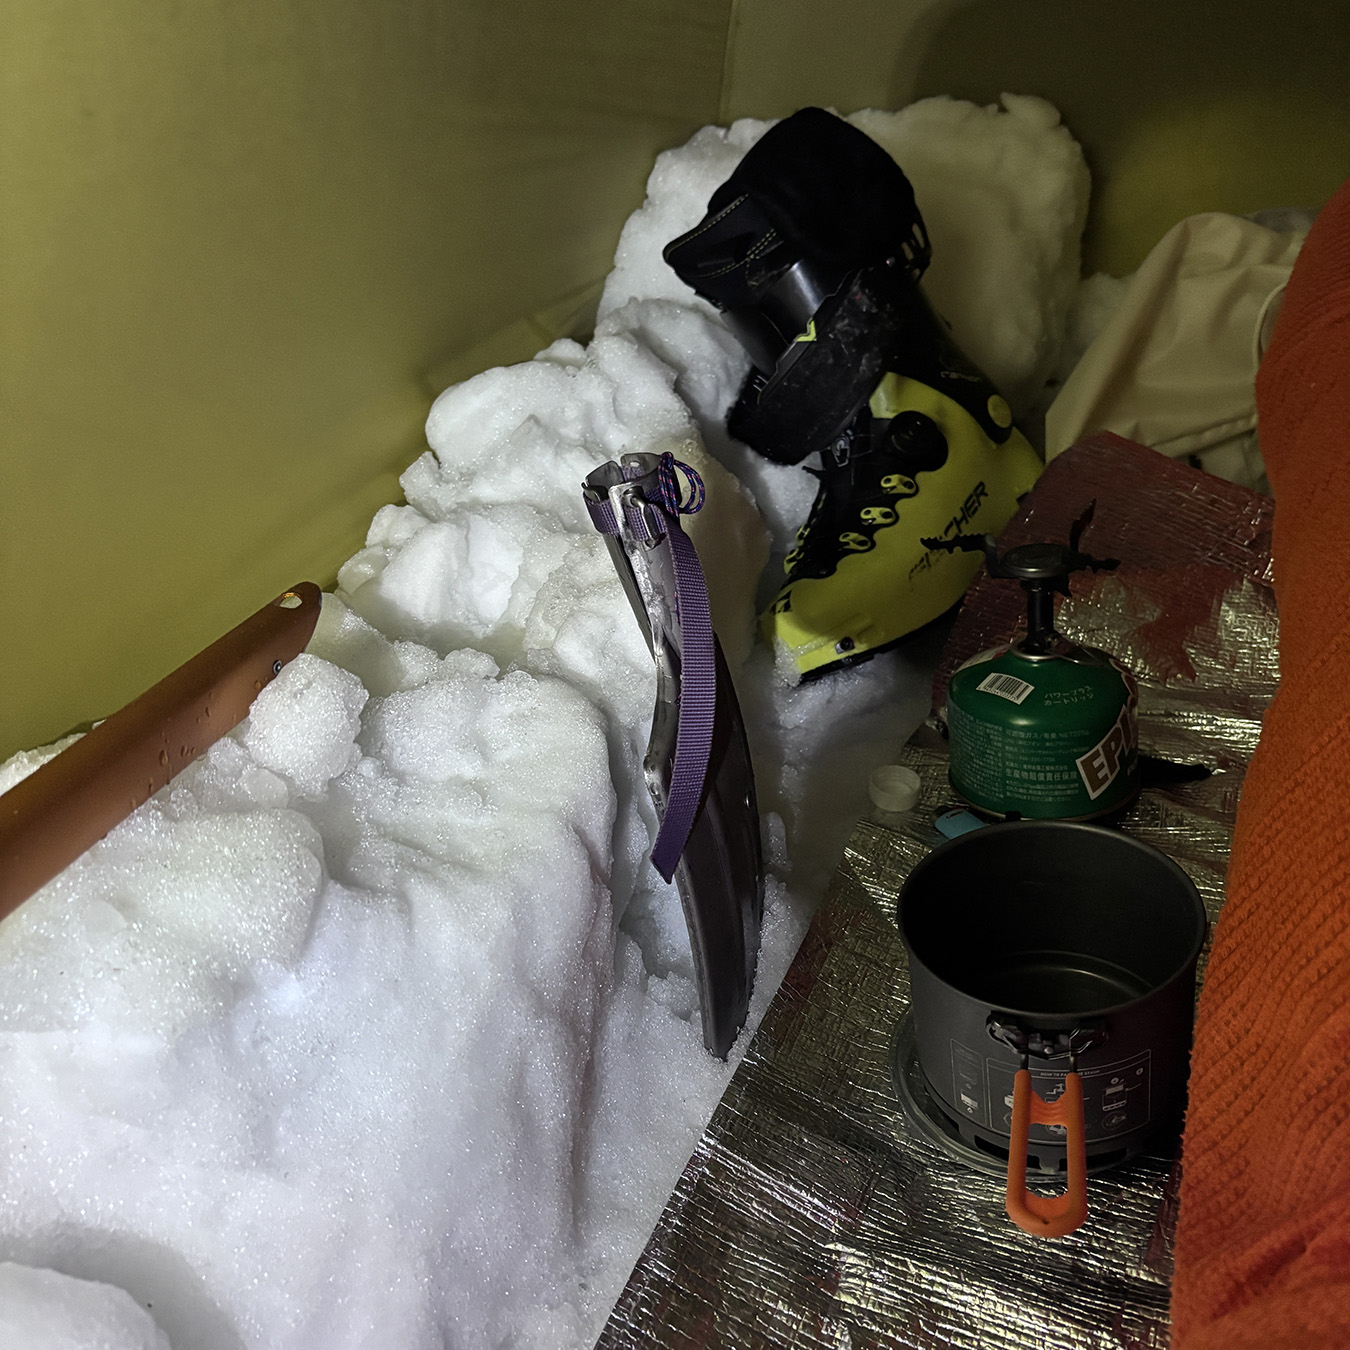
Cookware
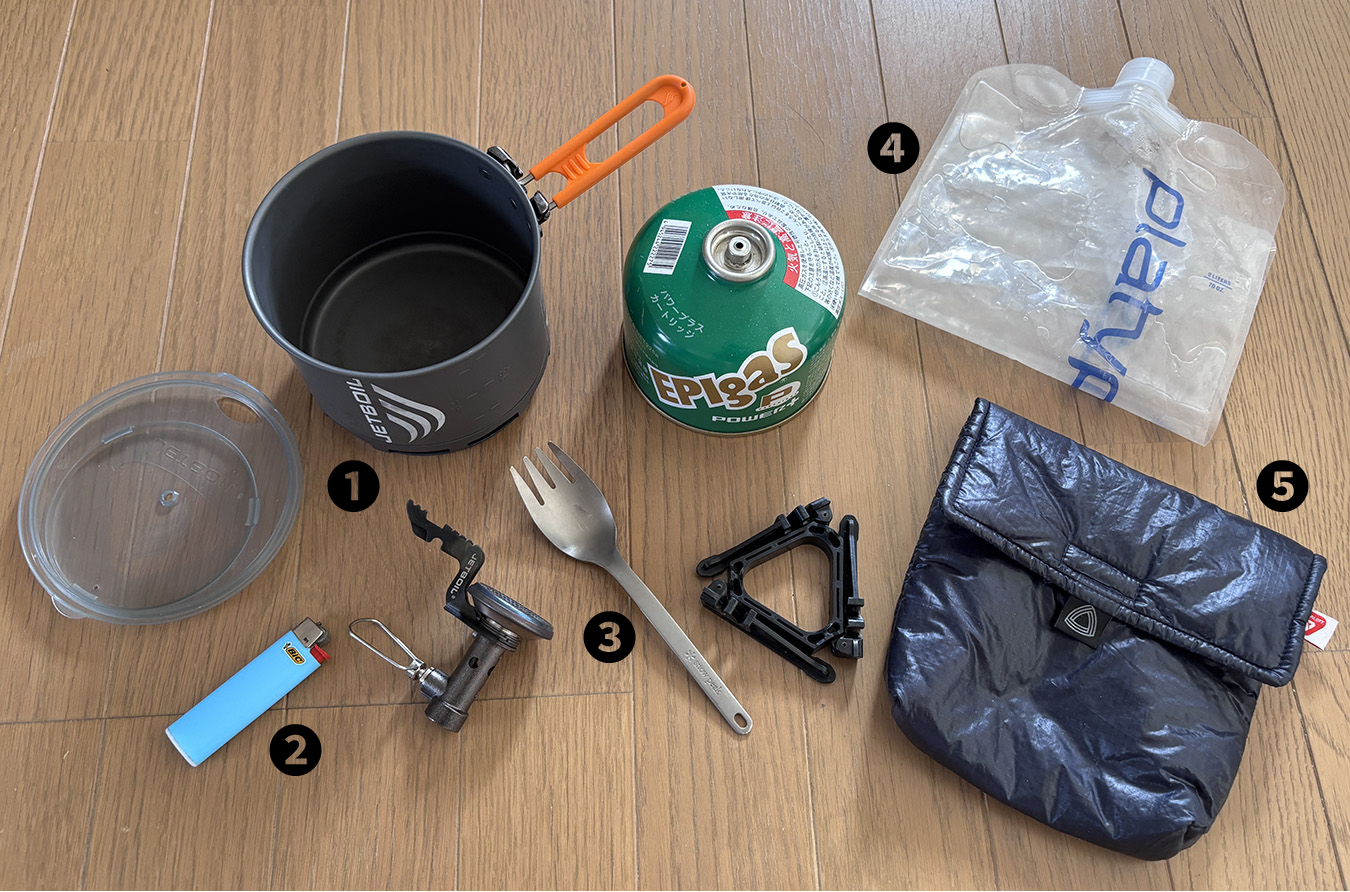
❶ Jetboil | Stash
❷ BIC | Lighter
❸ Snow Peak | Spork
❹ Platypus | 2L Bottle
❺ Trail Bum | P.I. Pouch
For winter mountains, I use the Jetboil Stash, a high-efficiency gas stove with a built-in heat exchanger. Over six days, I melted snow for 2–4 liters of water per day, plus hot water for meals, drinks, and even washing, all on a single 250-gram gas canister—with fuel to spare.
To save gas, I kept cooking simple: mostly freeze-dried rice meals and minimal water-boiling. The Stash’s flame isn’t the strongest, but it burns steadily, and I never found it lacking. The 0.8-liter pot is just the right size for melting snow and preparing water, and I didn’t need any backup fuel.
For water storage, I kept a Platypus reservoir inside the pack and two plastic bottles in the shoulder-strap pockets—about 2 liters total while on the move. For lunch, I packed rice balls in an insulated pouch to keep them from freezing.
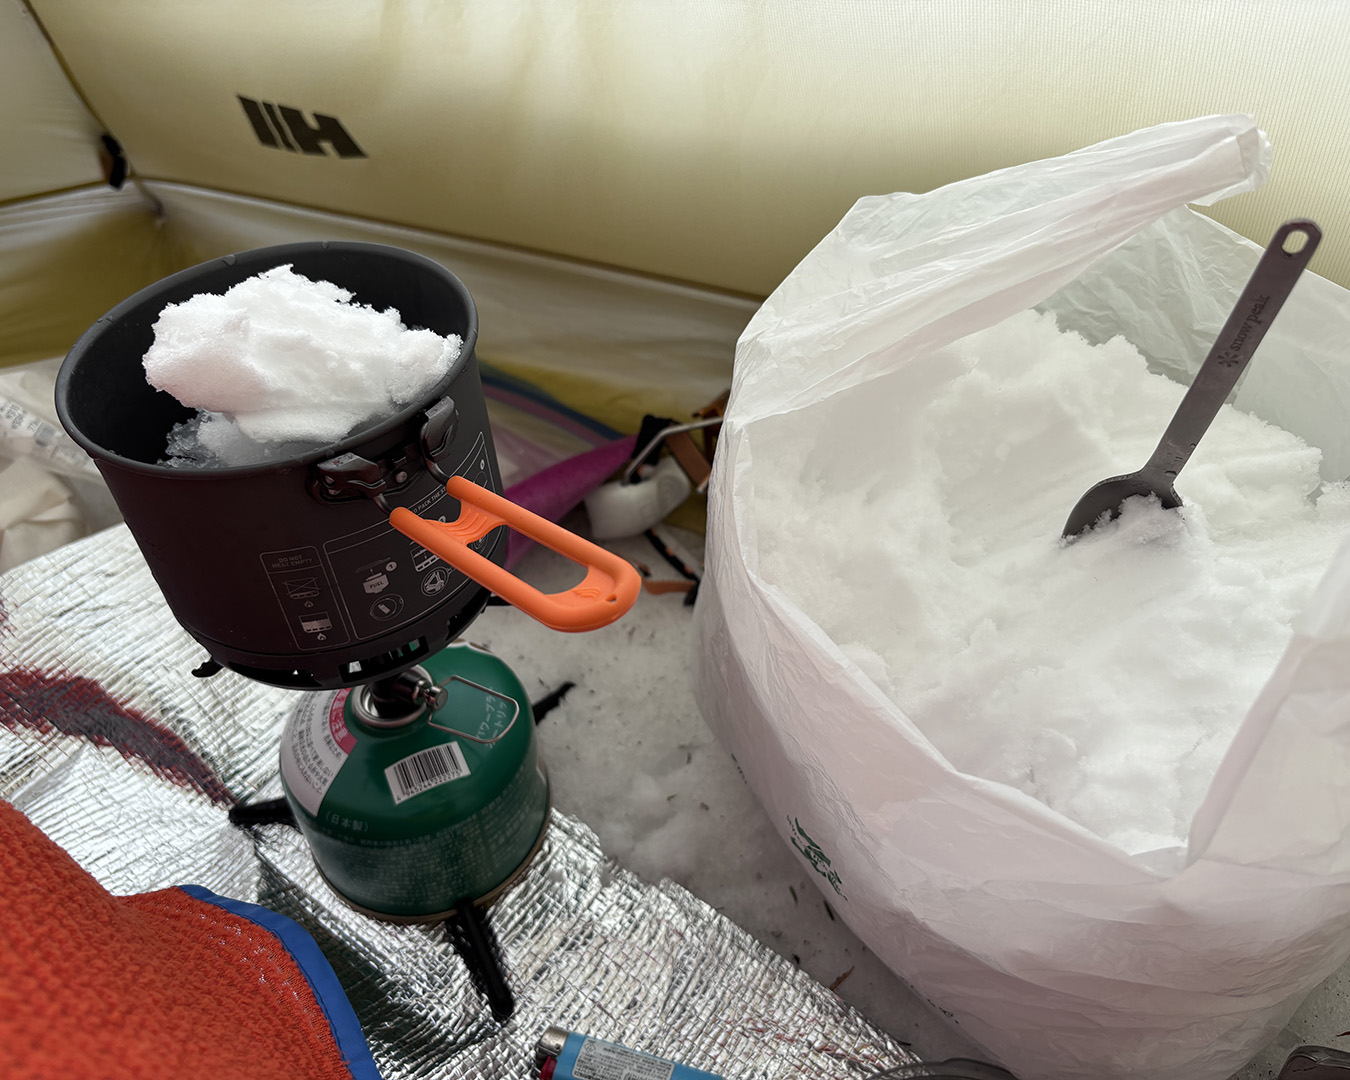
The humble convenience store bag — ideal for collecting snow.
Food
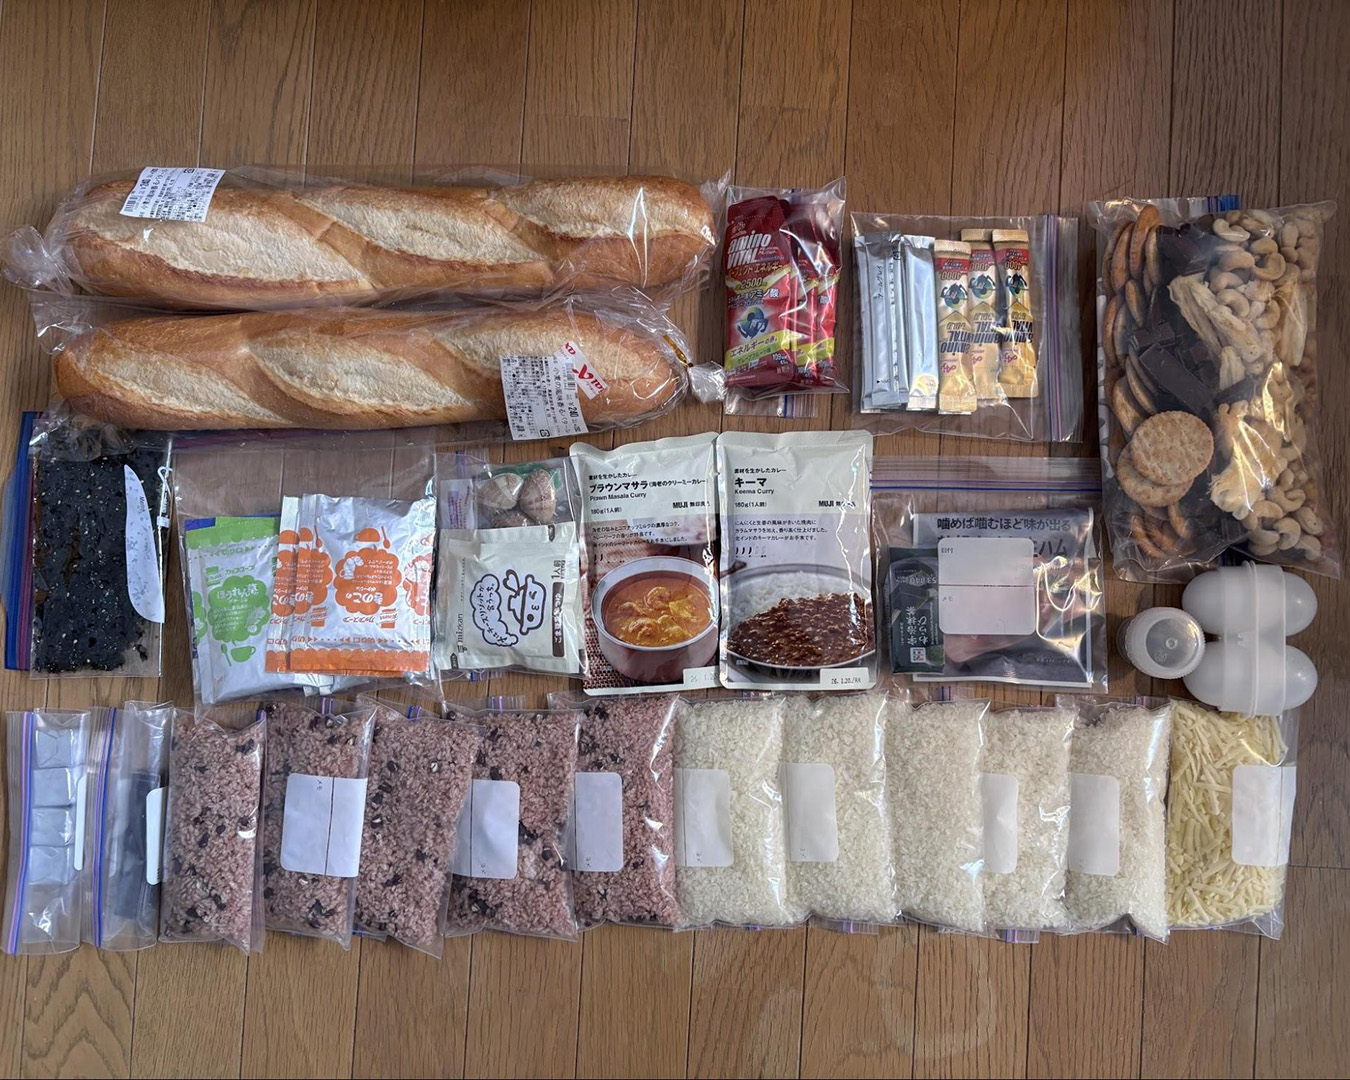
Breakfast: Baguette and soup
Lunch: Freeze-dried rice balls
Dinner: Curry or soy milk soup with clam rice porridge
Trail Snacks: Nuts, chocolate, energy gels, and more
For multi-day traverses, keeping food weight down means relying mostly on freeze-dried rice. I packed meals for four nights and five days plus one reserve day, but with a weather delay, the trip ended up lasting five nights and six days.
Living in Minamiuonuma, Niigata, where top-grade Koshihikari rice is part of daily life, I find freeze-dried rice a bit hard to love. This time, I tried to make it more palatable — mixing it with curry, soy milk soup, or shaping it into rice balls.
The Muji curry packs were as reliable as ever — tasty and hard to get tired of. One trick: after heating the pouch, shake it several dozen times to emulsify the contents; it makes a noticeable difference in flavor. The soy milk porridge, on the other hand, was a disappointment. The soup was fine, but the rice texture was off. If I use the same soup base again, I’ll switch to noodles instead.
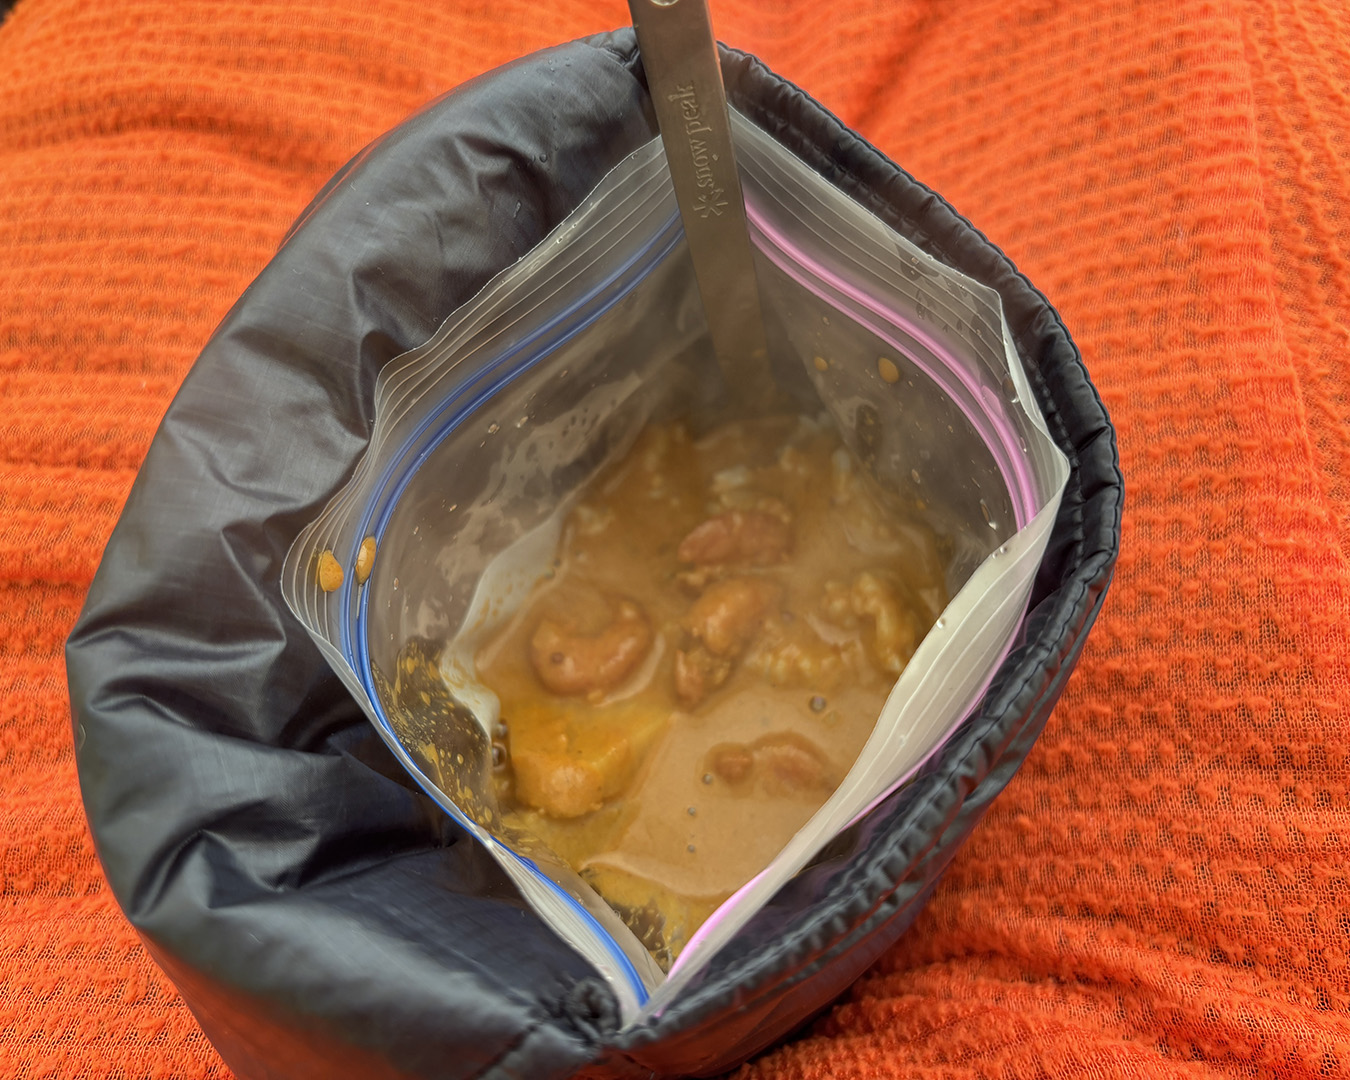
Muji curry, keema flavor — my go-to on the trail.

A mix of soy milk soup and clam miso turned into rice porridge — next time, I’ll use noodles instead.
The rice balls, on the other hand, were a huge success. When rehydrating freeze-dried rice, adding a small piece of kombu gives it extra umami and makes it surprisingly delicious. I made both red rice (sekihan) and plain white rice versions, and both turned out great.
The Onisi red rice comes with a small salt packet, but I recommend swapping it for a better, more flavorful salt. This time, I brought goma-shio (sesame salt) from home. For seaweed, shredded nori works best. After rehydrating the rice, I shaped the balls directly inside a ziplock bag, which kept things tidy and easy.
Next time, I’ll make all my freeze-dried rice into rice balls — with different fillings, it’ll be impossible to get bored.
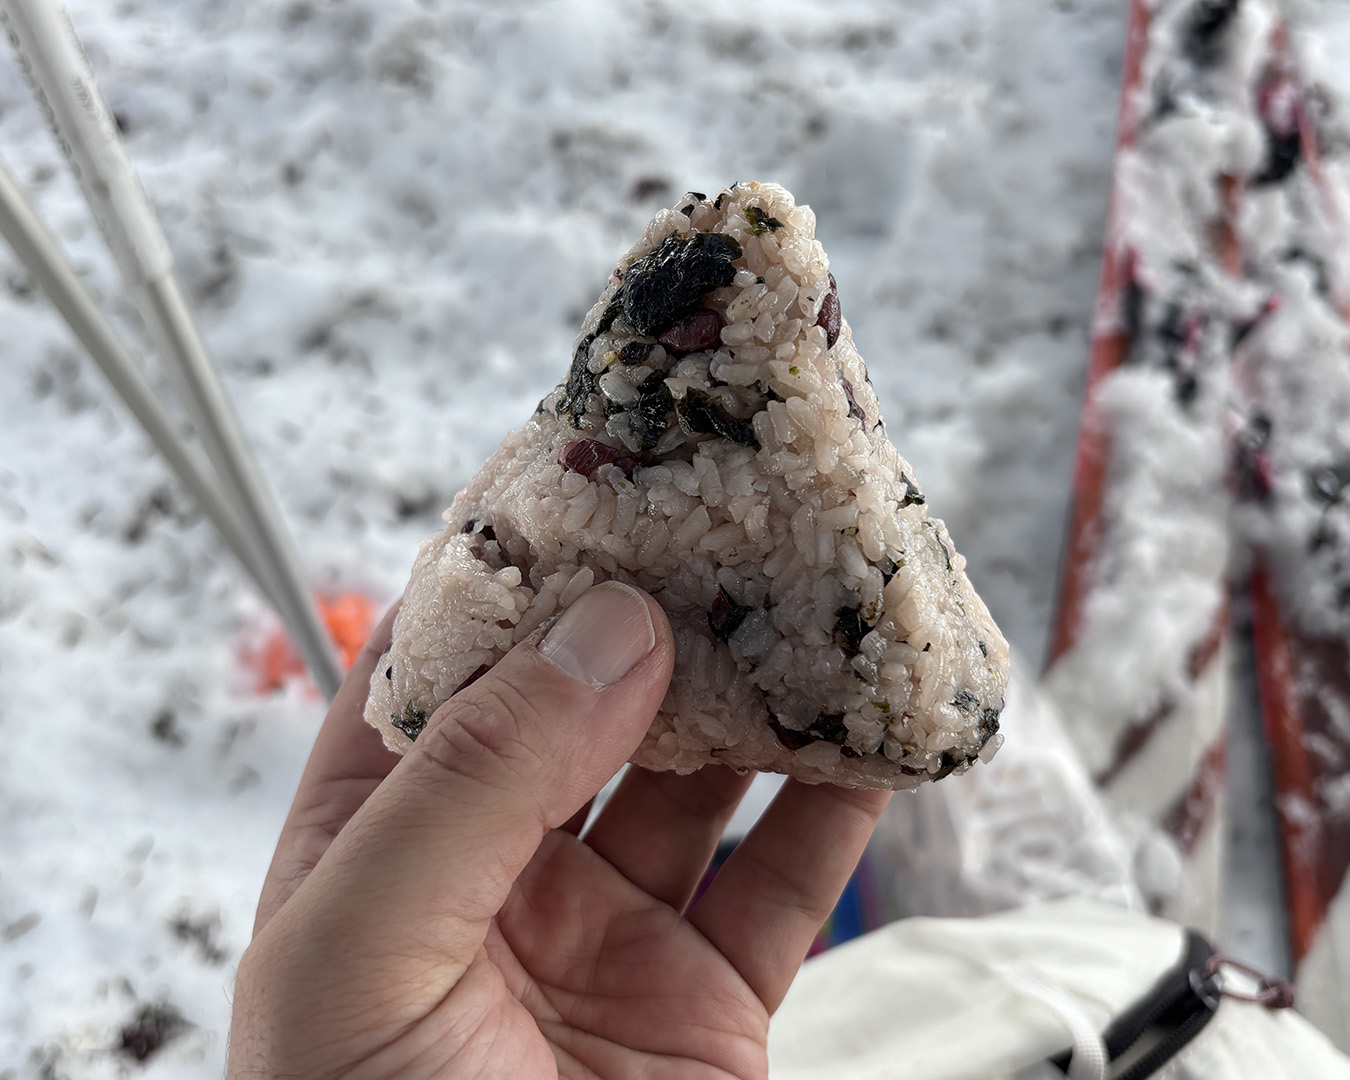
Lunch — freeze-dried rice balls. The red rice’s chewy texture stood out.
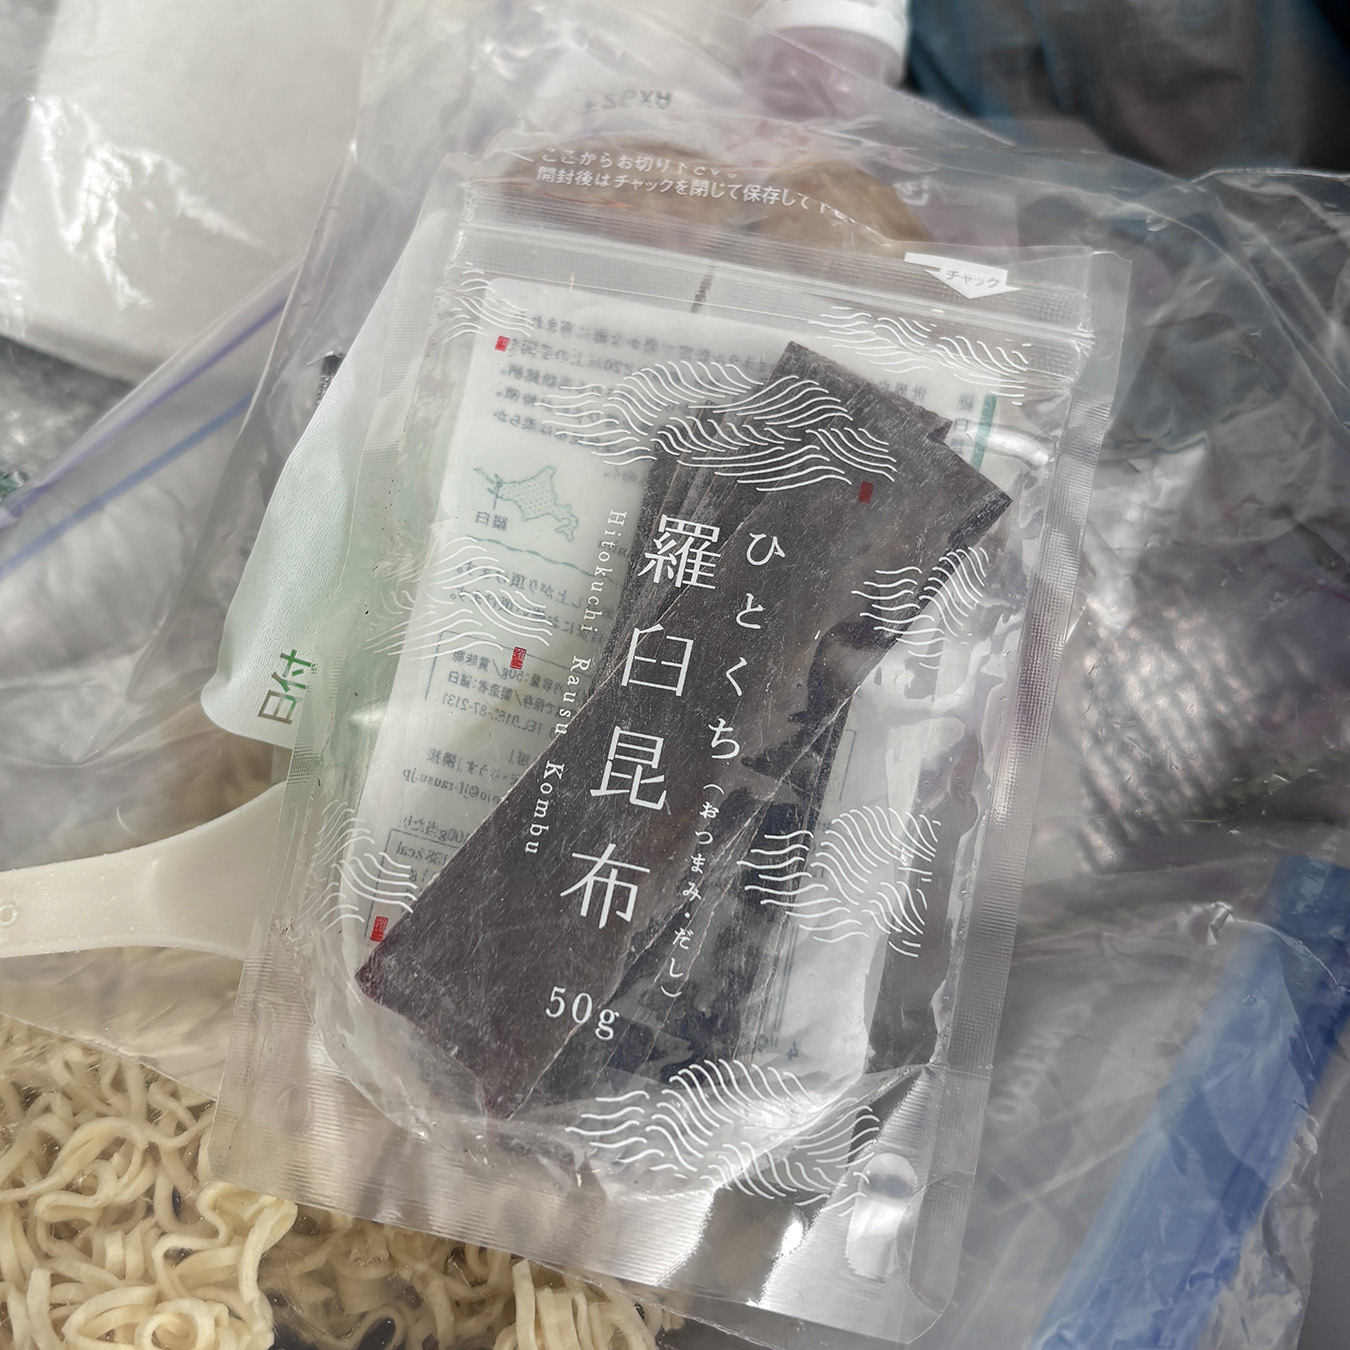
Most mountain food lacks umami — kombu is the cure.
By the third day, I was tired of baguettes for breakfast — I should’ve added a bit more variety in flavor. This time, I brought energy gels and amino acid powder for recovery, and they seemed to work well. Overall, I didn’t feel short on anything, but since my pack still felt light, I probably could’ve afforded to bring a few more comfort foods for morale.
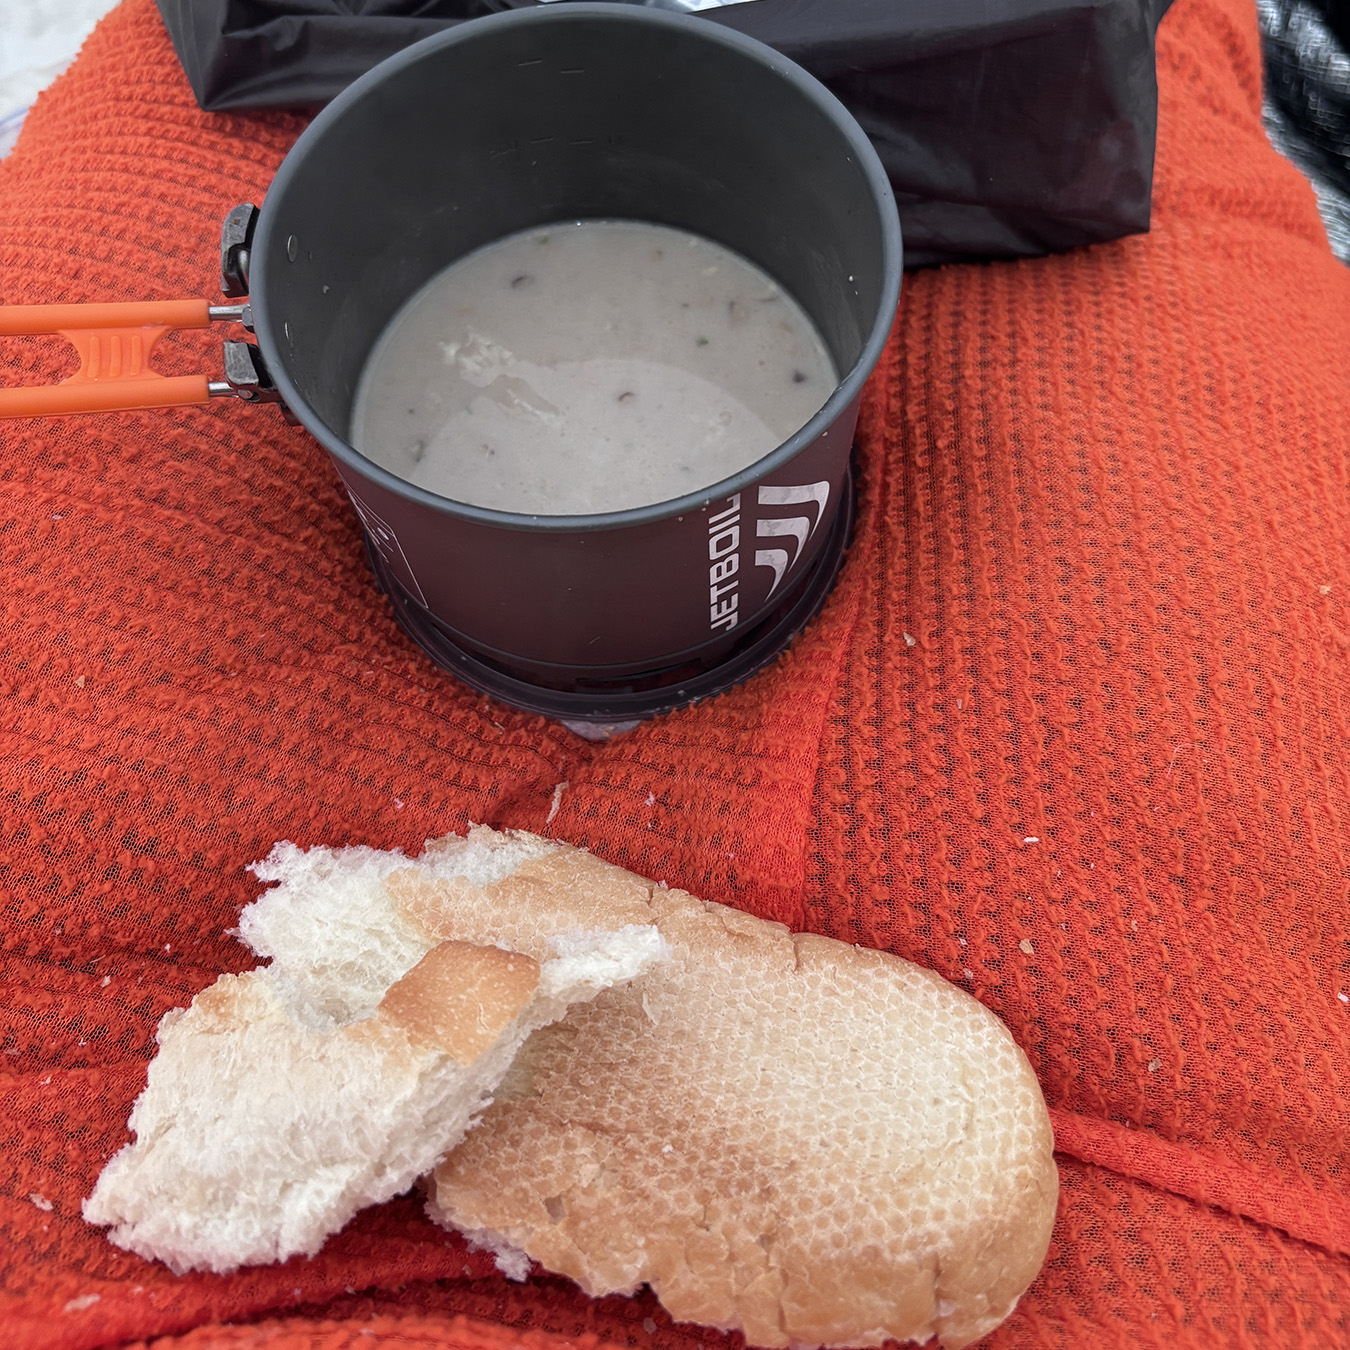
Baguette and soup for breakfast — next time, ham or cheese for variety.
Batteries
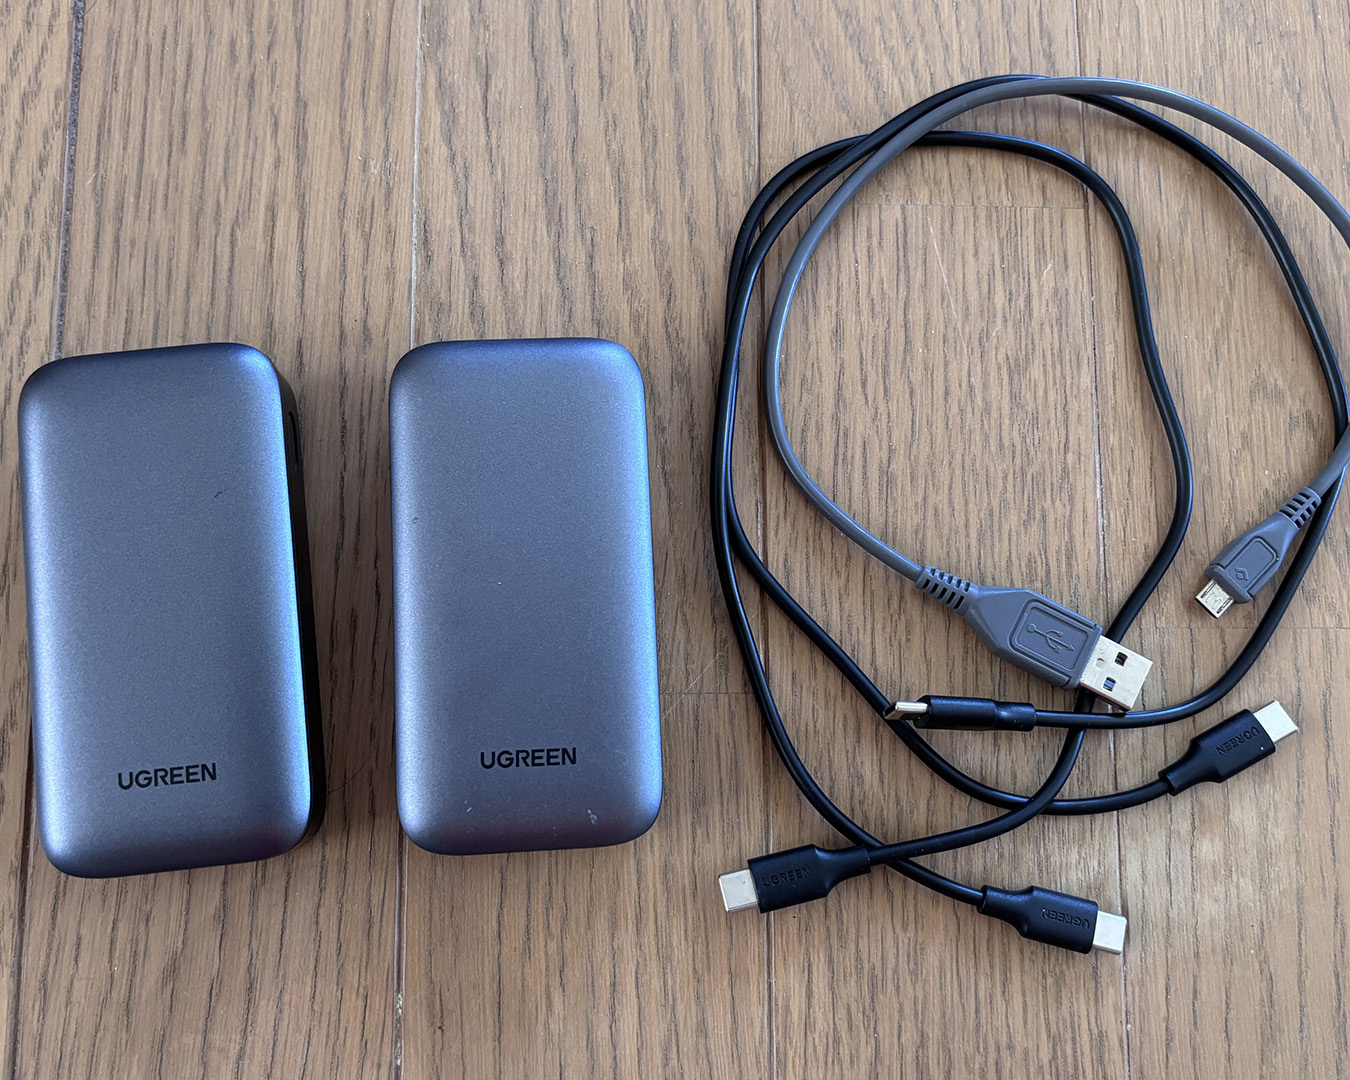
UGREEN | Nexode 10,000 mAh 30 W × 2 units
I carried an iPhone 15 for communication, GPS, and photography. Since it charges via USB-C, a PD-compatible (Power Delivery) high-capacity mobile battery is essential. I brought two, just in case, but because the iPhone 15’s internal battery is large, using only GPS and the camera in airplane mode kept daily battery use to around 30%. In hindsight, one power bank would’ve been enough, but if you end up checking social media whenever there’s a signal, you could easily drain it faster—so carrying a backup is probably wise.
PD (Power Delivery) is a USB-C charging standard capable of delivering up to 100 W of power.
For cables, I packed one main USB-C, a spare USB-C, and a USB cable for the headlamp, stored in my emergency kit. During the trip, I only got a cell signal twice—once on the summit of Mt. Tangoyama, where you can look down over the town, and again around Oze (carrier: SoftBank).
After descending, I learned that when charging small devices such as headlamps from a PD-compatible power bank, you need to switch to low-current mode. I hadn’t realized that in the mountains—and panicked when my headlamp refused to charge.
Sun protection

❶ OuterU | Face Glove Flex
❷ Other Items (lotion, moisturizer, sunscreen, lip balm)
When I was younger, I never paid much attention to sun protection. But after turning forty, I realized that even men should take it seriously. During a spring trip in the Tateyama mountains, I once got sunburned so badly it was practically a burn. Ever since, I’ve been meticulous about protecting my skin. My solution for physically blocking the sun is the Face Glove, which covers the cheeks and nose without wrapping the whole head—full-face coverings just feel too cumbersome.
For the exposed areas, I rely on sunscreen, and since that means applying a lot of it, I also take skincare more seriously now. I actually follow the advice of a cosmetics clerk at a drugstore—a world that, for most middle-aged men, is unfamiliar territory.
She told me: before putting on sunscreen, prepare your skin. Even in the mountains, I wash my face (and body) every night—either with a quick warm shower or a towel soaked in hot water—then apply plenty of toner to hydrate the skin, followed by moisturizer to lock it in. The next morning, I carefully apply sunscreen on top, making sure to cover my neck, ears, and upper chest as well. Don’t forget around the eyes, even if they’re hidden by sunglasses.
And always use lip balm. Under strong sunlight and with lowered immunity, lips are prone to herpes infections, which can lead to painful blisters that take days to heal. Once back home, I finish with a hydrating face mask after a bath—it’s the best recovery for sun-damaged skin.
Safety & communication
I submit my climb registration through the Compass app. As long as there’s cell service, I can also update route changes or send a descent notification directly from the mountains. Because a filed registration is required for mountain insurance coverage, I’ve been using Compass since this year.
I’m enrolled in the Yamakifu Mutual Aid Association’s general membership plan, which costs 4,000 yen per year and covers up to 10 million yen in search and rescue expenses. However, if no climb registration is filed, the coverage is reduced to 5 million yen.
As for satellite communication, until last year I rented an Iridium satellite phone, but now my iPhone 15 can send emergency SOS messages via Starlink satellites. Some carriers have begun supporting basic text messaging through this network as well, so the need to carry a dedicated satellite communicator or phone is quickly fading. Before long, even voice calls will likely be possible.
Currently subscribed to “au Starlink Direct” via UQ Mobile, which allows text messaging through satellites even in areas without cell reception.
That wraps up Part One: The Gear.
In the next installment, I’ll share the actual journey itself — a detailed account of how I traversed the Okutone ridgeline step by step.
Born in 1972. Based in Minamiuonuma City, Niigata Prefecture. Works at Ishiuchi Maruyama Ski Resort.
X account: @greenliftgohttps://note.com/ulskihiker