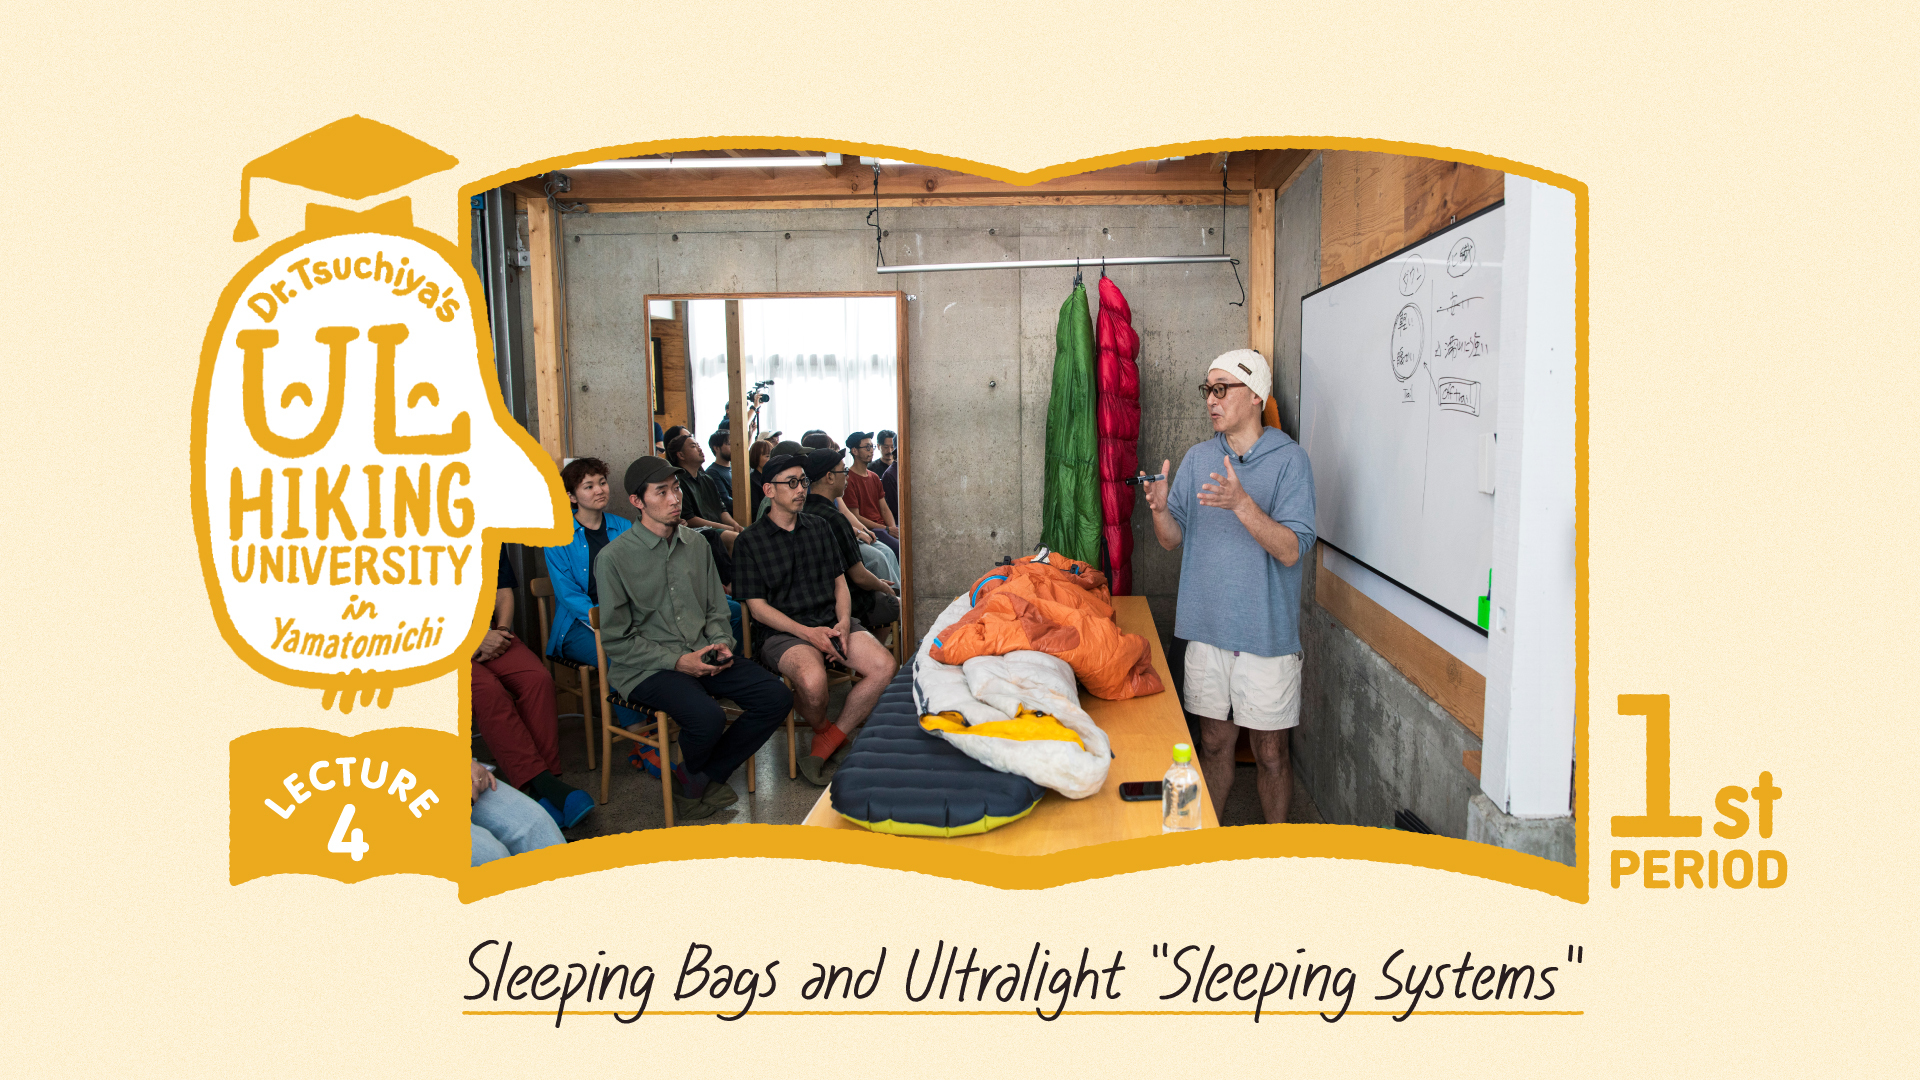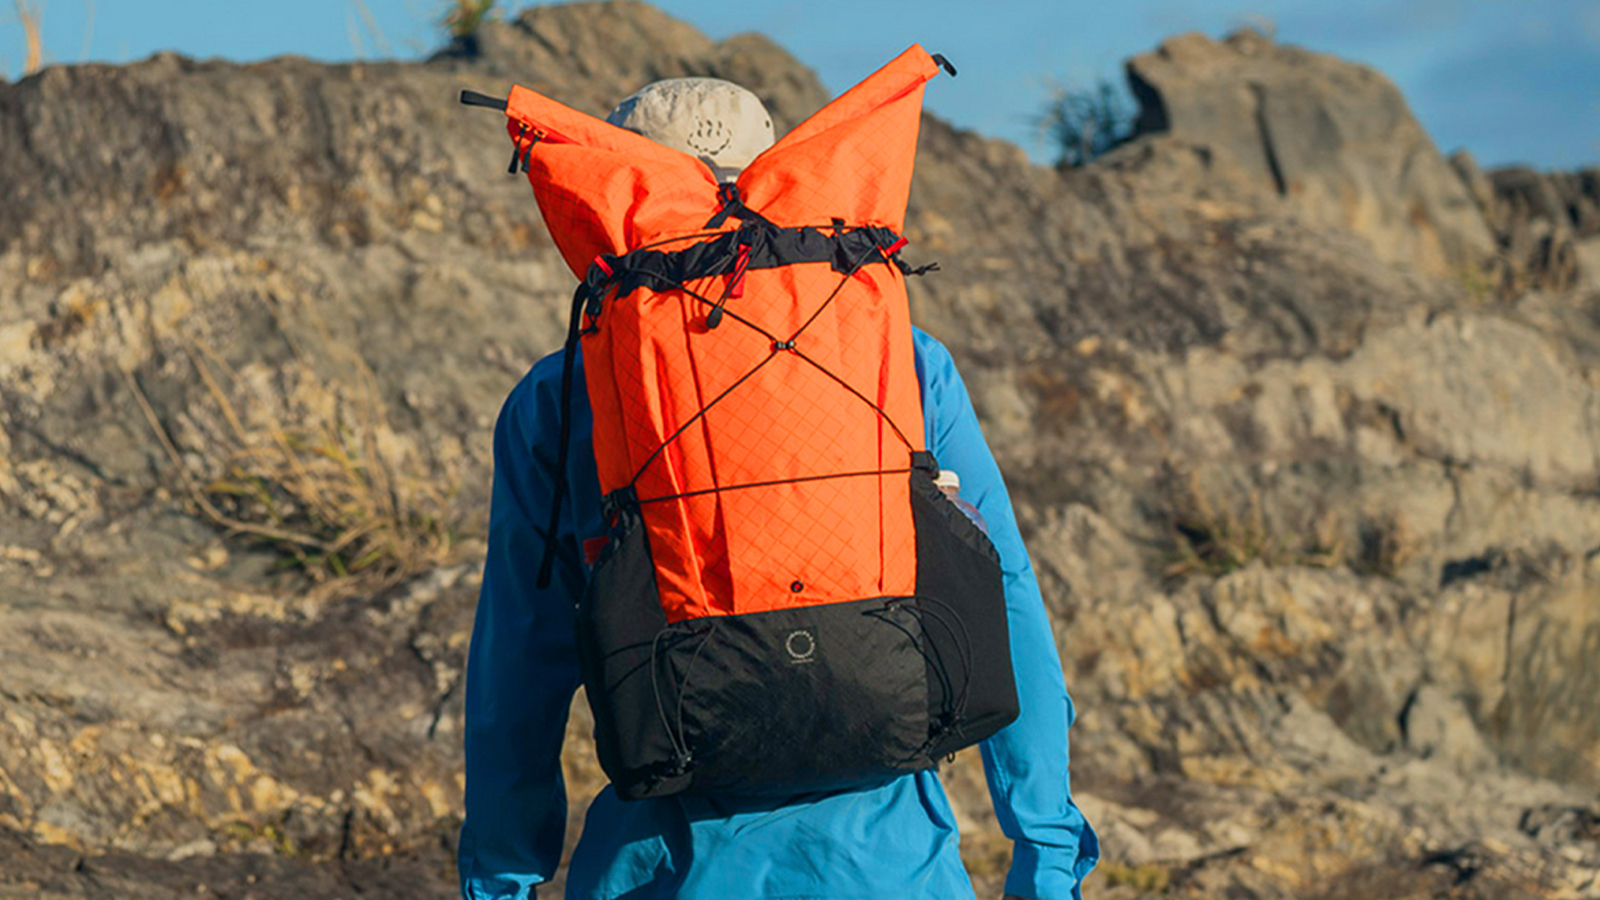


Lecture 4: Sleeping Bags and Ultralight “Sleeping Systems”
Photos: Masaaki Mita
Photos (gear): Go Kakizaki
Lecture 4: Sleeping Bags and Ultralight “Sleeping Systems”
Photos: Masaaki Mita
Photos (gear): Go Kakizaki
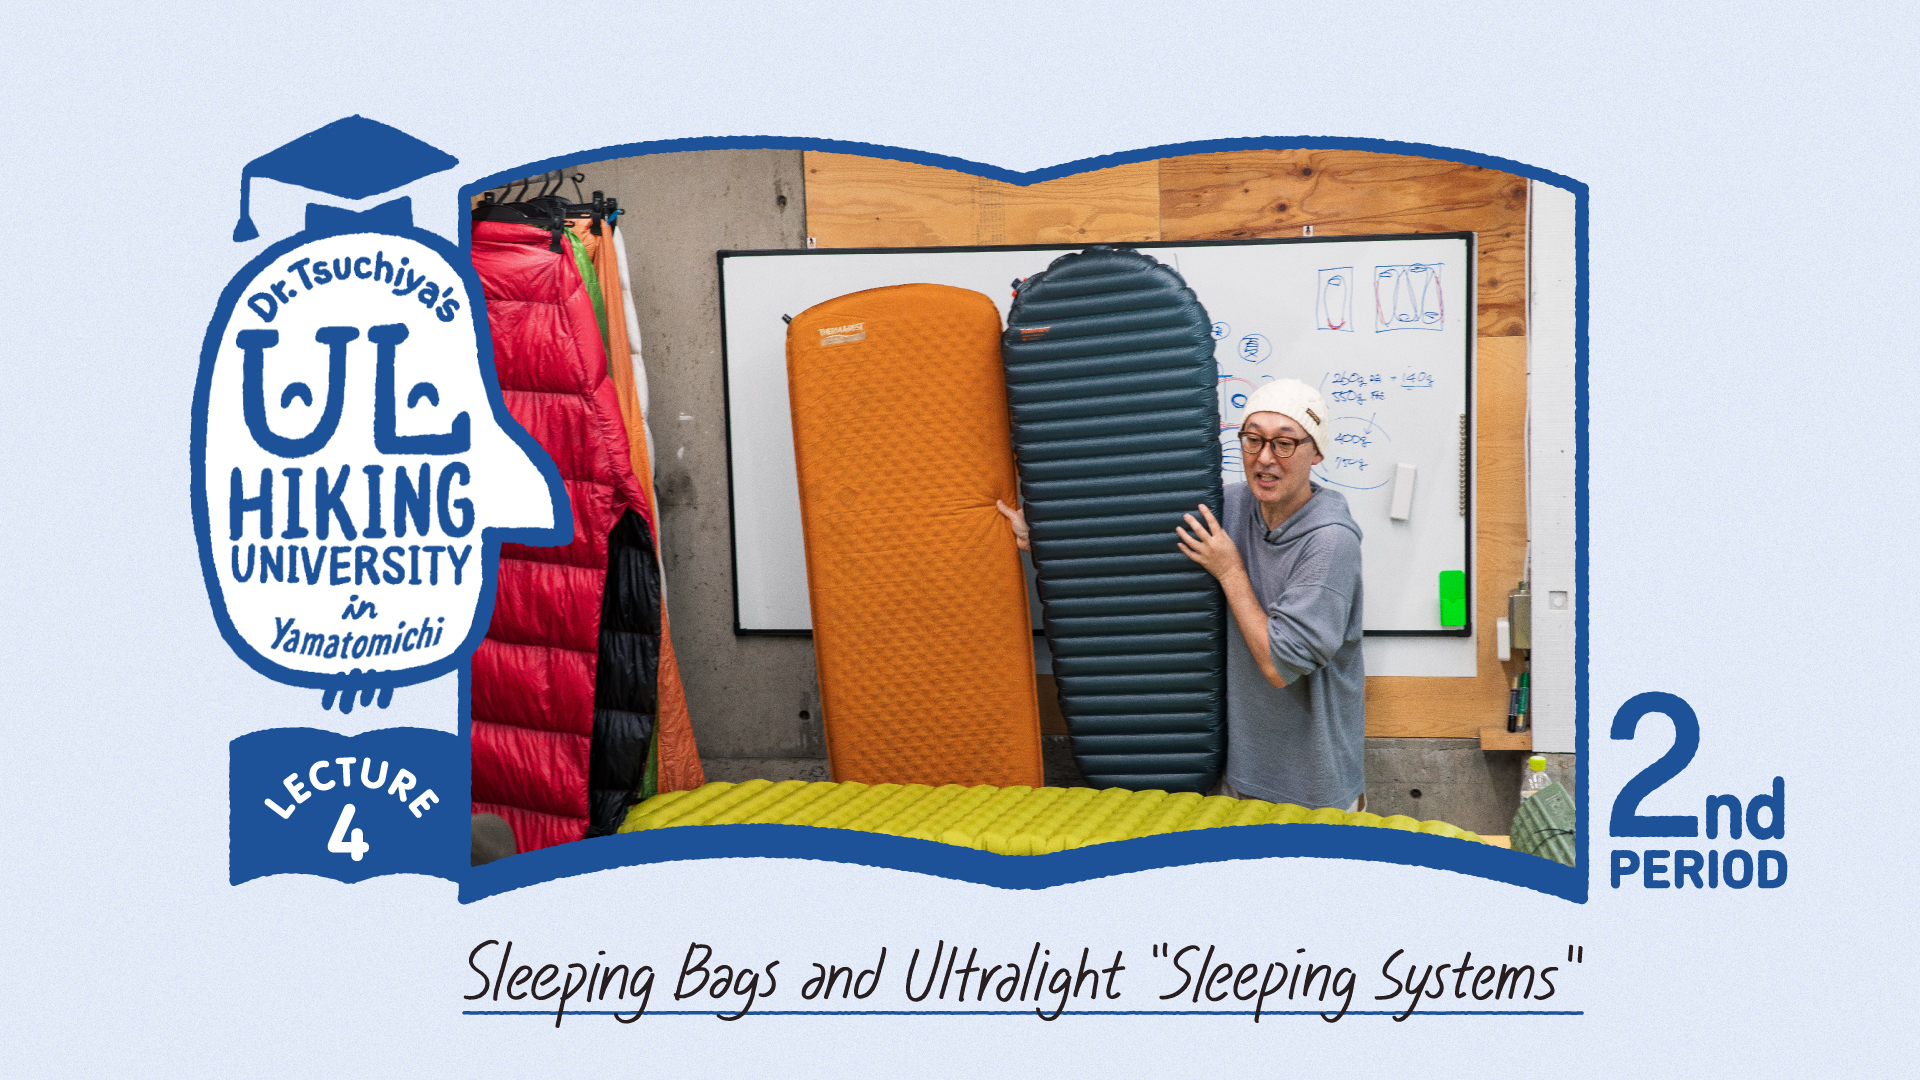
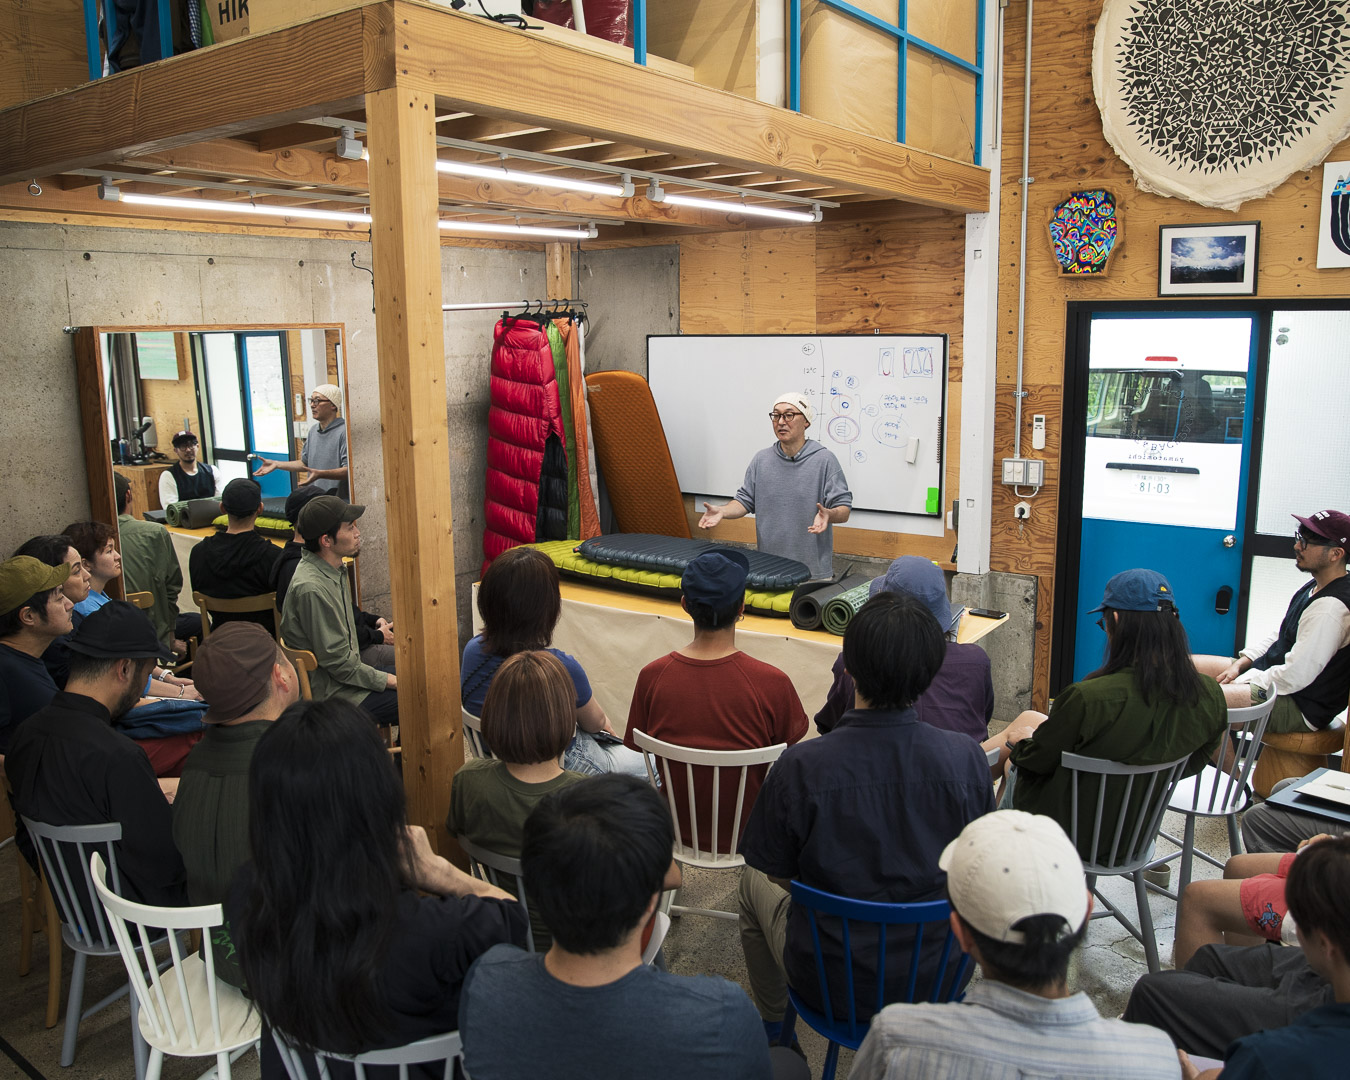
Tomoyoshi Tsuchiya, owner of Hiker’s Depot in Tokyo and one of Japan’s ultralight hiking pioneers, is the author of Ultralight Hiking (2011) and a frequent Yamatomichi collaborator. Every few months, Tsuchiya hosts a lecture at Yamatomichi’s Laboratory, in Kamakura, covering the history of ultralight hiking and the evolution of its practitioners’ gear. In past lectures, he's examined ultralight hiking backpacks, footwear and tents. In this fourth lecture series, he delves into the debates surrounding sleeping bags and the finer points of choosing sleeping pads. For the second period, he explores key features of the three main types of sleeping pads; how choosing a pad has evolved with changes in backpacking and hiking; and the link between R-value (an international measure of how much insulation a mat provides) and temperature ranges ー essential knowledge for every ultralight hiker.
Sleeping pads: types and features
In this second period, we’ll be talking about sleeping pads. With so many variations available, sleeping pads are one of the most difficult items to recommend in a shop. Prices range widely ー from around ¥4,000 to over ¥40,000 ー which adds to the challenge of choosing the right one.
Sleeping pads can be divided into three basic types: closed-cell foam pads, self-inflating pads and air mats.
Let’s look at the first type, the closed-cell foam pad. Made from foam insulation material ー like Yamatomichi’s UL Pad 15 or Minimalist Pad ー closed-cell foam pads are lightweight. Because the air bubbles are sealed within the foam and don’t come into contact with the outside air, they help to retain warmth. They’re highly resistant to moisture ー if they get wet, just wipe them off. Punctures aren’t a problem. Storage is simple, too: they can be rolled or folded. They’re more affordable than the other two types but also bulkier. And they tend to have a lower R-value*, which indicates how effective your mat is as an insulation material. The higher the R-value, the warmer your sleeping mat will be.
*R-value stands for “resistance value” and is an international measure of thermal resistance ー how well a two-dimensional barrier resists the flow of heat. The higher the R-value of a material, the better it is at insulating. It’s not just for sleeping pads; it’s also used to measure how well-insulated a wall, window or ceiling is.
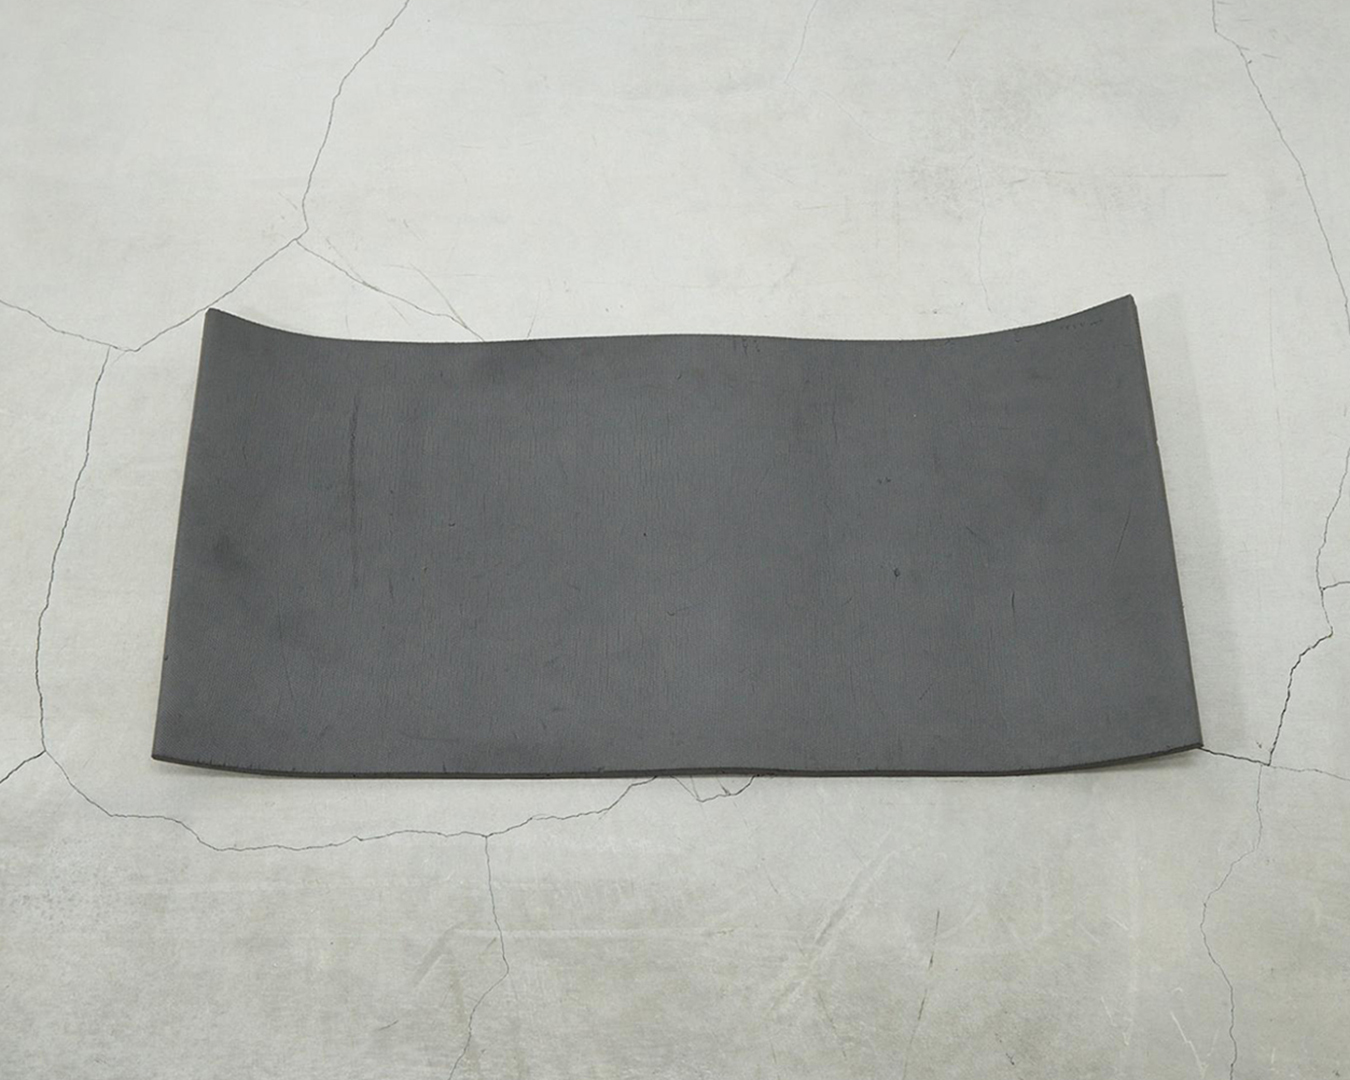
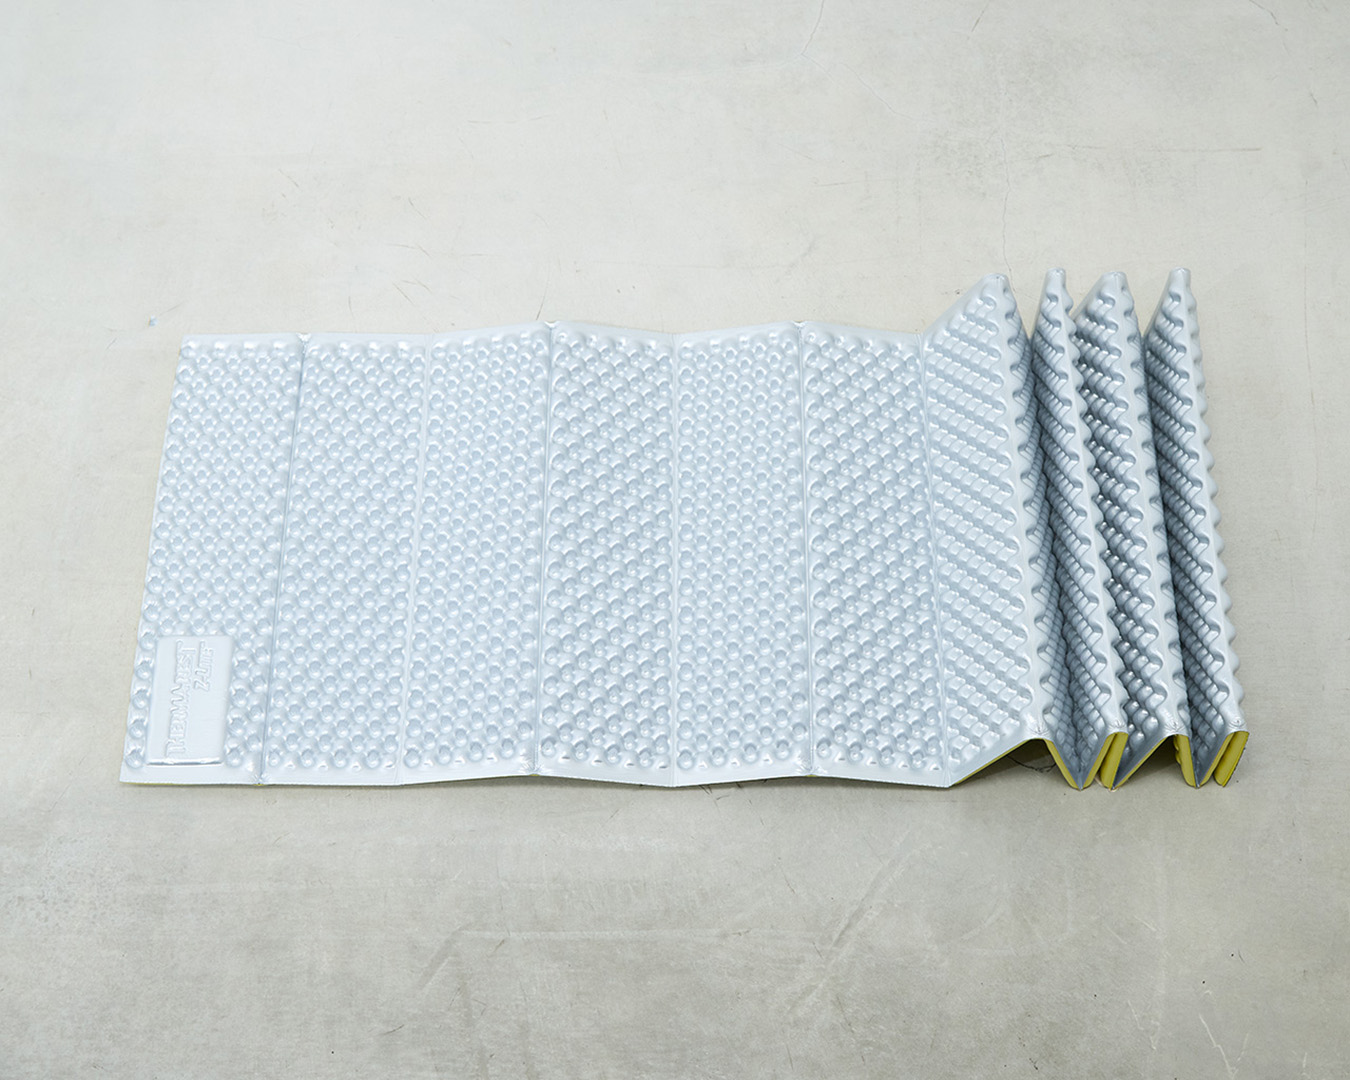
Yamatomichi’s UL Pad 15+ is the closed-cell foam type.
The second type: self-inflating pads. These contain compressed urethane foam inside. When you open the valve, air automatically flows in. Its structure is similar to a sponge: Squeezing it pushes air out, compressing it; releasing it lets it expand. The pad inflates mostly on its own, so you only need to blow in a little air before closing the valve.
Self-inflating pads have excellent cushioning and pack down smaller than closed-cell pads. But they tend to be heavier. Even if the pad is punctured, it will retain some cushioning and insulation, thanks to the internal foam.
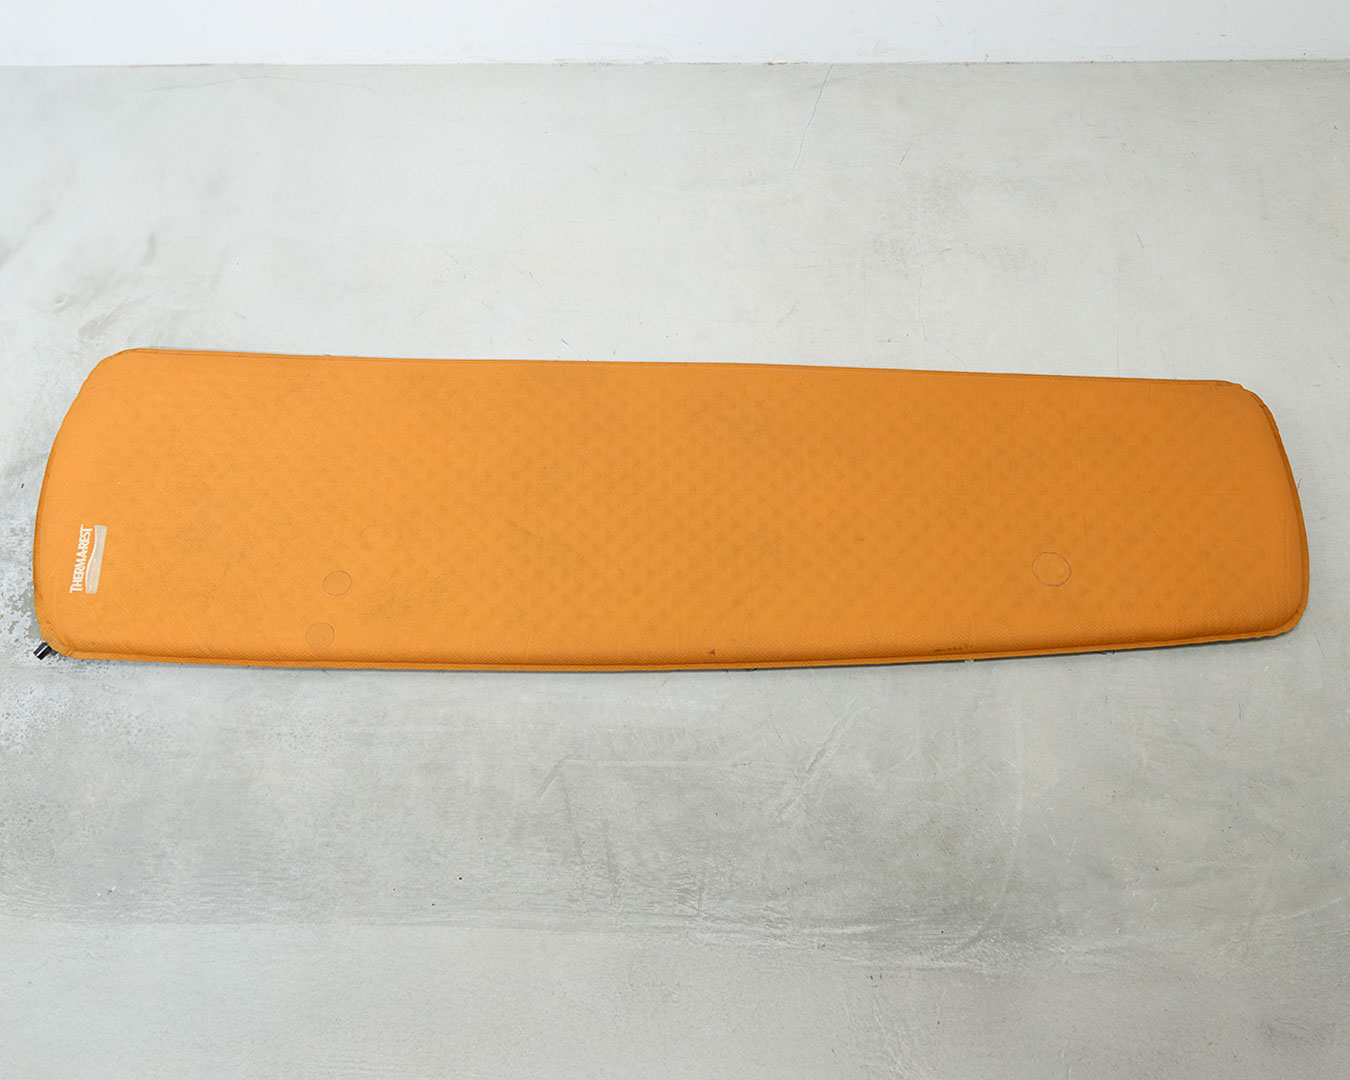
An inflatable pad classic: Therm-a-Rest’s ProLite (old model).
The final type is the air mat. An air mat relies on air for cushioning and gets high marks for comfort and packability. When Hiker’s Depot opened in 2008, the conventional wisdom was that air mats were not suitable for use in the mountains because they let heat escape quickly.
Back then, air mats trapped air warmed by your body but had no insulating material, so as the air began to circulate, the heat escaped.
For hikers, that meant there were just two viable options: closed-cell pads or self-inflating pads. Neither was ideal; each came with trade-offs. Closed-cell pads were light but bulky. Self-inflating pads were heavy but more compact and offered better comfort.
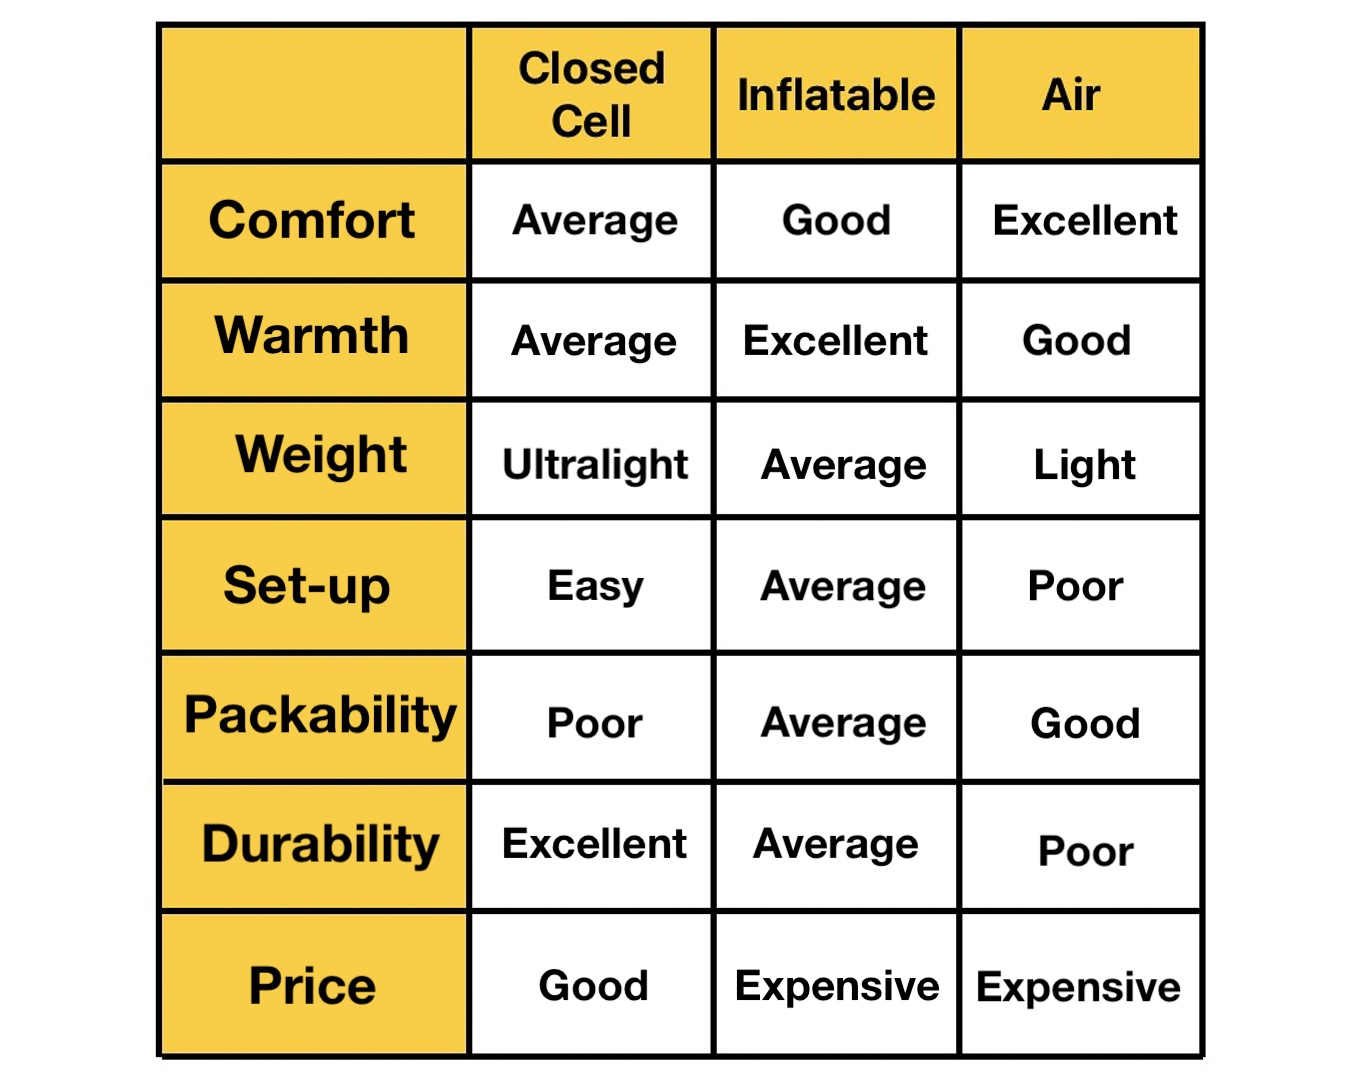
But in 2009, Therm-a-Rest ー patent holder of the original self-inflating pads ー released its NeoAir series, a new kind of air mat (as the product name suggests). What set the NeoAir apart was its use of multiple layers of aluminum film insulation inside the mat. These layers used thermal reflection to disrupt air circulation, ensuring that the mat retained heat ー and finally making air mats practical for outdoor use.
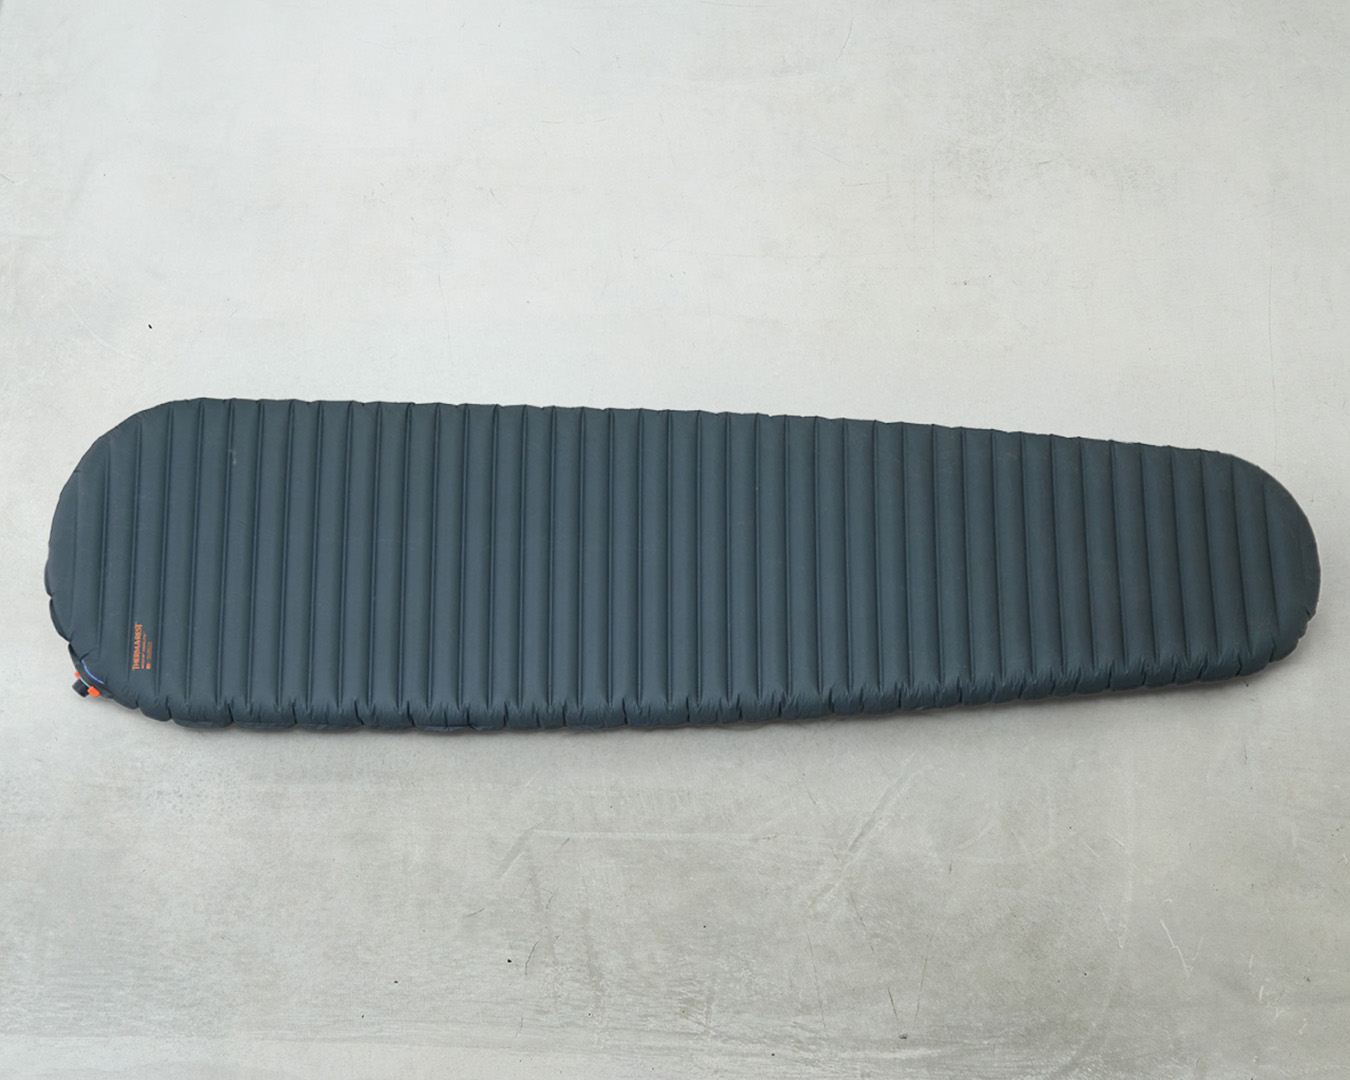
The lightest model in the NeoAir series — the Therm-a-Rest NeoAir UberLite.
Not too long ago, self-inflating pads were also known as air mats. This was misleading: air mats are, by virtue of their materials, lighter and more compact than self-inflating pads with urethane foam.
The arrival of insulated air mats mostly nullified the weight advantage of closed-cell foam pads. There are exceptions: Yamatomichi’s UL Pad 15 and Minimalist Pad weigh less than most air mats. Today, the biggest advantage of closed-cell foam pads is that you don’t have to worry about their getting punctured and losing their cushioning.
Let’s consider thickness.
The average thickness of closed-cell foam pads is around 1.3 cm, while for self-inflating pads, it’s about 2.5 cm. Some air mats are thicker than 5 cm.
Most air mats are fairly durable. Even if you use them on a rocky, uneven surface, these mats provide excellent cushioning. They’re also comfortable because you can adjust the amount of air inside. Which is why, among sleeping pads, air mats reign supreme. Even so, air mats, like self-inflating pads, can be punctured.
Air leaks can occur if the laminated materials begin to peel. The valve area, with its more complex structure, is also susceptible to problems. But like cyclists who don’t obsess about possible flat tires, most hikers accept that punctures can happen and can be repaired.
Air mats are at risk of getting punctured at campsites. The most common scenario is when people sit on their mats directly on the ground. That said, as long as you’re aware of the risk and pay attention to how you’re using your air mat, there’s no need to be overly nervous.
With air mats, there’s a risk of punctures and leaks around the valve and along the seams where the fabric is bonded.
Among hardcore mountaineers and university alpine club members, air mats aren’t popular. Closed-cell foam pads are more appealing when you’re exhausted: There’s no inflating needed. You unfold them and they’re ready to use.
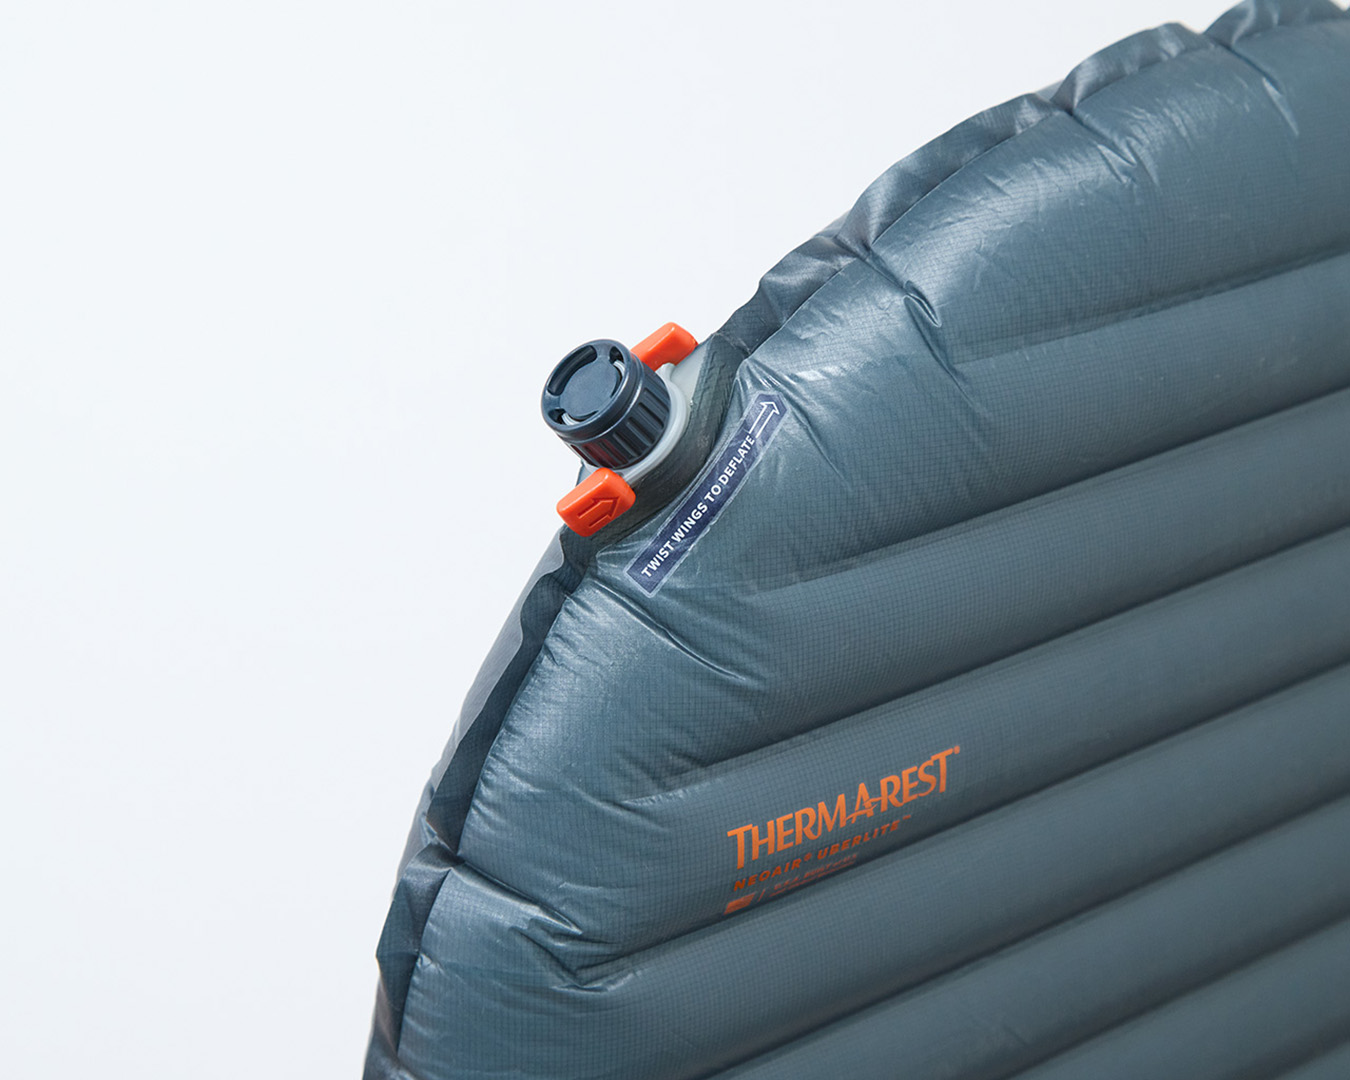
In today’s market, the self-inflating pad is stuck in limbo. Some people see value in these pads’ built-in urethane foam, which offers some insulation and cushioning even if the pad is punctured. Self-inflating pads are also relatively thin, compared to air mats, so when headroom is limited under a tarp or bivy, you’re less likely to bump your head using a self-inflating pad than an air mat.
Thickness: self-inflating pad (top) versus air mat (bottom). The difference can matter when it comes to comfort inside a tent.
This isn’t a problem in a dome tent. For ultralight hikers, having a thinner pad can help maximize living space and comfort inside of a low shelter. Which is why some hikers are giving self-inflating pads another chance.
The evolution of ultralight hikers’ sleeping pads
What kinds of sleeping pads have ultralight hikers used over the years?
The answer is connected to the backpacks that have been used. Early on, many ultralight hikers used closed-cell foam pads. In the 1990s, inflatable and closed-cell pads were the only options, and closed-cell pads won out because they weighed less. When Yamatomichi released its 113g UL Pad 15+, people were shocked by how little it weighed. Back then, a 200g pad was considered very lightweight.
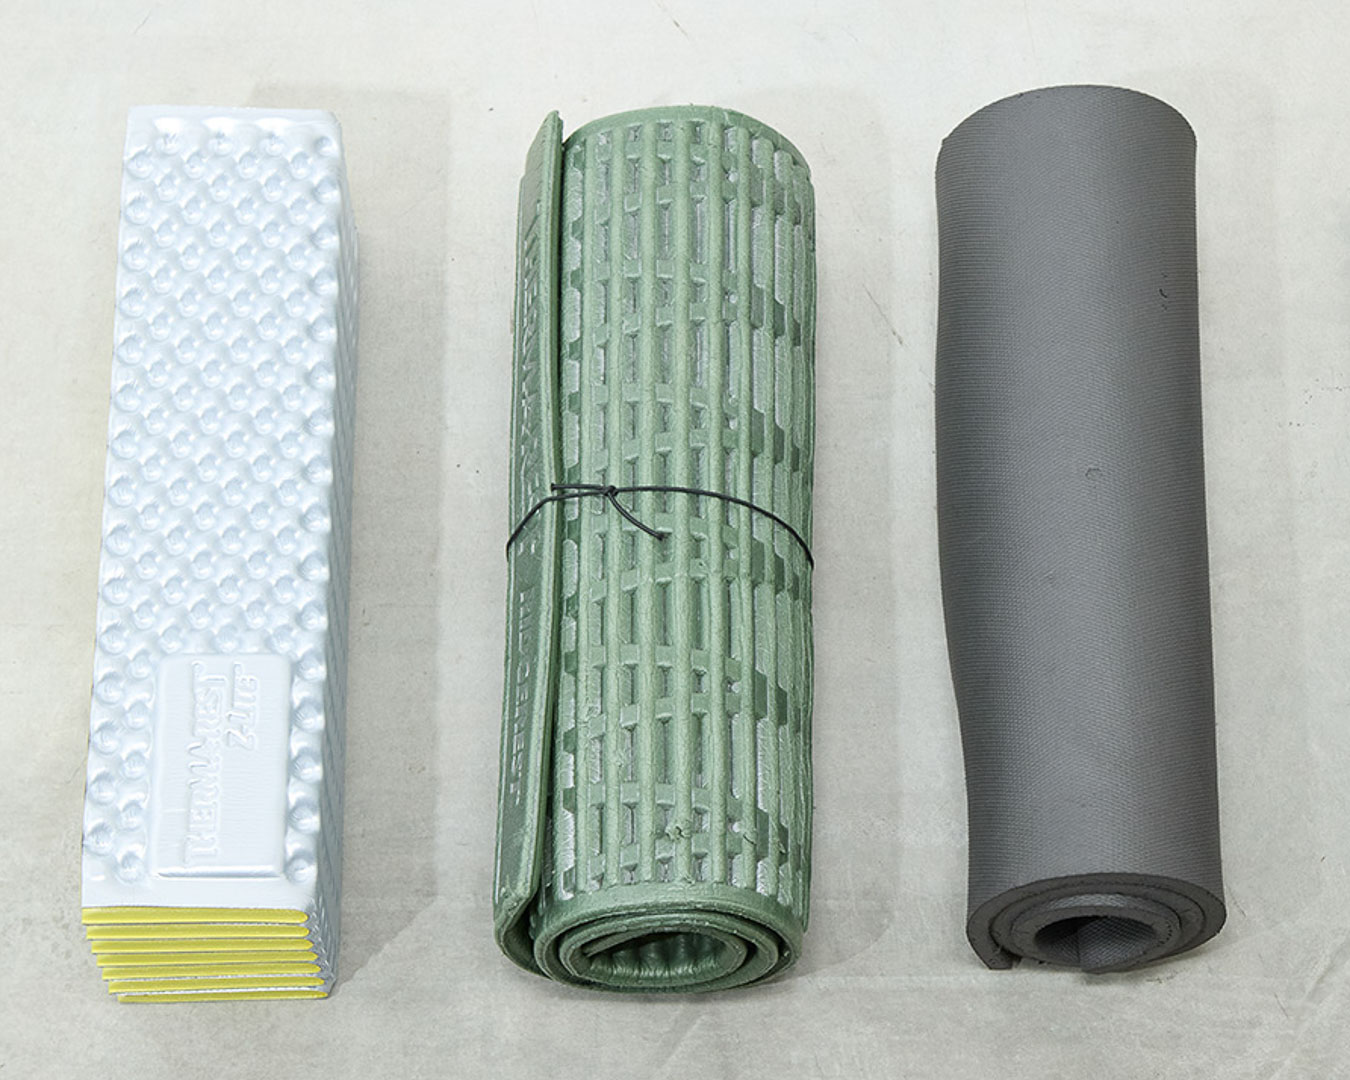
Closed-cell pad models (L to R): Therm-a-Rest’s Z Lite SOL (half-body size, 290g), RidgeRest (half-body size, 260g) and Yamatomichi’s UL Pad 15+ (half-body size, 113g). The UL Pad 15+ shocked people because it weighed so little.
Still, rolled mats were bulky back then. One trick ultralight hikers used was to shape the mat into a cylinder and pack it inside an ultralight backpack. The mat doubled as pad and frame while also acting as a gear organizer.
In ultralight hiking’s early days, it was common to roll a mat into a cylinder inside of a flimsy backpack. The mat doubled as a makeshift frame for the pack.
As backpacks for ultralight hikers evolved, so too did sleeping pads.
Ultralight backpacks were initially made for long-distance trails like the Pacific Crest Trail in the US. As the number of through-hikers increased, demand for backpacks with frames and support increased as well. Yamatomichi’s ONE was developed as a long-distance backpack but it has a frame and hip belt ー differentiating it from conventional ultralight backpacks. Around this time, Osprey released lightweight backpacks with frames. These kinds of backpacks allowed hikers to stop using pads as frame substitutes. As a result, among long-distance hikers, air mats became popular.
At the same time, through-hikers also favored accordion-style closed-cell pads like Therm-a-Rest’s Z Lite and Nemo’s Switchback. In the US, you’d often see hikers with an accordion pad strapped to the top of a backpack.
As ultralight backpacks with frames and support became more common, accordion-style closed-cell foam pads gradually became mainstream over rolled mats.
After the introduction of Pa’lante backpacks ー designed for faster, longer walking ー in the US a new group of hikers focused on completing trails in record time emerged. These Fastest Known Time (FKT) hikers needed smaller-capacity backpacks.
Early ultralight backpacks, even when spacious, were designed to be lightweight. But smaller backpacks that fit snug against the back were better for navigating tight spaces. To enable hikers more freedom of movement, backpacks became smaller ー to around 20 to 30 liters. That meant there was no longer space inside the pack for a 50-cm-wide, three-season, closed-cell pad rolled into a cylinder. As a result, hikers carrying these smaller backpacks switched to thin foldable sleeping pads. For through-hikers and FKT hikers who were covering around 1,000-km trails (the Colorado Trail or Arizona Trail, for instance) in a month, thin sleeping pads were sufficient: Foldable closed-cell pads a mere 5 mm thick, or lightweight, half-length air mats were popular choices.
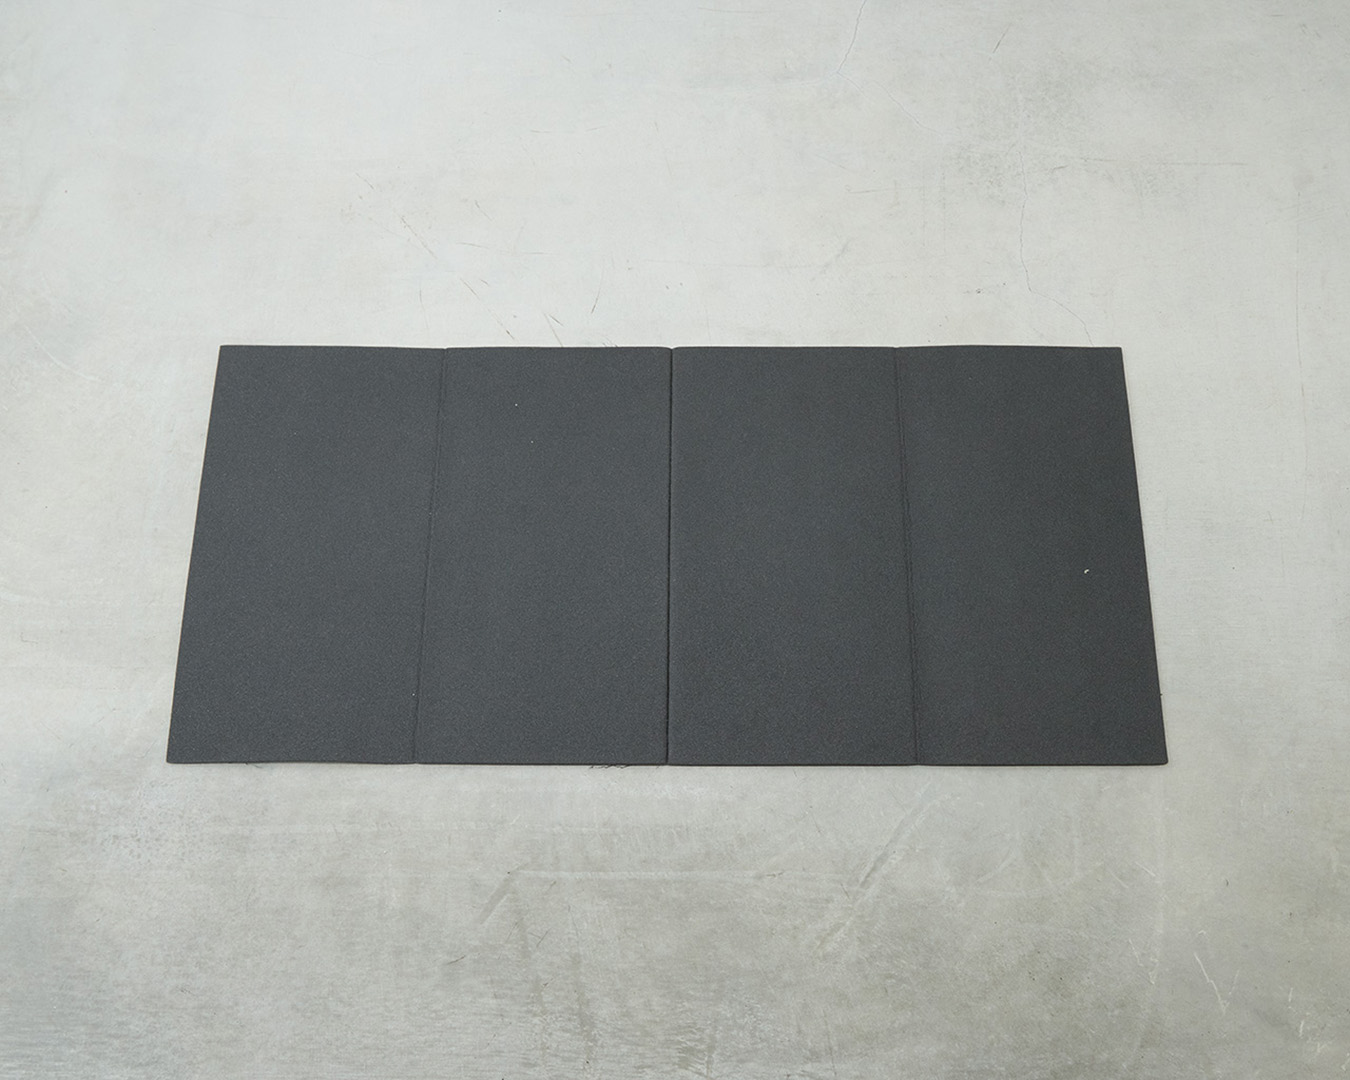
The Evernew FP Mat 100 is a thin, foldable pad that’s 5 mm thick but made from a firm material that cushions against uneven ground.
When choosing a sleeping pad, you have to think about its compatibility with your backpack. My advice would be this: If you’re unsure of what to get, buy a rollable mat for now. Or I would recommend an accordion-style mat like the Z Lite or Nemo Switchback. Why? Because they’re cheap and versatile. No sense spending tens of thousands of yen (hundreds of dollars) on a sleeping pad. I started with one of these mats. If you have one, at least you can get some sleep.
Remember that when choosing a sleeping pad, you’re weighing a complex matrix of factors: your backpack, the level of comfort you want and the temperature rating you’re interested in.
Framework for picking a sleeping pad: correlating R-values and temperature ranges
Next, let’s go over the R-value of sleeping pads.
Temperature ratings for sleeping bags are based on a global standard called EN (European Norm). With EN, you can compare sleeping bags from different brands. Recently, sleeping pad manufacturers have adopted a standardized R-value to measure warmth, so now it’s possible to compare pads, too.
You’ve heard that the insulation on the back of sleeping bags compresses and loses effectiveness, which is why sleeping pads are important. But a sleeping pad’s R-value alone doesn’t tell you everything. You can’t just assume that a warmer pad is always better. To find the sleeping pad that fits your needs, it helps to have a framework to assess temperature ratings and R-value. The framework that I use is based on comparisons of manufacturer-stated R-values and temperature ratings and my own experience, so it’s best to treat it as a rough guideline.
Think back to our discussion about three-season sleeping bags in Period 1. You’ll recall that we had 0 degrees Celsius as our temperature benchmark. At 0 degrees Celsius, a sleeping pad with an R-value of around 2.0 will suffice. This is the standard for three-season pads and you’ll sleep comfortably even when the temperature dips to around 0 degrees Celsius.
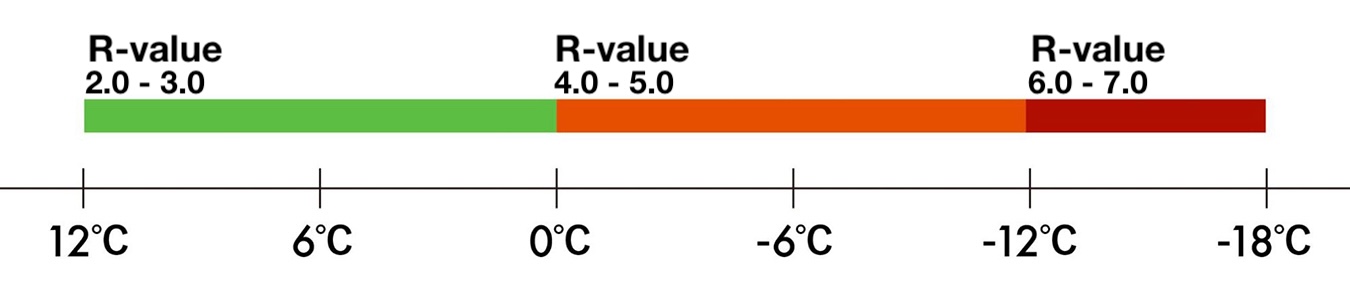
For temperatures of around minus 10 degrees Celsius, you’ll want a sleeping pad with an R-value of 4.0 to 5.0. These pads are marketed as suitable for cold three-season conditions ー such as Therm-a-Rest’s NeoAir Women’s Regular from the past and Nemo’s current Tensor All-Season. This R-value range is versatile and ideal for hikers who want one sleeping pad that can be used all year.
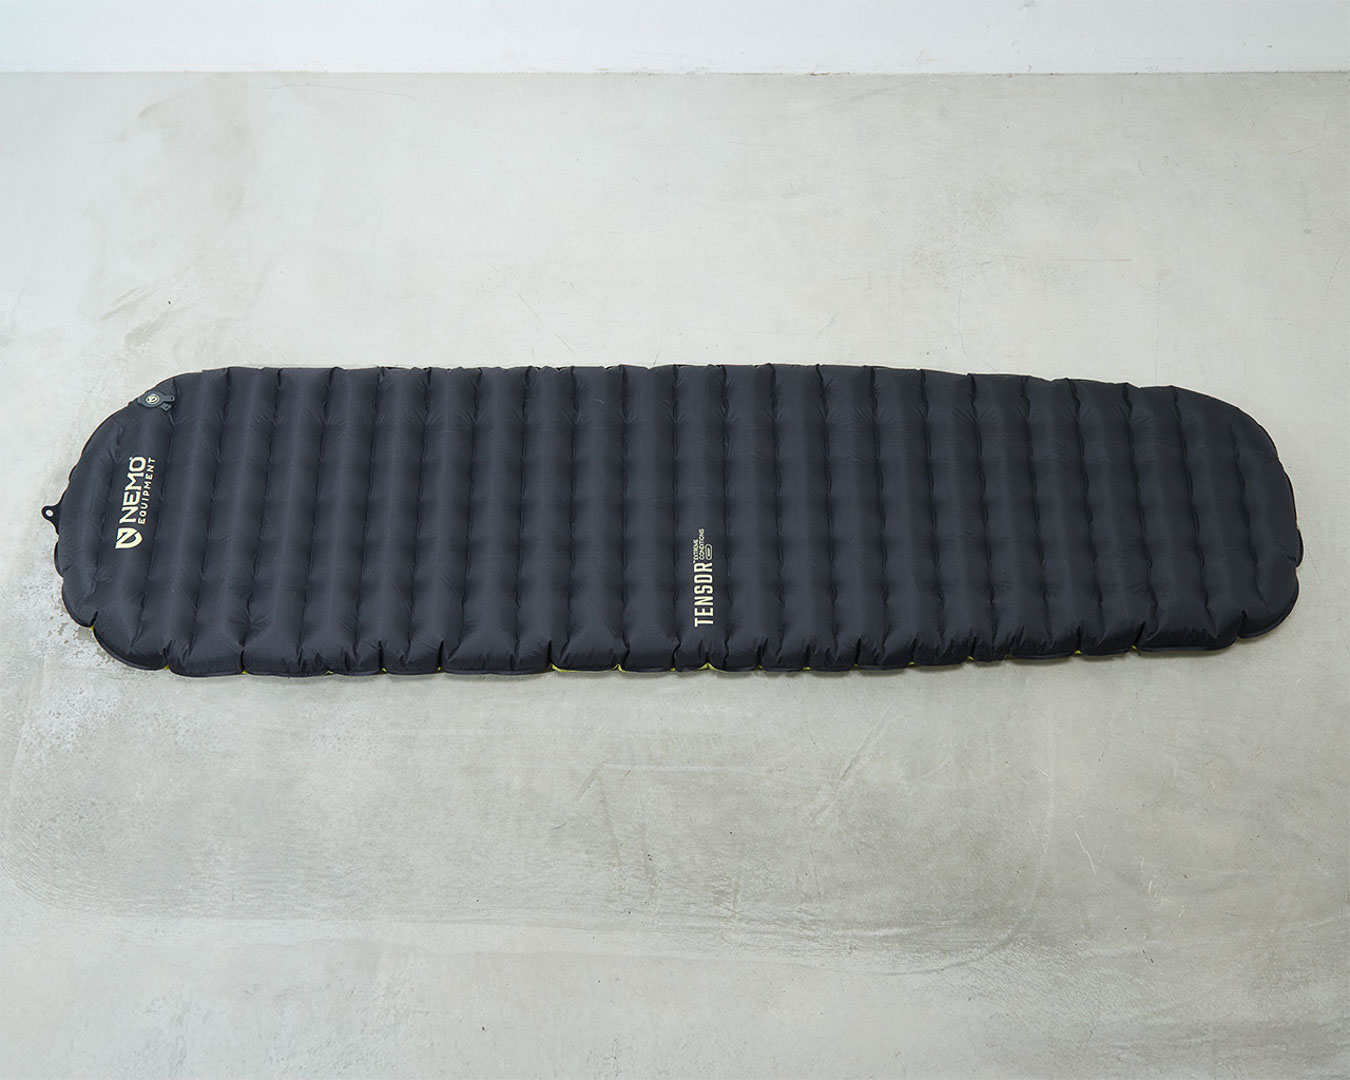
Nemo’s Tensor Extreme Conditions has an impressive R-value of 8.5 ー significantly warmer than the All-Season model mentioned above (R-value 5.5) ー but weighs just 472g, comparable to typical three-season pads.
For temperatures around minus 20 degrees Celsius, the benchmark R-value range should be 6.0 to 7.0. In winter, air mats filled with down or bonded with synthetic insulation have long been the preferred choice. Many air mats also boast multiple layers of aluminum film ー often four sheets ー to boost heat retention.
That said, some hikers who venture out in winter shy away from air mats of high R-value. The reason: the risk of punctures. They might opt for closed-cell foam pads with R-values around 2.0 instead ー but also have a high tolerance for the cold. Ultimately, you should know your body’s ability to withstand chilly weather.
Critical but overlooked: warmth and pad width
You shouldn’t focus solely on R-values for winter pads. Width is also a critical but often-overlooked consideration. With narrower pads, your body can shift slightly off the pad in the middle of the night, which can lead to your feeling the chill. Many hikers will have experienced this: your arms feeling cold while you’re sleeping.
If you’re particularly sensitive to the cold, you should think about pad width. Wider pads will keep your arms from getting cold ー and will help you feel warmer. In the past four to five years, manufacturers have added more wide pads to their offerings. The standard pad width is around 50 cm. But among winter pads with R-values above the 4.0 to 5.0 range, you’ll find square-shaped wide pads or mummy-style pads with the extra width around the arms.
The downside is that wider pads are heavy ー and that’s true for most winter-use pads. I wouldn’t unconditionally recommend a wider pad for everyone; it may not align with ultralight ideals. But I bring it up because there are plenty of hikers who struggle to keep warm in winter.
Is it warmer to put your sleeping pad inside your sleeping bag?
Finally, let’s look at a once-trendy ultralight idea: putting a sleeping pad inside of a sleeping bag.
This gained attention with a pad, made by Klymit, that had holes. The idea was that the pad supported the body only in key places and that the holes minimized the pad’s weight and prevented the pad from compressing the sleeping bag’s insulation, which kept you warmer. When the Klymit pad was first introduced in 2012, it was hailed for its radically innovative approach.
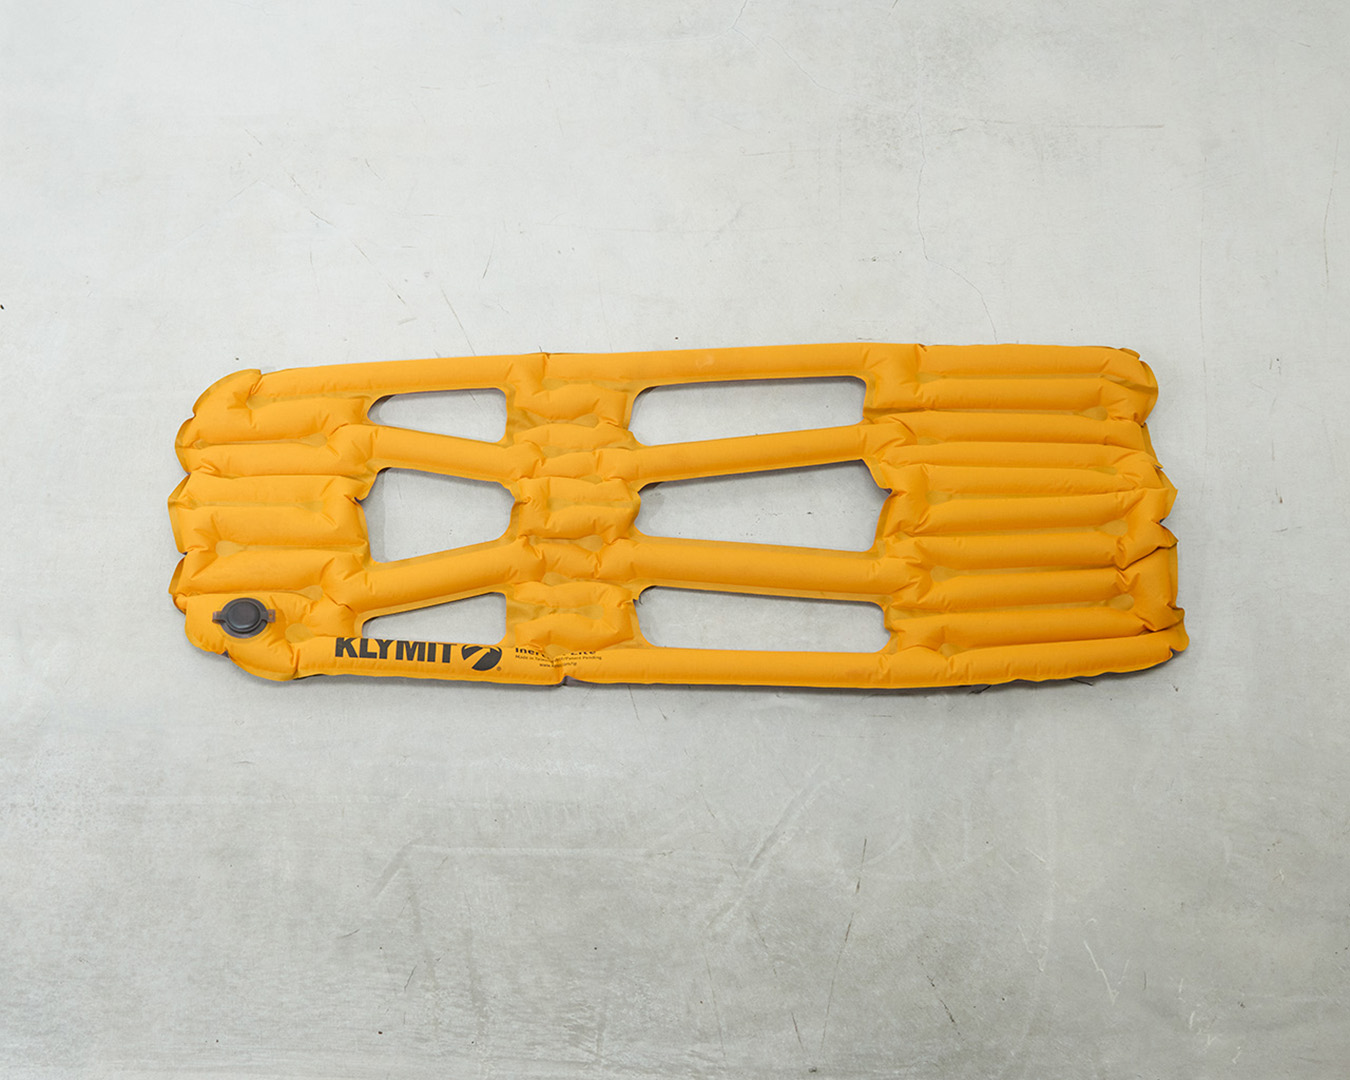
The Klymit Inertia X Lite, a half-length pad that weighs just 173g. Its innovative design and light weight caused a stir when it went on sale in 2012.
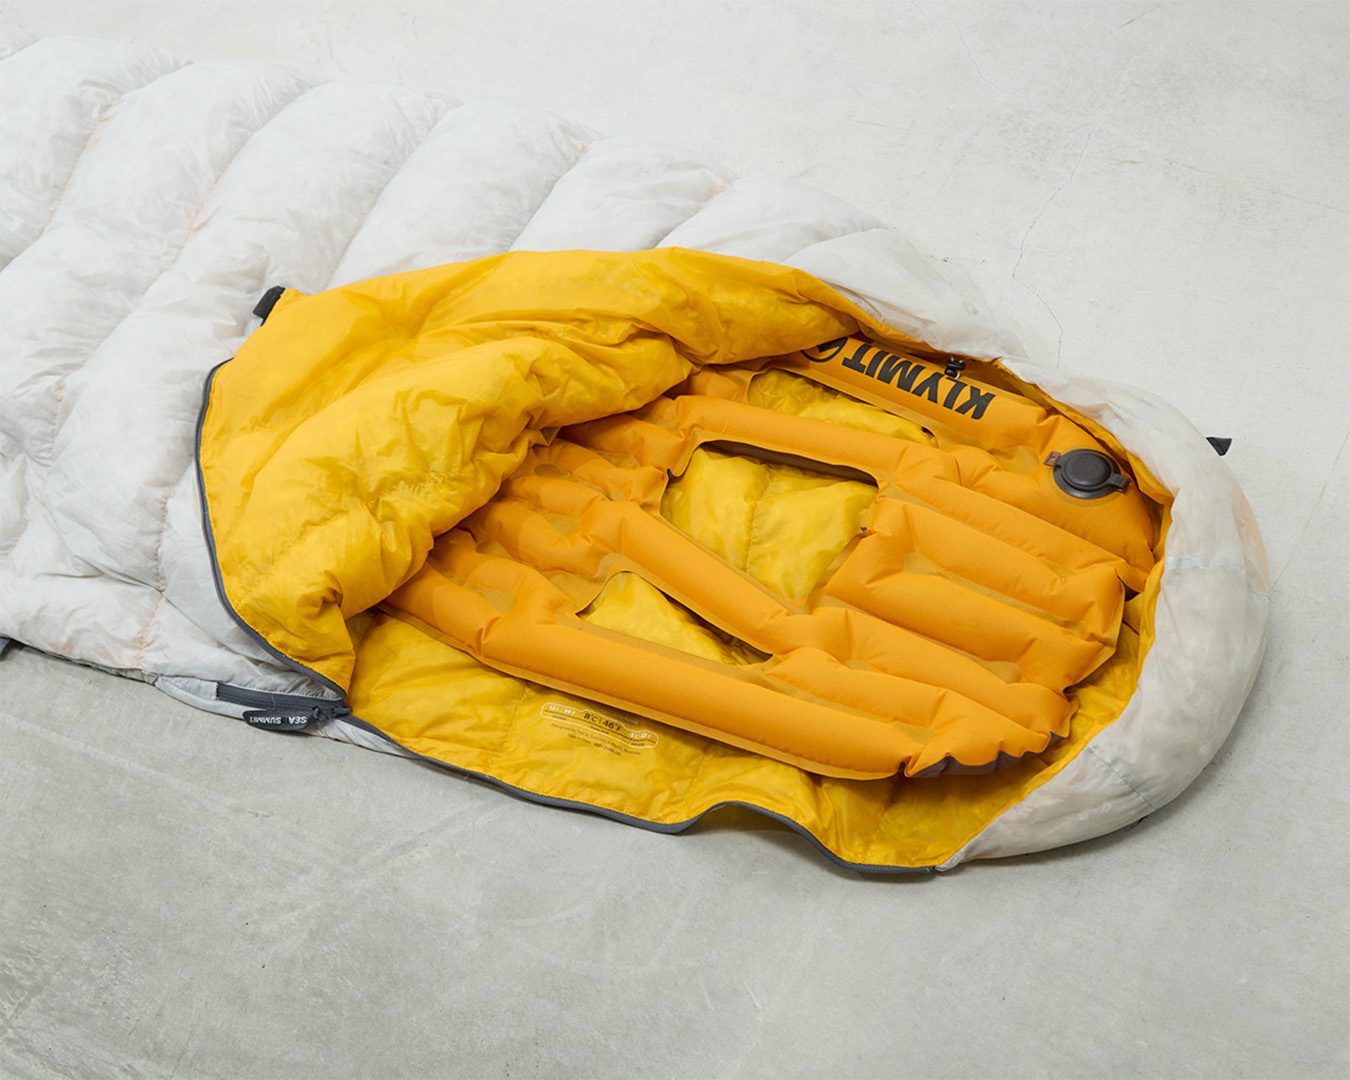
Used inside a sleeping bag, the Klymit pad prevents the insulation on the back side of the bag from getting compressed, helping to maintain warmth.
But that led to misconceptions. People began assuming that putting a sleeping pad inside of a sleeping bag was warmer. This only works if the pad has holes on the back, like the Klymit. Klymit pads are also narrower than the standard 50 cm width of most sleeping pads and tapers at the top, which ensures that the pad won’t prevent the bag from wrapping snugly around the shoulders.
If you try putting a thick 50-cm-wide sleeping pad inside a sleeping bag, the bag will no longer fit tightly around your body. And with some models, the pad can end up compressing the bag’s insulation, sacrificing warmth.

For DIY ultralight gear enthusiasts inspired by Klymit, try this: Trim the width of a closed-cell foam pad ー ideally one that’s 1 cm thick to avoid adding bulk ー and then cut out a section where your back rests, so the down in your sleeping bag won’t get compressed. The founder of one cottage ultralight gear brand made sleeping pads like this!
Here’s a common ultralight tip for quilts, which have no insulation on the back: Attach the sleeping pad to the back of the quilt. Doing so can be helpful in preventing drafts when you roll over. You need to be careful, though. If you attach a 50-cm-wide pad to a quilt, you’ll have gaps around the shoulders and torso. The quilt won’t wrap around you tightly. It will also be harder to cinch the collar around your neck, so you’ll lose warmth.
Also, in some cases, getting in and out of a narrow tent will be tricky. If the quilt can be attached after you get in, it’s not a problem. But if the sleeping pad is already attached to the quilt, you’ll have to shimmy in from the foot end. That might be alright in a roomy tent, but not in tight quarters. And rather than attaching the pad to the quilt, you’ll be warmer using the quilt’s rear attachment loops to secure it snugly to your body ー and safer since it will be easier to get out of in an emergency.
In the last few years, quilts have become more mainstream, and they have a lot of potential for ultralight hikers. I’ve personally used quilts for more than 20 years ー and I don’t attach them to pads or fix them with cords. Sometimes the simplest approach is the easiest. Keep in mind, though, that there are limitations ー and alternatives ー to the standard ways of using your gear.
Any questions?
Question: Can you share any insight into how sleeping position relates to sleeping pad performance? I’ve heard that sleeping on your back in a mummy bag, your body compresses more of the insulation compared to sleeping on your side, so you end up feeling colder.
Answer: Yes, for side sleepers, curling up like a fetus reduces surface area and keeps you warmer ー like how making a fist is warmer than keeping your fingers spread.
Personally, when it’s really cold, I pull the sleeping bag closer to my body to make it fit snugly. I wrap my tights around my neck to keep warm air from escaping. I also use a balaclava or neck gaiter to cover my mouth, so I can breathe into the fabric and avoid moisture building up around my collar from condensation.
Question: I’ve been experimenting with different pad and sleeping bag combinations ー trying thicker pads, lighter bags. How do you decide on your own setup?
A: I don’t use air pads because I don’t like the plush feel. It’s not logical ー just a personal preference. I generally prefer thin pads.
The conventional wisdom is that you should prioritize a warm pad. But for me, if the temperature stays above 0 degrees Celsius, I’m perfectly comfortable with something like the Evernew FP Mat 100 or the Yamatomichi Minimalist Pad. Once it drops below freezing, I switch to a pad that’s 1 cm thick.
I also prefer to use warmer sleeping bags. I used to pair a lightweight quilt that had no insulation on the back with a down jacket. Lately, though, I’ve been experimenting with an active insulation layer and a warmer sleeping bag instead of the jacket.
Trial and error is key. With sleeping bags, weight isn’t the only consideration. Down handles moisture better, absorbing and releasing it efficiently. But in summer, down bags have cold spots because there’s so little filling. Since warmth and moisture aren’t a big concern in summer, a synthetic bag with sheet-like insulation that won’t shift around may work better.
Only you can find what works best for you. Think about the framework we discussed and keep experimenting!
YouTube
Watch Tomoyoshi Tsuchiya’s “Lecture 4: Sleeping Bags and Ultralight ‘Sleeping Systems'” on YouTube. (English subtitles available)
Series: UL Hiking University